Showing posts with label Red Velvet. Show all posts

Saturday, September 26, 2015

Saturday Down South: University of Alabama-Inspired Houndstooth Pudding Trifle with Homemade Red Velvet Pudding, Cream Cheese Whipped Cream, Crushed Double Stuffed Oreos, + Red Velvet Cake Sprinkles

The Haute + Heirloom blogger has returned, yay!! I know I have been gone for-like-ever and I apologize for that, but I have been extremely busy and my personal life is in shambles. I hate that I haven't posted some of my new recipes, but I'm back, and the recipes are even BETTER. It's a 100% guarantee, mmk? As many of my followers know, we are huge football fans. Obviously, Alabama comes in first in the ranking, and just behind them comes University of Georgia + the Atlanta Falcons. So if you're a Georgia gal like me, this dessert is perfect for all three teams and all of your buddies will love you for making a pan of this trifle during the long day of tailgatin'. Trust me on that one. My usual go-to dessert had always been my Gourmet Banana Pudding, but I wanted something festive to celebrate with... and this is certainly festive. If you didn't know already, Alabama's team colors are crimson + white, but the school has incorporated the pattern of houndstooth into the scheme as well. The tradition of houndstooth comes from the greatest college football coach of all time, Bear Bryant. He wore a houndstooth hat to every single game, and well, it caught on like wildfire. Now it's almost impossible to not see someone with houndstooth on during the game day. So, when I first started concocting this dish in my head, it became clear to me that I wanted the same idea that I use for banana pudding. Instead of creamy vanilla bean pudding, there is a luscious + homemade red velvet pudding. You have to know by now that my obsession with "red velvet desserts"is quite unhealthy and I tend to go overboard, but hey who's counting anyway. Next, I used crushed up Double Stuffed Oreos rather than the homemade shortbread because I needed the contrast of the black + white cookies to represent the houndstooth concept. And hell, who doesn't like Oreos... I sure do!! What's even better about them is that if you let the pudding trifle sit in the refrigerator for 1-4 hours (or overnight if you need to) like we did, the cookies begin to soften to the texture of the Oreos in cookies + cream ice cream. They literally, like, melt in your mouth. Lastly, you have to make the "frosting" type whipped cream layer. It has the tang of a cream cheese frosting (which is what all red velvet cakes must have), the sweetness from the sweetened condensed milk, the delightful cloud-like fluff from the Cool Whip, oh and don't forget that vanilla bean that is added in because that is so much better than vanilla extract. One fun ingredient I found for this dessert are some of Betty Crocker's yummy Red Velvet Cake Sprinkles. And let's be honest, sprinkles make every dessert so much better, it's a scientific fact. To be frank, these are double the fun because they are sprinkles that taste like cake.... woah, woah, WOAH. Mind Blown. These Red Velvet Cake Sprinkles also give the dish a little crunch with each bite. Textures galore here, folks!! I hope y'all enjoy this pudding trifle as much as we did because it's already on our tailgate menu for the Alabama-LSU game in Tuscaloosa in November. So go on, start cookin' it :)
the beginning of making the homemade red velvet pudding
assembling like a beast
check out those layers, guys
The Close Up: Amazing Betty Crocker Red Velvet Cake Sprinkles
And the best shot of them all... a perfect spoonful of every glorious layer :)
For the Classic Pudding Mix:
½C Cornstarch
¼C Buttermilk or Milk Powder (I used buttermilk since it’s a key component in red velvet cake)
1C Cake Flour (AP Flour can be substituted if you don’t have it)
1 ½C Sugar
1t Kosher Salt  

For the Homemade Red Velvet Pudding:
3C Whole Milk, Divided
¾C Classic Pudding Mix (above; you will have leftover mix, but now you can make more of it)
5T Cocoa Powder, Sifted
Generous Pinch of Salt
¼C Sugar
2 Eggs
1T White Vinegar
2T Salted Butter
2t Vanilla Extract
1T Cream Cheese Emulsion
Red Food Coloring (use as much as you want until you reach your desired red color)

For the Cream Cheese Whipped Cream:
8oz Cream Cheese, Softened
1 Can of Sweetened, Condensed Milk
1T Cream Cheese Emulsion
¼C Heavy Whipping Cream
16oz Cool Whip, Defrosted
1 Vanilla Bean, Split + Scraped for Seeds (if you don’t have vanilla bean, sub in 2t vanilla extract)
Generous Pinch of Salt  (or to taste)

For the Houndstooth Trifle:
Prepared Homemade Red Velvet Pudding, Completely Chilled
Prepared Cream Cheese Whipped Cream, Completely Chilled
1 Box of Double Stuffed Oreos, Crushed into Bite Size Pieces
1 Container of Betty Crocker Red Velvet Cake Sprinkles (chocolate sprinkles can be subbed in)

Directions:
1. For the Classic Pudding Mix: Combine the cornstarch, flour, buttermilk powder, sugar, and salt. Whisk the mixture until it is a cohesive mixture is formed. Set this pudding mix aside. If you have any remaining pudding mix left, store it in an airtight container.
2. For the Homemade Red Velvet Pudding: Pour 2 ½C of whole milk into a medium sized saucepan or pot. Turn on the stove to low heat and allow the milk to get hot (with some slight steaming), but make sure the milk does not start boiling! While the milk is heating, get another mixing bowl and whisk together the pudding mix, sifted cocoa powder, sugar, 2 eggs, a generous pinch of salt, white distilled vinegar, and the remaining ½C of whole milk. While whisking, make sure it is a smooth, creamy, chocolate liquid. Once the milk is hot, add in the chocolate liquid to the hot milk and whisk vigorously (so that the eggs won’t cook and curdle). Then add in the salted butter, vanilla extract, cream cheese emulsion, and red dye. Increase the heat to medium or medium-low while whisking continuously because the pudding could easily burn. Cook and whisk until the pudding mixture starts to thicken, this usually takes about 8-12 minutes, depending on the thickness that you prefer. During the cooking period, make sure to taste test it to see if it needs more salt or vanilla (do it to taste) When it has reached your desired consistency, turn off the heat and remove the pan from the burner. It will continue to thicken a little more as it cools and sits. Press a piece of plastic wrap onto the top of the pudding; this will help the pudding to remain smooth and also prevents it from developing a “skin” on top.  Cool the pudding until it is completely chilled and store in the refrigerator until you need to use it.
3. For the Cream Cheese Whipped Cream: Place the softened cream cheese, vanilla bean seeds, heavy whipping cream, cream cheese emulsion, and a pinch of salt into the bowl of a standing mixer with the whisk attachment. Beat the cream cheese at medium speed until it smooth and slightly whipped, about 1-2 minutes. With the mixer still on, pour in the can of sweetened, condensed milk and mix until it is a cohesive, creamy mixture (also make sure to scrape down the sides and the bottom of the bowl to get any remaining cream cheese that is stuck). This should take another 1-2 minutes. Lastly, gently fold in the defrosted (yet still cold) Cool Whip, so that it is completely incorporated, but still has a light and airy texture. Cool the refrigerator until you are ready to use it.
4. Assembling the Houndstooth Pudding Trifle: Get your favorite serving piece (preferably a glass trifle dish, so that you can see every layer) and begin the layering process. Start off with a base of crushed double stuffed Oreo cookies. Next, dollop some of the homemade red velvet pudding all over the cookies and then gently smooth it out, so that the Oreos are completely covered. Following the same method as the pudding, dollop the cream cheese whipped cream on top of the red velvet pudding and smooth the top as well. Spread some of the red velvet sprinkles evenly over the cream cheese whipped cream. Repeat the layering process of crushed cookies, red velvet pudding, cream cheese whipped cream, and red velvet sprinkles until you have run out of all of the different components. 
5. You can enjoy the pudding now, but I personally prefer to let it sit in the refrigerator, so that the pudding and whipped cream have firmed up, while the cookies are soft (think of the softened textures of Oreos in cookies + cream ice cream). You can chill it from 1-4 hours… or even overnight if you want or need to! Besides that, it’s time to chow down on your festive football dessert. And hey, it’s also great for UGA + Falcons fans as well!!

Wednesday, December 31, 2014

Homemade Peppermint Bark Topped Red Velvet Brownies with Chocolate Fudge Icing, White Chocolate, + Crushed Peppermint Candies

Homemade Peppermint Bark Topped Red Velvet Brownies with Chocolate Fudge Icing, White Chocolate, + Crushed Peppermint Candies
I come to you with a sad message today... it's the end of 2014, which means this is my last new recipe for the year :( But the good news is that I will be back tomorrow with out Top Ten Favorite Recipes: Salty + Sweet of the year... YAY!! This is by far our favorite post of the year because we get to reminisce and reflect back on all of the yummy food we were able to create, and more importantly, EAT. But before we get to talkin' about the festive Christmas-treat inspired red velvet brownies I made, let's talk about last night, shall we? As many of my followers know, my Mountain Man + I both attended the University of Alabama and are huge football fans, so we decided to travel down to New Orleans for the Sugar Bowl/First College Football Playoff Game where our Crimson Tide is taking on the Buckeyes of Ohio State. We woke up early, drove all day, unpacked our stuff, and got ready to head out for a night of good cajun food, lots of booze, and even more shenanigans. And I know as I type this story out to y'all, you are probably thinking... Oh man, New Orleans, she got hammered, what if she was arrested, did she get any beads? Well, my friends, the complete opposite happened. We had arrived at the restaurant and just ordered our food, and while waiting, I went outside to answer a phone call. I opened the door and assumed that there were at least 2-3 steps until the sidewalk, but there weren't any, just one largeeeeeeee drop off. I fell to the ground, rolled my ankle, and crashed it into the cement sidewalk. It was so bad that it immediately started swelling and I had to go to the Emergency Room. So, our first night in New Orleans, we spent it getting x-rays, crutches, finding an open pharmacy, and finished by icing my ankle for the rest of the night. Do I have the best luck or what? I mean, I guess I just like to make a big fat freakin' grand entrance wherever I go. Okay, the depressing start of my NYE vacation has come to an end, so let's get to that recipe. My Mountain Man's family always has a huge reunion Christmas party every year, and I knew I had to make a festive dessert to join in on the potluck. As we all know, my borderline-unhealthy relationship has taken over just about every type of dish you can think of, but I had yet to make red velvet brownies. I made them with the all classic "secret southern" ingredients Mama Jones used to make her red velvet cake with... red food coloring, white vinegar, buttermilk powder (instead of buttermilk for better brownie texture), and just a tad bit of mayo to keep it moist. After you mix up the batter, dump it into a prepared baking pan, bake them, and allow them to cool slightly... then you whip up my mother's easy-peasy chocolate fudge poured icing and drown the top of the red velvet brownies in a thick layer of sugary-chocolatey-heavenly goodness. While the fudge icing is beginning to set, yet still a little warm, scatter a thick layer of chopped up Ghirardelli white chocolate peppermint bark bars over the top. The peppermint will begin to melt as well, and that is the perfect time to top the white chocolate with some more crushed peppermint candies. All you gotta do now is wait for the icing and peppermint bark topping to set and firm up before lifting them out of the pan and cutting them into squares. I really think y'all are going to love these because you get to enjoy everything... layers of moist red velvet brownies, melt-on-your-tongue chocolate fudge icing, the texture of set peppermint bark, and the slight crunch/crackle/pop of the refreshing peppermint candies. Go on ahead and try to tell me who doesn't love red velvet + brownies + fudge frosting + peppermint bark... you can't because it's impossible :) So, it might be a little late to make now since the holiday season has passed us, but I could eat these bad boys all year long!! Enjoy :)


For the Red Velvet Brownies:
2 Large Eggs
2T Mayo
1 Stick of Unsalted Butter
2t Vanilla Extract
¼C Unsweetened Cocoa Powder (preferably high-quality)
Heavy Pinch of Salt (or to taste)
1T Red Food Coloring (or more until you reach your preferred, desired red color)
1t White Vinegar
¾C AP Flour 
2T Buttermilk Powder

For the Chocolate Fudge Icing:
1 Stick of Butter
1/3C Dark Cocoa Powder (preferably high-quality)
1 Box of Confectioners’ Sugar
1/3C Milk
Splash of Espresso
1t Vanilla
Pinches of Fleur de Sel, For Sprinkling (optional; but we love the balance)

For the Peppermint Bark Topping:
1-2C Chopped Ghirardelli White Chocolate Peppermint Bark (depending on your preference on how minty you want the brownies to taste, as well as how thick of a topping you want)
Extra Crushed Peppermint Candies, Crushed (for extra flavor and a nice crunch)

Directions:
1. Preheat your oven to 350 degrees and line 13x9 sized baking pan with foil (let it hang over top of pan) and spray with nonstick cooking/baking spray. Set it aside while you make the brownie batter.
2. For the Red Velvet Brownies: Whisk together the cocoa powder and boiling water together in large bowl until smooth. Add unsweetened chocolate and whisk until chocolate is melted. Whisk in melted butter and oil. (Mixture may look curdled.) Add eggs, yolks, and vanilla and continue to whisk until smooth and fully incorporated. Whisk in sugar until fully incorporated. Add flour and salt and mix with rubber spatula until combined.
3. Baking the Red Velvet Brownies: Scrape batter into prepared pan and bake until toothpick inserted halfway between edge and center comes out with just a few moist crumbs attached, 30 to 45 minutes (depending on the size of your pan and heat of your oven). Transfer the warm brownies to wire rack and let cool for 20-30 minutes.
4. To Make the Fudge Icing: Melt the butter in a large saucepan. Stir in the cocoa, keeping the mixture hot. Add in the remaining ingredients quickly and beat until smooth. Spread warm icing on the cooled brownies, and sprinkle with a little fleur del sel (optional).
5. Finishing the Brownies: While them icing begins to firm (yet is just slightly warm), scatter the chopped up white chocolate peppermint bark all over the fudge icing until you have a thick layer that begins to melt on top. Since the white chocolate is beginning to melt, sprinkle the tops of that with crushed up peppermint candies.
6. Serving the Brownies: Once the icing and peppermint back set, lift the brownies out of the pan, using the parchment paper, and cut them into squares. Serve immediately at y'all's Christmas parties!


Sunday, February 23, 2014

Revamped : Red Hot Velvet Cinnamon Rolls with Cream Cheese Icing Glaze

Revamped: Red Hot Velvet Cinnamon Rolls with Cream Cheese Icing Glaze
By far + away, the single-most FAVORITE recipe here on PLC are my Red Hot Velvet Cinnamon Rolls. They are probably my greatest creation. Actually at the time when I first concocted the idea of this "dessert for breakfast", it was the only one on the internet. Now different versions are popping up EVERYWHERE. So, I am very proud to say that this was the ORIGINAL idea behind the celebrity. Anyway, I am a firm believer in that everything can be improved upon, so why not revamp the most visited recipe on my site? Well, it happened that my Mountain Man's place of work had a Valentine's Day Bake Off, so I knew I just had to enter my Red Hot Velvet Cinnamon Rolls to be judged. I changed a few things around a bit this time though. Firstly, I took out the cocoa powder in the dough. I felt like that made the cinnamon rolls a bit cake-y in texture, so I wanted to achieve a more yeasted cinnamon roll this time around. But of course, in order for it to be considered "red velvet", there's gotta be buttermilk, red dye, vinegar, and cocoa powder. Instead, I sifted cocoa powder on top of the butter, sugar and cinnamon for a lightly chocolatey filling. It was perfect. To make sure the rolls were extra puffy, I used instant yeast instead of active dry yeast, but either will work for y'all, I'm sure. Also, I felt like my cream cheese frosting was a tad bit thick last time, so this go-around, I whipped up a cream cheese icing glaze. It's still thick enough the coat the rolls, but it is thin enough that in seeps into the middle of the rolls... making them extra gooey. And that's all we want, amirite?! We added some cinnamon into our cream cheese glaze, for a little more spice, but you can easily leave it out, no worries!! As for the garnishes, we found some nifty red velvet cake sprinkles to sprinkle over the top to be super festive and they were awesome! But you can also use any Valentine's Day themed sprinkles or crushed red hots. It's up to y'all!! These are 10 times better than the original, so I hope y'all can get around to makin' them soon!! Enjoy (we sho' did) :)
roll out the red velvet dough with some flour...
spread the melted butter everywhere...
sift over some cocoa powder, cover with sugar, + sprinkle on a mess of
cinnamon (and press gently down so it adheres together)
and tightly roll them up...
so they look gorgeous like this...
and this...
then proof them, so they rise a bit and look like this...
then bake them until they are huge + puffy
and cover them in the cream cheese icing glaze...
and finish them with some sprinkles, butofcourse!
For the Cinnamon Rolls:
2C Buttermilk (minus 2T)
2T White Distilled Vinegar
½C Vegetable Oil
½C Sugar
2-3oz Red Food Coloring (or to the color of your liking)
1 Package of Instant or Active Dry Yeast (0.25oz Packets)
4C AP Flour + ½C AP Flour
½t Baking Powder, Heaping
½t Baking Soda, Scant
1t Salt, Heaping
1C Butter, Melted
1-2T Cocoa Powder (depending on how chocolate-y you like it)
1C Sugar
Generous Sprinkling of Cinnamon

For the Frosting:
4oz Cream Cheese, Softened
7T Unsalted Butter, Softened
1 ½C + 2T Confectioners’ Sugar
3-4T Buttermilk, For Thinning
1t Cinnamon (optional)
¼t Salt (or to taste)
1t Clear Vanilla Extract
Festive Valentine’s Day Sprinkles & Crushed Red Hot Candies, For Decoration

Directions:
1. Measure out the 2C buttermilk in a large measuring cup, and then remove 2T of the buttermilk and substitute by adding in the 2T of white vinegar. Mix the buttermilk, vinegar, vegetable oil, sugar, and red food coloring in a pot. Heat the mixture until just before the boiling point. Turn off the heat and leave to cool for 45 minutes to an hour. Meanwhile, sift together the 4C AP flour and set it aside. When the milk mixture is warm (but not hot), sprinkle in the package of yeast. Let it sit for a minute or two, and then add in the sifted flour. Stir the mixture and cover, and then let it rise for at least an hour.
2. After rising for an hour, add in ½C AP Flour, baking powder, baking soda, and salt. Stir the mixture together. Refrigerate the dough overnight to help it become firm and better for presentation.
3. The next day, sprinkle a rolling surface generously with flour. Take the dough and form a rough rectangle, and then roll the dough thin, maintaining a general rectangular shape. Drizzle or spread on 1C of the melted butter over the dough. Now, sift the cocoa powder over the butter, followed by sprinkling 1C of sugar over the cocoa and butter, followed by a generous sprinkling of cinnamon. Press the spices lightly into the butter to make sure they adhere together.
4. Now, starting at the opposite end, begin rolling the dough in a neat line toward you. Keep the roll relatively tight as you go. Next, pinch the seam of the roll to seal it. Spray a 13x9-baking pan with Pam, and set it aside. Then, begin cutting the rolls into approximately 12 thick round rolls and place them into the prepared buttered pans. Let the rolls rise for an hour.
5. Preheat the oven to 375 degrees.
6. Bake the cinnamon rolls for 17-25 minutes or until light golden brown.
7. To Make the Frosting: Beat together the cream cheese and butter with an electric mixer in a large bowl until creamy. Mix in the clear vanilla extract and buttermilk, then gradually mix in the confectioners' sugar and salt until smooth and fluffy. Add in the cinnamon if you are using.
8. Spread the cinnamon rolls with the icing (generously), sprinkle with garnishes if using, and enjoy immediately while they are still warm.

Saturday, February 16, 2013

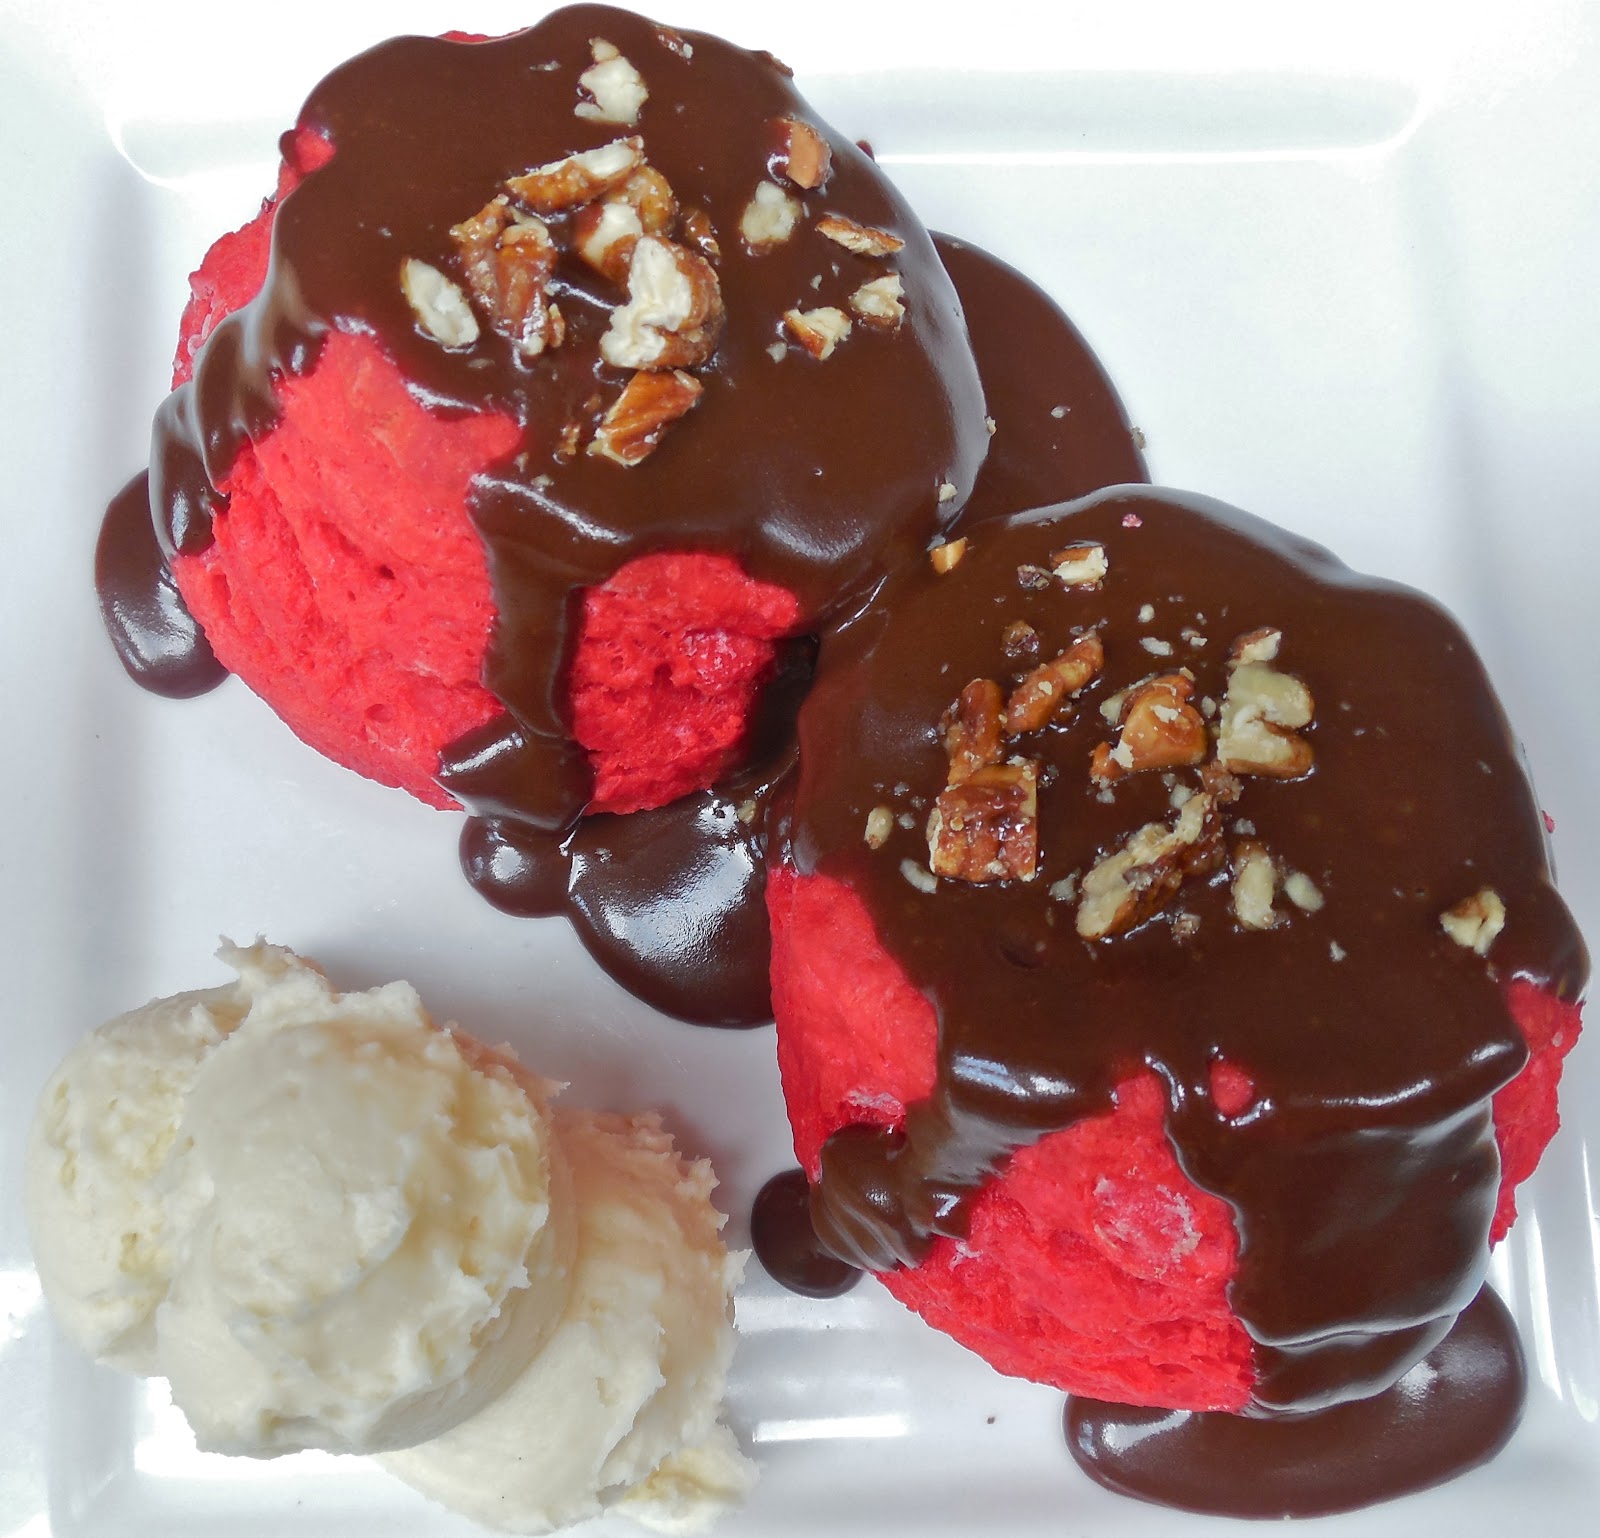
Red Velvet Buttermilk Biscuits with Southern Chocolate Gravy + Whipped Cream Cheese Butter

Red Velvet Buttermilk Biscuits with Southern Chocolate Gravy + Whipped Cream Cheese Butter
I hope all of y'all had a wonderful Valentine's Day... and I'm sorry it has taken this long to post a new Red Velvet inspired recipe!! As I mentioned in my last post, my Red Hot Velvet Cinnamon Rolls were the perfect breakfast-in-bed-with-your-honey meal, and I just had to come up with another one for this year. I racked my brain for breakfast ideas that could be turned into a red velvet recipe, but I didn't want to do one that had already been done... a lot of people have done waffles, pancakes, & crepes. And then it hit me, RED VELVET BISCUITS. Why had I never thought of that before?! Who knows. Well, I started building from there, and immediately remembered enjoying Southern Chocolate Gravy with Buttermilk Biscuits as a child. What kid doesn't want chocolate for breakfast? This kid over here does! So along with the Red Velvet Buttermilk Biscuits, that brings in the red and buttermilk component of this cake classic, the chocolate gravy would sub in for the cocoa powder element, and lastly, the Whipped Cream Cheese Butter mimics the ever-popular cream cheese frosting. So, this dish is practically Red Velvet Cake... deconstructed... in breakfast form... with some Southern lovin' added in for good measure as well. There aren't many things that are as comforting as biscuits + gravy, especially if chocolate and sugar are thrown into the mix also. The biscuits turned out to be a gorgeous "God Bless 'merica" red and were utterly + effortlessly fluffy. As for the chocolate gravy, I called my mom asking if she remembered her recipe and she couldn't find it in the millions of recipe cards shoved into the drawers in our kitchen. So, I found a recipe online that had gotten a lot of great reviews, and it certainly didn't disappoint. If you're like me then you'll want to split the biscuits in half and spread on some of that cream cheese butter until it melts into the hot bread, and drown them in the chocolate gravy until they are completely covered. And just for presentation, I sprinkled on some toasted pecan bits over the top. Honestly, I don't know if there is more in my belly... or more on my face and hands because I got knee deep in this meal. But, that's half the joy of it all, isn't it? Finger lickin' good gravy always cheers this girl up. What an awesome meal this was on Valentine's Day with my Mountain Man. Oh and P.S., I need to be officially dubbed the "Queen of Red Velvet", o'tay? Good, glad y'all agree with me because having this many red velvet inspired recipes is just plain unhealthy!! Enjoy :)
Chocolate Gravy Waterfall  
biscuits + gravy... red velvet-style 
Homemade Whipped Cream Cheese Butter 
Garnish with some Toasted Pecans!

For the Red Velvet Buttermilk Biscuits:
2 ¼C Cake Flour, Sifted
1T Baking Powder
1T + 1t Sugar
1t Salt
6T Unsalted Butter, Cut into Cubes & Frozen
¾C Buttermilk, Well-Shaken
Red Food Coloring (to your liking)
2T Melted Butter, For Brushing

For the Southern Chocolate Gravy:
4T Unsweetened Cocoa Powder
2T AP Flour
1C Sugar
1 ½C Whole Milk
4T Unsalted Butter
1t Vanilla
Pinch of Salt

For the Whipped Cream Cheese Butter:
1 Stick of Unsalted Butter, Softened
4oz Cream Cheese
¼C Sugar
½t Vanilla
Pinch of Salt

Directions:
1. For the Red Velvet Buttermilk Biscuits: Preheat the oven to 400 degrees. In a mixing bowl, whisk together the flour, baking powder, sugar and salt. Add in the frozen and cut the fat in using a pastry cutter until the mixture resembles coarse crumbs, but pea-sized pieces of butter still remain. In a measuring cup, pour in some red food coloring, and then fill up the measuring cup to ¾C of the liquid mixture (this will make sure that you don’t add too much extra liquid to your biscuits). Whisk together the food coloring and buttermilk until it is red. Pour in the red buttermilk and use a fork to mix it until the dough just comes together. Turn the dough out onto a floured surface, knead with floured hands, and pat into a thick square. Using a large, floured biscuit cutter, cut the biscuits from the dough and place them about 1-2inches apart on an ungreased baking sheet (I made about 6-8 biscuits). Brush the tops of the biscuits with some melted butter and bake for 20-25 minutes, depending on their side, or until the tops are golden brown. Just before serving, brush the tops of the biscuits with more melted butter.
2. For the Southern Chocolate Gravy: In a medium sauce a whisk together the dry ingredients. Pour in the milk and whisk vigorously to combine. Heat over medium-high until the mixture bubbles. Turn heat down to medium and stir until mixture has thickened to a gravy consistency. Remove from heat and stir in butter and vanilla. Let cool slightly then transfer to a gravy boat. Serve warm over buttermilk biscuits.   
3. For the Whipped Cream Cheese Butter: In the bowl of an electric mixer, fitted with the whisk attachment, beat together the butter and cream cheese until smooth & creamed together, about 1-2 minutes. With the mixer on high, add in the sugar, pinch of salt, and vanilla. Beat on high speed until light & fluffy like a whipped frosting. Refrigerate until ready to use.   
4. For Serving: Place some Red Velvet Buttermilk Biscuits onto a plate and pour the Chocolate Gravy over the top. Garnish the top of the gravy with some toasted pecans and serve the biscuits with the Whipped Cream Cheese Butter.