Showing posts with label White Truffle Oil. Show all posts

Saturday, May 18, 2013

Let's talk about cheese plates + a Goat Cheese-Roasted Garlic-Truffle Honey Beehive...

Whipped Fresh Cracked Pepper Goat Cheese, Pureed Rosted Garlic, & Truffle Honey Drizzle Beehive
I'm an entertaining kinda girl... not in the way that I'm the life of the party or I'm just super hilarious and everyone adores me (because most of the time, they don't, ha). But, I love love love to host parties and entertain my friends with a dinner meal, cookout, Sunday Funday, tailgatin', and holiday themed food. I am just the eternal host, and I can't ever stop. Seriously, it's become a problem. I start planning events months + months in advance. For an example of my madness, the process of planning our yearly "Friendsgiving" has already been discussed this week. Yeah, we're lame. But that's not the idea for today's post because we are focusing on cheese plates!! Now, I don't know about those people out there who don't like cheese, but watch your back, that's just plain mean... and that's coming from a person who is lactose intolerant. Before I get to the main recipe for an AMAZING goat cheese beehive + pictures of my cheeseboards, we havta talk about the set up. First of all, you need a big 'ole serving plate, wooden cutting board, or a professionally made cheese board. This is where you get to stack and pile on all your goodies :) Next up, the main ingredient + undefeated champ of the cooking world, CHEESE. A variety of cheese in flavor + texture is key here, people, especially when trying to making/keeping your guests and friends happy. You need some odd flavors, some really stinky strong cheese, some creamy, some tangy, some classics... well, you get my drift. The cheeses I like to include are the following: Gorgonzola Dolce, Comte, Creamy Goat Cheese, Vintage Aged Cheddar with Crystals (my favorite brand is Coastal Rugged, Mature White Cheddar, and I'm obsessed with it), Gouda Cheese, Brie, Black Pepper Parmesan, Manchego, a cheese with fruit in it (I prefer cranberry), and something spicy (I prefer triple pepper colby jack cheese from boars head). Now, don't feel like you have to inlcude all of these, they are all just suggestions; so, I would stick to 3-5 kinds of cheese for a dinner party. I like to take all of my cheese out of the refrigerator out and place it onto the counter, so it can soften and get rid of the chill. The accoutrements are the hype girls to the cheesy ring leader that means you nee some jams (preserves, spreads, etc.), fresh fruit (grapes, apples, etc.), dried fruit, crostini, fancy crackers, crusty fried bread, high quality pickles or marinated veggies, roasted or spiced nuts and a whole lot of yummy charcuterie. These additions are all very important, don't leave 'em out, okay? I also find it helpful to find and/or buy specialty cheese knives because they work with the cheese, as opposed to you being covered in cheese on your new, fancy dress. Each cheese should mostly be broken down in different ways... parmesan & cheddar need to be broken into large chunks, the Comte can be sliced or cubed, and the soft cheeses should just be left alone because it will just clutter your board. Okay, now that I've gotten that out of the way, here are some pictures of my cheese plates that I made in the past...


See? Look how awesome those are. I mean really, who needs dinner when you got this in front of you?  It's easy entertaining at its' best, but still incredibly satisfying and delicious!! The next item we have to tackle is the main recipe of this post... a Goat Cheese-Roasted Garlic-Truffle Honey Beehive that is featured in The Cheesemonger's Kitchen. 

This concoction is ridiculous, in all ways you can think of. Whipped Fresh Cracked Black Pepper Goat Cheese + Pureed Roasted Garlic are layered into a cheesecloth-lined bowl, and then inverted onto a cake stand and drizzled with yummy-yummy-tasty-tasty white truffle honey. I can't described to you the satisfaction I felt when I popped it out of the container and peeled off the cheesecloth to find perfectly crafted layers of fluffy cheese + creamy garlic. The flavors are all so wonderful together that we finished this entire beehive in one bite. Honestly, I can't stop thinking about all of the other amazing combinations of ingredients that I can substitute in... like for Christmas, maybe use sundried tomato paste, basil pesto, and roasted garlic... or for Thanksgiving, use cranberry sauce, pumpkin puree, & sage pesto. The list could go on + on, but I promise I won't. Wait, scratch that, how about making a sweet beehive instead? OMG, doing that with summer berries tomorrow. Back to our 'hive though, it is set onto a cake stand, and we had so much extra room that we decided to garnish with some speck, salumi, pepperoni from our favorite butcher in Atlanta, along with some sweet + tart apples. The beehive is so easy to spread onto bread and crackers, and perfectly perfect for a snack with a big glass of wine!! Enjoy :)


For the Whipped Black Pepper Goat Cheese:
2 16oz Blocks of Creamy Goat Cheese, Room Temperature
¼-½C Heavy Cream (we found our goat cheese was too thick, and this helped a lot) 
Sea Salt & Freshly Cracked Pepper (to your liking, we did about 1-2T of pepper)

For the Pureed Roasted Garlic Layer (the easy way):
1-2C Whole Roasted Garlic Cloves (we bought ours at Whole Foods)
¼-½C Extra Virgin Olive Oil

For the Goat Cheese Beehive:
Prepared Whipped Black Pepper Goat Cheese Layer
Prepared Pureed Roasted Garlic
Salt & Pepper, To Taste
Gourmet Truffle Honey (or any other high quality honey will do)
1-2 Cheesecloth
1 Small, Deep Dish Baking Dish or Bowl (look for one that is round, but flat on the bottom) 
Crostini, Crackers, Cured Meats, Fresh Fruit, or Fried Bread, For Serving

Directions:
1. Line a baking dish or bowl with cheesecloth/muslin with plenty of overhang. Set it aside.
2. For the Whipped Black Pepper Goat Cheese: Place the softened goat cheese into the bowl of a standing mixer and beat for about 1-2 minutes until it has started to whip and smooth out. Depending on how thick it is (and how thick you want it to be), add in some heavy cream, fresh cracked black pepper, & salt and continue beating until light + fluffy, about 1-2 minutes. Refrigerate or set aside until you are ready to layer, but make sure it is room temperature and easily spreadable in the baking dish.
3. For the Pureed Roasted Garlic Layer: Place the roasted cloves of garlic into a food processor and begin to puree it until smooth and no chunks remain. With the food processor still on, drizzle in the olive oil until it has emulsified and creamy. Season with salt, pepper, & a pinch of sugar. Set it aside until ready to use.
4. Layering the Beehive: Using a rubber spatula, scoop out some of the whipped goat cheese and plop it into the cheesecloth-lined bowl and gently layer it (this first layer can be frustrating, but don’t worry, you can always fix your mistakes when you remove the cheesecloth from it later on). Season the top of this layer with salt & pepper to taste. Using the same method as the whipped goat cheese, dollop the garlic puree on top of the goat cheese layer and smooth it out once more. Repeat this alternating process until all of the ingredients have been used and you have created gorgeous layers (just make sure you end with goat cheese or it will get messy). Cover the beehive with the overhang of the cheesecloth (or an additional cheesecloth) and cover with tinfoil or plastic wrap. Refrigerate this overnight, in order for it to set properly.
5. For Serving: An hour or so before serving, remove the beehive from the refrigerator and peel back the cheesecloth. Place a cake stand upside down on the bowl and then invert the two together. Remove the bowl and peel off the cheesecloth/muslin to reveal the beehive. Any cracks in the goat cheese can be smoothed with a wet finger or spatula. Drizzle the beehive with truffle honey to complete the beehive theme and balance the aromatic garlic. Serve with bread, crackers, or fruit (and a glass of wine).

Tuesday, February 12, 2013

Truffle-Honey Caramel Corn with Truffled Honey Caramel & Truffle Salt

Truffle-Honey Caramel Corn with Truffled Honey Caramel & Truffle Salt
So, Valentine's Day is in a couple days... that means you need to spend some quality time with your honey. Last year, I came up with the first + original recipe for Red Hot Velvet Cinnamon Rolls. You may have seen them on Pinterest because they blew up on there, and probably a few other recipes around the internet that got the idea from here, and if you haven't tried them, you should. Especially for the extra special lover's day. This year, my Mountain Man & I are kind of busy, so we have to push our celebration off until Friday. And for every holiday, we always have our own thing that we plan. He always takes us out for dinner, dessert, and a little surprise, while I always cook us a fancy dinner or a cute picnic lunch for the park. This time around, I thought about how I wanted to do a movie night with a bunch of gourmet snacks to enjoy while snuggling up together. This was one of my ideas and I know I will be recreating it for our special dinner + a movie. I mean, you always have to have popcorn while watching a film, ya know?!? Why not spice it up a bit with some caramel corn, and not just any kind of caramel corn... Truffle-Honey Caramel Corn. That's right, popcorn that is perfectly covered in a caramel sauce that is made with truffle honey and truffle butter, and then sprinkled with truffle salt! We love truffle-anything around this house. My Mountain Man is always sniffing the can of white truffle oil while I'm cooking, he's addicted. But, I do know, truffle isn't for everyone, so I urge those who aren't truffle fans to steer clear because it is DEFINITELY truffled. This is the perfect little snack to pop in your mouth while watching rom-com's or scary movies (whatever floats your boat)! Oh, and P.S., check back on Valentine's Day for a new, super awesome red velvet recipe... maybe it could top the cinnamon rolls? Debatable!! Enjoy :)

For the Gourmet Popcorn:
1/3C Corn Kernels
1T White Truffle Oil
½t Salt
2T Truffle Butter, Melted (for tossing the popcorn)

For the Truffle Honey Caramel:
½C Gourmet Truffle Honey
¼C Heavy Whipping Cream
2T Unsalted Butter or Truffle Butter (depending on how much truffle you want)
1t Vanilla
Truffle Salt or Vanilla Bean Fleur de Sel, For Sprinkling    

Directions:
1. Lightly coat a heatproof rubber spatula, a very large mixing bowl and line a large baking sheet with a silpat. Preheat the oven to 300 degrees.
2. In a large saucepan or pot with a lid, heat the 1T of white truffle oil over medium-high heat. Add the popcorn kernels and salt, cover and keep the saucepan moving until all of the kernels have popped, about 5-10 minutes (depending on the heat level). Transfer to the prepared bowl, removing any un-popped kernels. Pour over the melted truffle butter and toss to coat all of the popcorn (this will add even more truffle flavor, but can be omitted if wanted). Set the buttered popcorn aside.
3. For the Truffle Honey Caramel: In a medium pot, add in the truffle honey, whipping cream, butter, and vanilla. Bring the mixture to a boil over medium-high heat until it is bubbly and caramel in color, reaching 240 degrees. Make sure to stir continuously. Once it has reached the desired temperature, pour the honey caramel over the popcorn and toss it with the prepared rubber spatula until the popcorn is completely tossed and covered. Quickly pour & spread the caramel popcorn onto the prepared silpat. Sprinkle the hot popcorn with either truffle salt or vanilla bean fleur de sel until you have reached your desired saltiness (depending on how much truffle or sweetness you want, you can also use sea salt).
4. Place the popcorn pan into the oven and bake for 15-20 minutes until the popcorn has reached an even darker caramel color. Let the popcorn cool & harden completely before enjoying.

Thursday, July 12, 2012

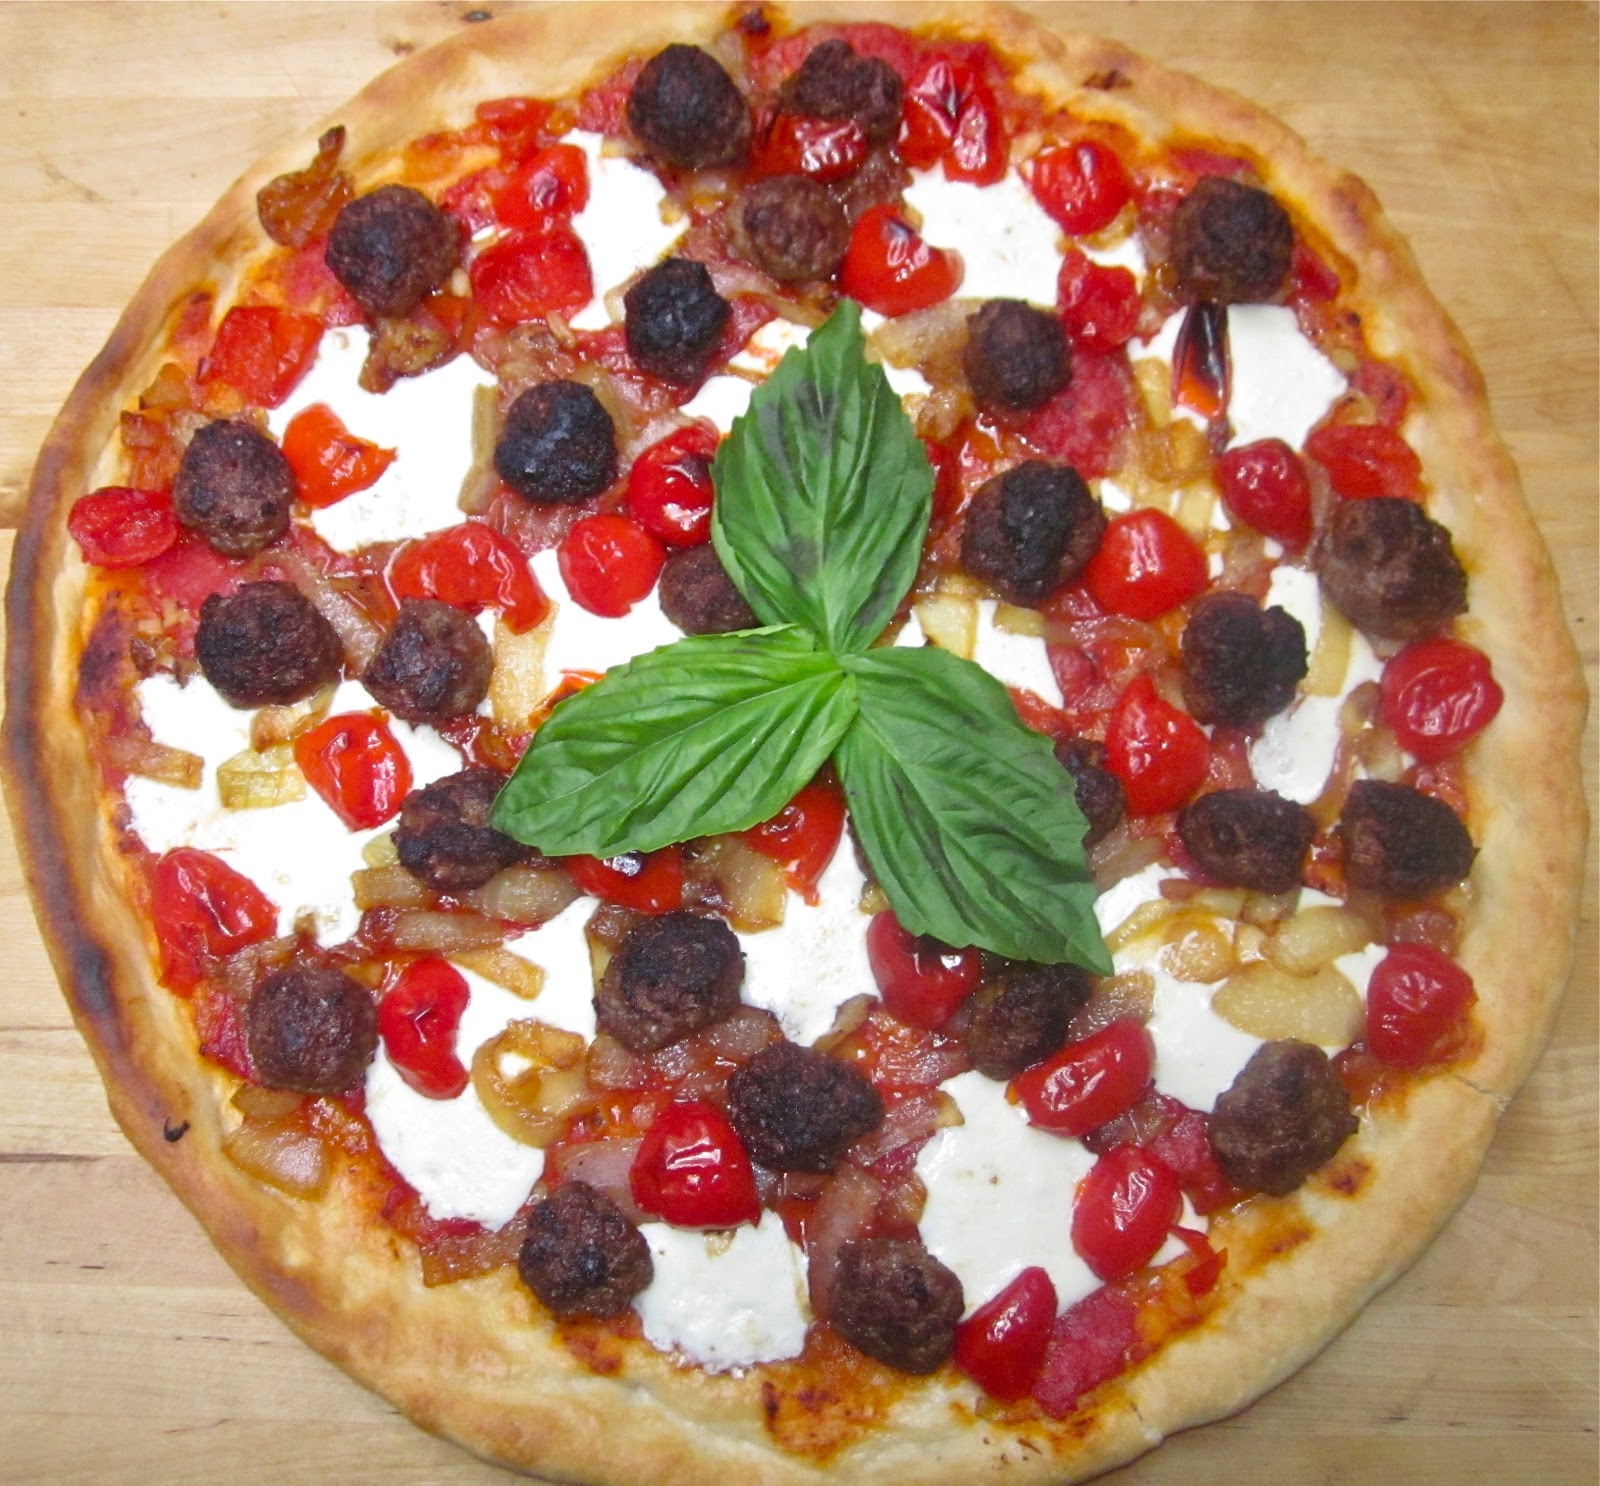
Antico Inspired "San Gennaro Pizza" on White Truffle Oil Pizza Dough

Our Antico-Inspired "San Gennaro Pizza" on White Truffle Oil Pizza Dough
If you ever make a trip to Atlanta, I have a great little pizza place for y'all to try. It's not really a secret anymore, but jam-packed after about 7PM. You wanna know how good it is? Well, celebrities like Jay Z, Ryan Reynolds, Scarlett Johannson, Tom Brady, and so many more frequent this tiny pizza parlor for authentic Italian style pizza. It's been voted some of the best authentic pizza in the Southeast, so it has a big reputation. If you try to go and eat there, it can be quite crowded since they don't have a lot of seating room, so we usually opt to take it to go and enjoy it at home on the porch. And trust me, it's just as good. Their pizzas are nothing fancy or crazy, but just focus on using high quality, imported Italian ingredients.
Here are some of Antico's pizzas that we enjoyed at home...
And well, you gotta get some fresh-made cannoli's for dessert... duh.
We particularly loved their signature pizza called the "San Gennaro". This pizza featured blistered pizza crust that is covered with a San Marzano tomato sauce and topped with caramelized Cipollini onions, Italian ground sausage, creamy buffalo mozzarella, sweet & spicy pickled red peppers (or peppadew peppers), and fresh basil as a garnish. Although it sounds so simple, it really is just so tasty. So much so that we had to recreate it at home. I tried to find every high-quality ingredient that I could because I think it makes a huge difference in flavor. The only change I made was substituting my White Truffle Oil Pizza Dough for just plain ole' dough. That's obviously up to you, it would be just as delicious on a different crust... trust me!! If you ever get a chance to grab a pizza in Atlanta, then definitely go for it, but until then make some of these at home like us because they are really yummy!! Enjoy :)
Creamy Mozzarella, Italian Sausage, Caramelized Cipollini Onions, & Peppedaw Peppers... perfecto! 
Don't forget to top it with a bunch of fresh basil!
Oh man, this is so good. 
For the White Truffle Pizza Dough:
1 ½C Warm Water
1t Active Dry Yeast
4C AP Flour
1t Truffle Salt
½t Sugar
1/3C White Truffle Oil

For the San Marzano Tomato Sauce:
28oz San Marzano Tomatoes, Whole & Peeled
1 Medium Onion, Finely Chopped
4T Unsalted Butter
2t Sugar
Salt & Pepper, To Taste

For the San Gennaro Pizza:
Prepared White Truffle Pizza Dough
Prepared San Marzano Tomato Sauce
8oz Fresh Buffalo Mozzarella, Thinly Sliced
Caramelized Cipollini Onions
Sweet & Spicy Peppadew Peppers
Ground Italian Sausage, Cooked & Crumbled
Fresh Basil, Chiffonade

Directions:
1. For the White Truffle Pizza Dough: Sprinkle the yeast over the warm water. In a mixer, combine flour and truffle salt. With the mixer running on low speed, drizzle in the white truffle oil or until just combined with the flour. Next, pour in the yeast mixture and mix until just combined. Coat a separate bowl with a light drizzle of white truffle oil and form the dough into a ball. Toss to coat the dough, and then cover the bowl tightly with plastic wrap and store in the refrigerator for at least 1 day, but preferably 3-4 days.
2. For the Tomato Sauce: Melt the butter in a medium saucepan and add in the onions. Cook over medium heat until caramelized & soft, about 5-10 minutes. Add in the tomatoes and gently crush the tomatoes. Cover the pot and bring the sauce to a boil for 3-5 minutes, and then reduce the heat to low and cook for another 10 minutes. Season with salt and pepper to taste. Set the sauce aside until ready to spoon over the pizza dough.
3. Preheat the oven to 500 degrees and roll out half of the pizza dough as thinly as possible and place onto a large baking sheet (the other half can be used for another pizza).
4. Making the Pizza: Drizzle the dough lightly with white truffle oil or olive oil and sprinkle a little bit of salt and fresh cracked pepper. Spread the tomato sauce all over the surface. Lay the sliced mozzarella across the dough, and then sprinkle the top with the peppers, caramelized onions, and sausage. Bake the pizza for 12 to 15 minutes, or until the crust is golden brown and the cheese is bubbly. Remove from the oven and immediately garnish the pizza with fresh basil. Cut into squares or slices and serve immediately.

Monday, June 4, 2012

Grilled Brie with Truffle Honey, Roasted Figs, Prosciutto, & Olive Oil Fried Bread

I swear that sometimes I am not a part of my family. It's kind of a running joke that the only groceries that my parents buy are cheese, crackers, and wine. So whenever I go home, I never have anything to eat. First off, I'm lactose intolerant, which means I don't like to eat cheese because I don't feel well. And I'm not too much of a wine drinker, I like the hard, dark stuff that guys drink. I know that probably sounds gross to a bunch of y'all, but I like what I like, okay? Good. Well, that pretty much leaves me with crackers, which does not a meal make. But, my Mountain Man, he could eat cheese and crackers all day. And he wanted a fancy cheese plate with a bunch of other stuff that he could nosh on. And this cheese plate has a bunch of stuff I could actually enjoy. I grilled a wheel of brie cheese, doused in homemade truffle honey, and topped with sweet roasted figs. On the side, I served our plate with thinly sliced prosciutto and bread that had been fried in olive oil. I love that buttery-richness that happens to bread when it's fried. You can eat the cheese by itself or do I what I did, and build a masterpiece and stack every ingredient on top of the bread. It was like a open-faced panini. I love the creamy brie, the chewy figs, salty prosciutto, & sweet truffle-honey in combination together. This would be great for a party or just an easy date night at home with your boy!! Enjoy :)
The Perfect Cheese Plate
Grilled Brie, Truffle Honey, Roasted Figs, Prosciutto, & Fried Bread 
Here's my chalkboard serving platter that would be perfect for parties...
Don't forget your glass of wine :)
For the Roasted Figs:
Fresh Black Mission Figs, Sliced in Half
Olive Oil, For Drizzling
Salt & Pepper, For Sprinkling (optional)

For the Truffle Honey:
16oz High Quality Honey
5-10 Drops of White Truffle Oil (to your preference)

For the Grilled Brie:
1 Small Wheel of Brie Cheese
Prepared Truffle Honey
Roasted Figs
Thinly Sliced Prosciutto
Slices of Fried Olive Oil Bread

Directions:
1. For the Roasted Figs: Preheat the oven to 400 degrees and trim the stems off the figs and cut in half. Place them into a dish cut side up. Drizzle with olive oil, salt, & pepper. Place into the oven and roast for 15-20 minutes until they are soft and starting to caramelize. Set them aside while you grill the Brie.
2. For the Truffle Honey: Whisk together the honey and white truffle oil to taste and pour into an airtight container, and then let it sit for 24-48 hours for better flavor. If you want to find store-bought truffle honey that is fine as well.
3. For the Grilled Brie: Preheat a grill until very hot. Carefully place the cheese on the grill and sear until marks appear and the inside starts to melt, about 1-2 minutes on each side. Using a spatula, transfer to a serving platter. Place the Roasted Figs on top and drizzle with the Homemade Truffle Honey. Serve with Prosciutto and Fried Olive Oil Bread.


source: grilled brie.

Sunday, January 15, 2012

Soup Sunday: Truffled French Onion Soup

I have never loved French Onion Soup. I'm not quite sure why though. I really like all of the ingredients that go into it. But, I though perhaps it was because I had never had it homemade before... and I was right. French Onion Soup is da-bomb. The caramelized onions, rich beef broth, thick bread, and ooey gooey-melty-delicious cheese topping are all just amazing. I took a classic recipe and pretty much kept it the same, however, I doubled the amount of caramelized onions and added truffle to it. What's not to love about truffles? Nothin'. So, there's some truffle butter, truffle oil, & bread slices fried in more truffle oil (for the topping). The soup was super easy and so delicious that we slurped it all up!! Enjoy :)

Truffled French Onion Soup
For the Soup:
3lbs Yellow Onions, Thinly Sliced
6T Truffle Butter
2T Truffle Oil
2t Salt
½t Sugar
3T AP Flour
2Q Beef Stock
½C Dry White Wine
Salt & Pepper, To Taste

For the Cheesy Bread Topping:
Thick Crusty Bread, Grilled or Fried in Truffle Oil
Gruyere Cheese, Grated  
Parmesan Cheese, Grated
Fresh Minced Parsley, For Garnishing

Directions:
1. Cook the onions slowly with the butter and oil in the covered saucepan for 15 minutes. Uncover, raise the heat to medium, and stir in the salt and sugar. Cook for 60-90 minutes, stirring frequently, until the onions have turned an even, deep, golden brown.
2. Sprinkle in the flour and stir for 3 minutes. Take the pot off the heat, and blend in the beef stock and white wine. Simmer partially covered for 30-45 minutes or more. Season with the salt & pepper.
3. Preheat the oven to 400 degrees. Pour the soup into bowls and top with a slice of truffle bread and a handful of grated gruyere cheese and parmesan. Place the soup on a baking sheet and bake for 20 minutes or until the cheese is melted and brown.
4. Garnish with parsley and enjoy with the soup is hot.


Wednesday, December 7, 2011

Date Night : Angry Mussels with Grilled Truffle Bread

My Mountain Man and I have decided to start a new tradition of having a date night once a week. I know that sounds bizarre because we're still quite young, and this kinda sounds like an old married couple who doesn't have time for one another, but it's quite the opposite. We've been dating now for about four and a half years and when you get to being with someone that long, you have to keep the "zsa-zsa-zsu" alive (as Carrie Bradshaw would say). Well, this new tradition is a lot of fun, and we really look forward to it every week now. I either cook us a special meal or he takes us out to dinner, and there are always some beautiful flowers involved (or some delicious chocolates, yum). So, for one of our date nights, I decided to recreate one of his favorite dishes from JCT Kitchen called "Angry Mussels". I have probably described this meal before because it is his go-to order whenever we go to lunch. But the mussels are perfectly cooked in a serrano-bacon-onion-garlic white wine broth, and then served with the best bread in the entire world. Along side of our mussels, I made a fried goat cheese salad & an easy chocolate mousse (which I will post in the next couple days). But, honestly this meal was just so perfect. It was easy to prep and didn't require a lot of hassle because you just throw everything into the pot and wait until the mussels pop open. The most satisfying part of the meal is dipping the delicious grilled truffle bread into the leftover spicy broth... my mouth is just watering thinking about that. I really encourage any couple out there to try and keep a romantic date night once a week, just for some fun!! Enjoy :)
Our Romantic Date Night in the Garden by Candlelight 
Angry Mussels, Grilled Truffle Bread, & Fried Goat Cheese Salads
Angry Mussels with Grilled Truffle Bread
Spicy Serranos, Thick-Cut Bacon, Sweet Onion & Garlic, & White Wine  
The Most Perfect Meal... Ever
For the Mussels:
3lb Mussels, Scrubbed & Debearded
1 ½C Dry White Wine
1 ½C Seafood Stock
8-10 Strips of Applewood Smoked Bacon, Cut into Thick Cubes
1T Coarse Black Pepper
3 Green Onions, Sliced
1 Large Sweet Onion, Thinly Sliced
4-5 Cloves of Garlic, Thinly Sliced
4-5 Serrano Chiles, Thinly Sliced
6T Butter
3T Parsley
Salt & Pepper, To Taste
Thick Crusty Bread, Grilled or Fried in Truffle Oil

Directions:
1. Place the mussels in a large bowl with cold water to cover. Let them soak for about 20-30 minutes to remove any dirt or sand. Drain the mussels, and then remove the “beard” from each. If they are dirty, scrub the shells with a brush under running water. Discard any mussels whose shells aren’t tightly shut.
2. In a large stockpot over medium heat, cook the peppered bacon cubes to render down that fat. Once the bacon has rendered, remove the cubes, leaving the bacon fat to sauté the aromatics. Add the green onion and sliced onion. Cook these until they become fragrant, but do not brown. Add in the sliced garlic and cook for about 1-2 minutes. Next, add in the thinly sliced Serrano chiles. Let them sauté and become slightly tender. Add in the white wine, butter, and parsley. Bring to a boil and then reduce the heat and cook for about 10 minutes. Season with salt & pepper to taste.
3. Add the mussels into the pot. Cover and allow to cook until the shells are opened, about 10 minutes (discard any mussels that did not open in the cooking process). Once they have opened, add in the cooked bacon and cubes of butter, stirring to coat and melt the butter. Transfer the mussels and sauce to a large serving bowl. Garnish with the green onions & chopped parsley and with the fried bread slices for dipping.

Monday, September 26, 2011

Parmesan Truffle Fries

As I have mentioned before, JCT Kitchen in Atlanta, is one of my favorite restaurants ever. I have recreated a bunch of their dishes because they are just soooo good. Well, the other night, my Mountain Man & I decided to make their Fried Egg Burgers & Parmesan Truffle Fries. I'll post the recipe for the burger next. But, for right now, I'm going to focus on these amazing french fries. Whenever you go to JCT, you have to order a big bowl of their Parmesan Truffle Fries. They are crispy shoestring potatoes, fried to perfection, and then tossed in white truffle oil, grated parmesan, & fresh parsley. So, I just had to try and attempt to make these babies. And they definitely hit the spot. These fries go along great with any burger, sandwich, or their Angry Muscles (which is another recipe I will tackle next). We devoured these french fries, and they will definitely be a go-to side for any burger we make in the future! Enjoy :)
Parmesan Truffle French Fries
For the Fries:
4 Large Russet Potatoes, Cut into ¼inch thick Sticks
10C Water, Very Cold
1Q Canola Oil, For Frying
Fresh Grated Parmesan Cheese
2-3T White Truffle Oil (or more if you please)
Fresh Chopped Parsley, For Garnishing
Salt & Pepper, To Taste

Directions:
1. To Soak the Fries: Place the cut potatoes into a bowl and pour over the cold water. Refrigerate for at least 4 hours, to help remove the starch.
2. After you have soaked the fries, heat your canola oil in a deep fryer to 325 degrees.
3. Drain the fries from the water and pat them completely dry.
4. To Fry the Potatoes: Fry them in batches for 2-4 minutes until it reaches a pale blonde color forms and remove them to a sheet lined with paper towels. Next, heal the oil to 375 degrees and fry the potatoes again until golden brown & crispy, about 5 minutes. Drain the golden fries and put them into a bowl.
5. Toss the French fries with the white truffle oil, grated Parmesan, salt, and pepper until they are evenly coated. Garnish with chopped parsley.
6. Serve immediately.