Tuesday, February 18, 2014

Gourmet Spiced Turtles with Vanilla Bean Caramel, Dark Chocolate, & Sprinkled with Vanilla Bean Fleur de Sel + Toffee Chips

Gourmet Spiced Turtles with Vanilla Bean Caramel, Dark Chocolate, & Sprinkled with 
Vanilla Bean Fleur de Sel + Toffee Chips
Back when I lived in Savannah, there were candy kitchens pretty much at every block. Pralines were their number one seller by far, so much so that if you just walked in the store, a hot, freshly-made praline sample was handed to you. Naturally, that just meant we walked in and out about 5-10 times. Of course, who wouldn't? Most of their treats were quite tasty, but I could never get on board with store-bought turtles. I'm not quite sure why, but they just weren't my gig, ya'know? Well, a couple weeks ago, I had a custom order request from an Haute + Heirloom Etsy buyer, asking me if I could whip up some gourmet turtles for her. I had never made them, but I knew how to make all the components and I was sure I could spice them up some to make them extra special. The first component are the pecans. A lot of the time, no one does anything to them. Some people might toast them or salt them slightly, but I went with the extravagant route by "spicing them". After being toasted in butter, I added in some fleur de sel, cinnamon, ground ginger, pumpkin pie spice, nutmeg, chili powder, & cardamom. They are all perfect, comforting fall spices. I also sweetened them up a bit with sugar to give them a crackly crust (um yumm). Now onto the caramel... the gooey, sticky, chewy caramel that is speckled + scented with vanilla beans and flavored with a dash of fleur de sel. If that doesn't make your mouth water... then I don't know what would. The caramel will harden & solidify, which means they are ready to be covered in chocolate. Tempering chocolate may seem like a daunting task, but really it is all scientific. You just gotta be aware of the temperature and keep it even throughout the entire process. Once you pour the tempered chocolate over the caramel, it will quickly begin to settle, so while it is still soft, sprinkle the tops with some vanilla bean fleur de sel and toffee chips (just for presentation & extra flavor). Even though these candies are a little more labor-intensive than the ones you can buy in a store, the quality alone speaks for itself. And that's coming from a girl who hated turtles prior to making this recipe!! Enjoy :)
clustering the spiced pecans...
making the vanilla bean caramel...
pouring the vanilla bean caramel over the spiced pecan clusters
a little extra salt neva hurt no'body
ready for the chocolate...
I experimented a little bit by adding on some chocolate stour marshmallows--yumm!
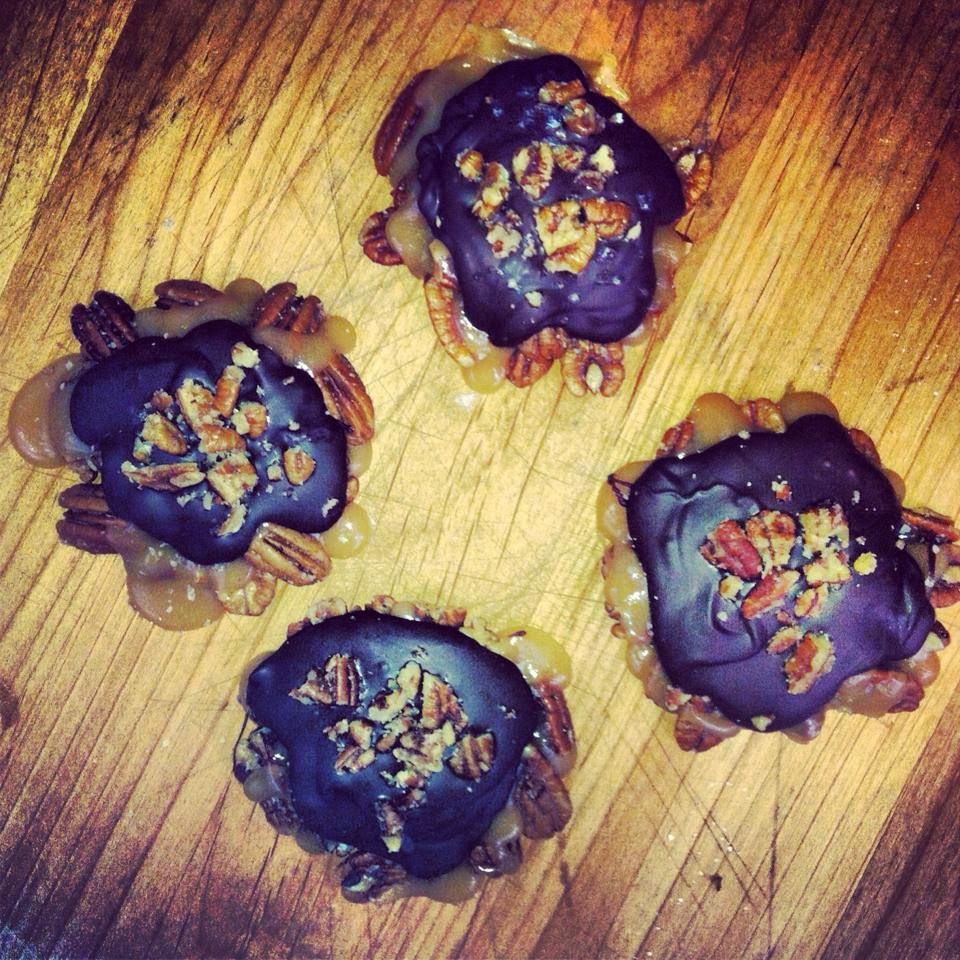
now it's time for the tempered chocolate, fleur de sel, & toffee bits
READY TO EAT!!
For the Spiced Pecans:
16oz Pecan Halves
3T Unsalted Butter, Melted
½t Salt, Cinnamon, Ground Ginger, Pumpkin Pie Spice
¼t Freshly Grated Nutmeg, Chili Powder, & Cardamom
1-2T Sugar (depending on how sweet you like it)

For the Vanilla Bean Caramel:
¾C Heavy Whipping Cream
½C Sugar
1/3C Dark Brown Sugar
3T Light Corn Syrup
2T Unsalted Butter, Cubed
1t Vanilla
1 Vanilla Bean, Split & Scraped for Seeds
½-1t Salt (depending on your taste)

For the Dark Chocolate Coating:
12oz High Quality Bittersweet or Semisweet Chocolate, Roughly Chopped
Vanilla Bean Fleur de Sel, For Sprinkling
Toffee Chips, For Sprinkling

Directions:
1. For the Spiced Pecans: For the pecans, preheat oven to 350°F. Toss pecan halves with melted butter and kosher salt and spread onto a large sheet pan. Toast the pecans, stirring halfway through cooking, until fragrant and golden, about 10 minutes; set aside until cool enough to handle. Once you can handle them, toss them with the spices and sugar until it adheres. Line two sheet pans with parchment paper and arrange cooled pecans into X-shaped clusters or feel free to place the pecan pieces into small mounds to yield a more rustic-shaped cluster.
2. For the Vanilla Bean Caramel: For the caramel, combine the cream, sugars, and corn syrup in a medium-sized, heavy saucepan and whisk until incorporated. Bring the mixture to a boil over medium-high heat. Please do NOT stir the mixture after it comes to a boil; if necessary, dip a pastry brush in water and brush down the sides of the pot to remove any sugar stuck to the sides. Continue boiling the mixture until it reaches 250°F on an instant read thermometer, about 10 minutes. Remove the saucepan from the heat and whisk in butter, vanilla extract, and vanilla bean seeds.
3. Working quickly, spoon a generous teaspoon or so over each cluster of pecans. Allow clusters to set, uncovered and undisturbed, for at least two hours but preferably overnight.
4. Tempering the Chocolate:To melt and temper the chocolate coating, prepare a double boiler or set a heatproof bowl over barely simmering water. Add approximately 3/4 of the chocolate (the remainder will get added in after the initial heating) to the top of the boiler. Melt the chocolate, stirring often, until it reaches the following temperature(s) on an instant read thermometer: 116 to 120°F for semisweet; 110 to 112°F for milk chocolate, and immediately remove from the heat. Add the reserved chocolate and continue stirring until the temperature drops to the following: 82 to 86°F for semisweet;80 to 84°F for milk chocolate. Return the chocolate to the boiler and heat on low until the temperature rises back up to 90°F, watching carefully to make sure the chocolate does not exceed the temperature.
5. Finishing the Turtles: Drizzle the tempered chocolate over the caramel-covered pecan clusters. Sprinkle the top with some vanilla bean fleur de sel and some toffee chips. Set aside in a cool place to set. Turtles will keep for up to two weeks, stored between sheets of wax paper in an airtight container at room temperature.

Thursday, February 13, 2014

How To : Brown Butter (like a boss)...

How To: Brown Butter (like a boss)...
Oh how I do love brown butter. And it is SO simple to make and it elevates any dish to another level! It's great in savory dishes, like pastas, sauces, or on seafood, but it is also fab in baked goods like cookies, doughnuts, and cakes. Oh and don't forget brown butter ice cream, it could possibly be my favorite flavor. It pairs amazingly with bourbon... which is also a win-win, since I like everything boozy. It is the perfect addition to chocolate chip cookies because it adds a nuttiness without including those pesky walnuts that I can't stand. I always drizzle some on top of my apple pies or just throw a whole stick of brown butter into my pecan pies... it's that good. I have almost 30 recipes featuring it as a prime component. So you need to jump on board and do the same. All you need is a couple sticks of butter, a saute pan, a whisk, & a rubber spatula... and you're in business!! So through this little tutorial, you'll learn how to brown butter, like a boss (just like me)!! Enjoy :)
Throw two sticks of butter into a heated pan.. 
And whisk, whisk, whisk away...
It'll foam, sizzle, & pop... don't worry that's just the water evaporating.
It'll clear up a bit and darken in color...
And shortly, you will see little brown flecks start to appear at the bottom of the pan...
Turn the heat off, but continue to whisk for another 30 seconds or so...
And then get it out of the hot pan and into a dish, where it will continue to brown due to the heat
Now you can use it right away or store it in the refrigerator for baked goods later...
For the Brown Butter:
2 Sticks of Unsalted Butter, Room Temperature

Directions:
1. Heat a light-colored sauté pan over medium heat (you use a lighter color because it will help you to be able to see whether or not the butter is burning or not, so you achieve the perfect caramel colored brown butter).
2. Add the two sticks of softened butter to the warmed skillet. Let the butter melt completely and continue to whisk/move the butter throughout the entire process. After a couple minutes, the butter will begin to bubble, and then foam before it subsides into a bright yellow color (the bubbling & foaming is just a sign that the water is evaporating out of the butter). After this, you should begin to see the butter beginning to darken and little brown bits forming at the bottom of the pan. At this point, you should begin to smell a toasty, nutty aroma (it should be quite intoxicating).
3. The butter should be almost completely golden with a few of brown butter specks; this is the time where you need to cut off the heat. Continue to whisk rigorously to ensure even browning. Using a rubber spatula, pour the butter into a dish and scrape out all of the brown bits into the dish as well (those are the most important part). And don’t worry, because the butter is still hot, it will continue to brown/toast while cooling off in the pan. This is the easiest way to ensure you will not burn the brown butter (yuck).
4. Now you can either toss it right into a dish… such as pasta or in a sauce, or you can refrigerate it so that it hardens again and it will be perfect for baking, like in cookies or cake (make sure to whisk it right before serving, so that the brown bits are evenly distributed throughout the butter). Once your butter has browned and been refrigerated, it should be good for about a week or two (if it’ll last that long).

Sunday, February 9, 2014

Goat Cheese Queso Fundido with Crumbled Smokehouse Sausage + Pepper Jelly Drizzle

Goat Cheese Queso Fundido with Crumbled Smokehouse Sausage + Pepper Jelly Drizzle
I am so mad at myself... why didn't I think of making this recipe a week ago for the Super Bowl? It's a shame because it's damn good and I'm sad I didn't have it for a party. Boo hiss. Oh well, you don't need a special occasion to enjoy this dip because it's great ANY time. Like  yesterday for instance, the weather finally turned a corner this weekend and the sun came out. Holy crap. It was 65 degrees and as sunny as it could be. And what could be more delightful than yummy chips + dip with an ice cold beer or fancy margarita... well, nothing probably. I have made Queso Fundido in the past, but nothing quite like this. With the simple addition of creamy goat cheese, the flavor profile is brought to a different dimension. The melty monterey jack cheese compliments it perfectly and has that always-lovable stringy quality to it. I don't know, it has a certain "je ne sais quoi" about it all. Ya know? The tang of the goat cheese balances in complete harmony with the crumbled smokehouse sausage. Tangy + Smoky... who doesn't love that? Nobodyyyy. I put my southern twist on the dish with the sausage and the drizzle of homemade pepper jelly. Pepper jelly and creamy cheese are like the South's peanut butter + jelly. No lie, I will spread some cream cheese and this spicy condiment on two pieces of toasted bread and devour it in seconds. Just like how this dip was hoovered in .57 seconds. Yep, it was quite the task, but we did not even struggle. The recipe has it all... salty, sweet, smoky, spicy, creamy, crunchy. I mean really, if it was a person, I would hate it for being an overachieving perfectionist. But c'est la vie, this is (thank god) just an easy queso fundido that only took about 15 minutes to prep & cook. There's nothin' to hate about that. So, call all y'all's galpals and/or bro's and whip up this dip-- everyone is gonna love it!! Enjoy :)
it starts with a layer of crumbled smokehouse sausage.
then you pour over the queso, crumble some goat cheese, and sprinkle with spices
and toast it to perfection.
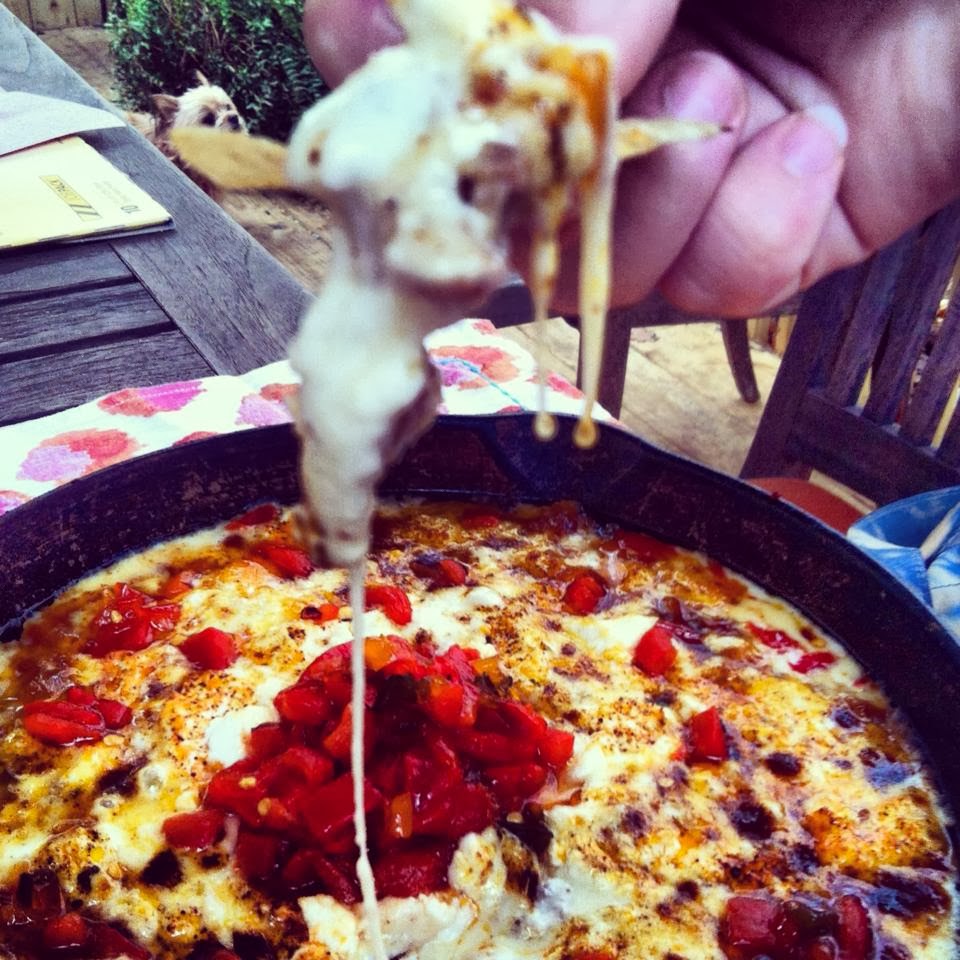
garnish it with a drizzle of pepper jelly + some diced, roasted red peppers
just dig in + go for it...
because when something this cheesy + gooey is in front of you...
you won't be able to control yourself. word. 
For the Goat Cheese Queso Fundido:
16oz Ground Smokehouse Sausage (or any southern sausage/chorizo/ground meat)
1T Unsalted Butter + 1T AP Flour
1C Whole Milk
12oz Monterey Jack Cheese, Shredded
¼t Salt + Pepper
Chili Powder, Cayenne, & Dried Oregano (for sprinkling)
8oz Goat Cheese, Crumbled into Big Pieces
Homemade Southern Pepper Jelly, For Drizzling
Diced Roasted Red Peppers, Pico de Gallo, or Corn Salsa (for garnishing)
Fresh Cilantro, Minced (for garnishing)
Warmed Tortilla Chips, For Dipping

Directions:
1. Heat a cast iron skillet over high heat and cook the ground sausage until the meat is crispy on the outsides, but cooked through (make sure to break it up in the small bite-size pieces). Drain out all of the fat that has been rendered, so that your dip will not be oily.
2. Meanwhile, preheat the oven broiler. Melt the butter in a medium saucepan over medium heat. Add the flour and cook for 1 minute. Whisk in milk and cook until slightly thickened. Remove from heat and stir in the grated Monterey Jack cheese and season with the salt and pepper. Scrape the mixture into the 8-inch cast iron skillet that is filled with the cooked sausage. Sprinkle the top of the queso with some chili powder, cayenne, & dried oregano. Top it with the crumbled goat cheese evenly throughout the pan. Place the pan under the broiler and broil until the goat cheese is golden brown on top.
3. Remove from the oven and drizzle with homemade pepper jelly and finish with some diced roasted red peppers and a sprinkle of minced cilantro. Serve with warmed chips and a cold beer.

Friday, February 7, 2014

Eggplant Parmesan Pizza with Roasted Eggplant Chips, Ricotta, Sun Dried Red Peppers, Toasted Tomato Sauce, Fresh Basil, + Crispy Garlic Bread Crust

Eggplant Parmesan Pizza with Roasted Eggplant Chips, Ricotta, Sun Dried Red Peppers, Toasted
 Tomato Sauce, Fresh Basil, + Crispy Garlic Bread Crust
Everybody loves raymond pizza. Amirite? Yep. We make it weekly, most of y'all order it weekly... it's an oldie, but goodie. I'm kinda sorta really over delivery pizza. I think I had my fill of it over the years of middle school slumber parties and drunk binge eating in college. Now I want it fancy. And what's more Italian than pizza? Well, I always think of either chicken parmesan or eggplant parmesan. Which means, I just had to concoct a Eggplant Parmesan-inspired Pizza. Let's start with the sauce... it sorta reminds me of a sun dried tomato paste sauce. It's toasty, herby, and really enhances the tomato to a'whole'nother level. This condiment really would be great on pasta, chicken, or even on a piece of toasted bread. So, it's quite versatile. Now onto the toppings. I roasted some thinly cut eggplant to make some "chips". That's easy-peasy, so don't skip this step and just put raw eggplant on the pizza, we didn't like it that way at all. Oh buddy, it's time for the best part... the sweet + tangy sun dried red peppers. I found these little red jewels at our grocery store and I was immediately drawn to them. I don't know how they make them or what they flavor them with, but they are straight-up gangsta. And that's impressive since this girl right here is not a fan of roasted red peppers. At all. But these Delallo Peppers, I could eat straight out of the jar. I think I purchased a whole basket of them because we love them that much. I made a killer sun dried red pepper dressing and I plan on making a hummus this weekend featuring them as well. They make everything so much better. Okay, now enough of my love affair with a vegetable. The rest of the pizza is topped with mozzarella, parmesan, ricotta cheese, and fresh basil. However, there was just one more component I needed to address. I needed a way to mimic the crispy breadcrumb coating of eggplant parmesan. Eventually, we landed on the idea of making a crispy garlic bread pizza crust. The outer rim of your pizza dough is brushed with a butter-garlic-herb mixture that is chock full of herbed Panko breadcrumbs. When you bake it in the oven, the breadcrumbs toast & crisp up and give you the most amazing crispy exterior. It was the perfect way to finish this over-the-top pizza, mark my words. So ditch the delivery crap and give this a go, I really think everyone who loves this classic Italian dish will love the pizza even more!! Enjoy :)
Y'all have to try these Delallo Sun Dried Peppers!!
Eggplant Parmesan-inspired Pizza :)
Don't forget the fresh basil, it's super important.
sliced up + already eaten. 

For the Crispy Garlic Bread Crust:
5T Unsalted Butter, Melted
2 Garlic Cloves + Sea Salt (mashed into a garlic paste)
2T Parmesan Cheese
1t Dried Basil + Dried Oregano
3T Toasted Panko Breadcrumbs (plain or Italian flavors will work)

For the Toasted Tomato Sauce:
1/3C Olive Oil
1 Clove of Garlic, Minced
½t Dried Oregano, Basil, Thyme, & Rosemary
A Generous Pinch of Red Pepper Flakes
½t Fresh Cracked Pepper & Sea Salt
3oz Tomato Paste
½t Honey

For the Eggplant Chips:
1 Small Eggplant, Thinly Sliced into Rounds
Olive Oil, For Drizzling
Salt, Pepper, & Dried Oregano, For Sprinkling

For the Eggplant Parmesan Pizza:
Homemade Extra-Crusty Pizza Dough
Prepared Crispy Garlic Bread Crust Butter
Prepared Toasted Tomato Sauce
8oz Fresh Mozzarella Cheese, Cut into Thin Slices
Baked Eggplant Chips
4oz Ricotta Cheese (for dollops)
Sweet + Tangy Sun Dried Red Peppers (I love the Delallo brand)
Fresh Basil, Chiffonade
Freshly Grated Parmesan Cheese

Directions:
1. For the Crispy Garlic Bread Pizza Crust: Using a roll pin or your hands, form the dough into your desired shape (sometimes I use baking sheets and do rectangles or free form pizzas). Melt 5 tablespoons of butter and mix it with the minced garlic, dried herbs, and 1 tablespoon of Parmesan cheese. In a small sauté pan, toast the panko breadcrumbs over medium heat until they smell nutty and they are lightly golden brown in color. Set them aside once you are done toasting them. Using a spoon or pastry brush, douse the outside edges with the herbed garlic butter mixture. You can spread the butter all over; just make sure to focus on the edges. Although make sure to save about one half of the butter, to spread on the pizza once it comes out of the oven. Continue to make your pizza with your desired toppings.
2. For the Toasted Tomato Sauce: Add the olive oil, garlic, basil, oregano, thyme, rosemary, crushed red pepper, salt, and some freshly cracked pepper to a small skillet. Stir and heat the mixture over low heat for about 3-5 minutes. It’s okay if it sizzles slightly, but you don’t want it to get hot enough that the herbs burn. Add the tomato paste and honey. Allow it to heat through as you stir. It will not form a smooth sauce. Continue to stir and heat over low for about 5 minutes or until you notice the tomato paste has darkened slightly. Either use immediately or refrigerate until ready to use.
3. For the Eggplant Chips:Preheat the oven to 350 degrees and line a baking sheet with a silpat. Thinly slice the eggplant into rounds or chips. Spread them out onto the baking sheet and drizzle them with some olive oil and sprinkle with salt, pepper, and dried oregano. Bake them for 25-30 minutes or until they are golden brown and slightly crisp.
4. Prepping the Dough:During the last hour of the dough’s resting, preheat the oven to its hottest setting, around 500-550 degrees, and arrange a rack in the middle of the oven. Now it’s time to add on the toppings.
5. Assembling the Pizza:Spread the dough with some of the herbed-garlic butter and toasted tomato sauce, and then scatter the mozzarella cheese over the dough in an even layer, and drop on dollops of ricotta cheese. Then top it the eggplant chips, sun dried peppers, and freshly grated Parmesan Cheese. Place the pizza into the hot oven and bake for roughly 10-12 minutes or until the cheese has melted and the crust has begun to brown. Bump the oven heat up to broil.
6. Serving the Pizza:Remove from the oven and brush the pizza with garlic-parmesan butter, using it all up. Sprinkle a bit of Parmesan over top if desired. Generously top it with some fresh basil, and a sprinkle of salt, pepper, and red pepper flakes. Cut into slices and enjoy it while it is still hot!

Monday, February 3, 2014

Blood Orange Mulled Red Wine with Spiced Brown Butter

Blood Orange Mulled Red Wine
HI GUYS. I am terrible. I left y'all high + dry. But but but but, I can explain. See last week the world ended. What? You guys didn't hear? That's shocking, I know, but so true. Well, if you didn't hear, I'll give you the quick rundown of how it snowed two inches in Atlanta and the whole city shut down. I'm not making this up. Luckily for me, I work from home, so I really didn't experience anything too badly. Actually, we were quite excited at first...
the beginning of snow fall
yep, it snows in the south
starting to cover the ground
shots at 5AM in honor of the "state of emergency" 
snow day with my little pup.
See? We welcomed the snow, with open arms. I was tooooo excited, I hadn't seen snow since probably my middle school days. It started innocently enough, but then I got a phone call from my Mountain Man around noon, saying that he got released from work early due to the possible inclement weather. I was TOTES excited. However, I just waited and waited and waited... I watched the news. EVERY major highway, intersection, and street was practically shut down. Black ice was everywhere. Children were stuck at school, or worse, in school buses. Finally 9PM had rolled around I had yet to see my Mountain Man because he had been stranded for over eight hours. In the same spot. I mean it couldn't get any worse. I was stranded at home and couldn't possibly rescue him. It got so crazy, he and one of his friends, abandoned their cars and walked about 7 miles in the sleeting snow back to our house. I can't even tell you how crazy it all was, and it was all over a pathetic two inches of snow. People had to sleep in grocery stores, hospitals, gas stations, and even their frozen cars. It was just straight up ridiculous. By 10 o'clock, the Governor officially called a "State of Emergency" and cancelled all non-essential work/travel for two days. If you guys watch The Walking Dead, this is really how Atlanta looked. No joke. We had no food, or barely any at all, so we ate a lot of potatoes and leftover roasted chicken. Not fun. We did, however, have a lot of red wine... and blood oranges. So, I decided that I would try my hand at making mulled red wine. This classic winter cocktail never really gets enjoyed here because well it's always so-dang-hot and DEFINITELY not snowing. It was the perfect occasion. The flavor was boosted with those gorgeous red citrus fruit, fresh ginger, mulling spices, apple, a-whole-lotta-booze, simple syrup, and a homemade spiced brown butter. The brown butter/compound butter is perfect for any fall drink, but especially anything mulled or it would be fab in a hot buttered rum too! This was the bomb to drink while the snow kept collecting on the ground... and it warmed my Mountain Man up real fast. So all of y'all that are still cold up in the Northern states can enjoy it as well!! Enjoy :)
juicing the blood oranges.
winter citrus art.
gorgeous blood orange slices in mulled wine
a generous slice of homemade spiced brown butter
ready to drink!
For the Spiced Brown Butter:
2 Sticks of Unsalted Butter, Browned & Softened
2C Homemade Dark Brown Sugar (or store-bought can be used)
1 ½t Cinnamon
1t Fleur de Sel
½t Freshly Grated Nutmeg, Bourbon Smoked Paprika, & Ground Ginger
¼t Cardamom, Cayenne, & Black Pepper

For the Mulled Red Wine:
2 Bottles of Red Wine
4 Blood Oranges, Zests Peeled & Sliced
1 Apple, Sliced
1 Inch Knob of Fresh Ginger (peeled)
2 Cinnamon Sticks
¼C Mulling Spices
2 Star Anise Pods
1C Homemade Mulled Simple Syrup
1 Vanilla Bean Pod, Split & Scraped for Seeds
½C Brandy, Bourbon, & Apple Jack
Nutmeg, For Grating
Homemade Spiced Brown Butter, For Serving

Directions:
1. For the Spiced Brown Butter: Cream together the butter, spices and sugar. At this point you can roll up the mixture with parchment into a log. Cover well and refrigerate or freeze for later use. In the fridge the mixture will keep for two weeks, in the freezer a couple of months.
2. For the Mulled Red Wine:Peel the zests off the blood oranges, and then cut up one of the oranges into slices and juice the remaining three. Throw them into the pot, along with the sliced apple, cinnamon sticks, mulling spices, star anise pods, mulled simple syrup, vanilla bean pod, and fresh ginger. Let this mixture simmer for 5 minutes. Add in the wine and bring back to a simmer, about another 5-10 minutes. Turn the heat off the burner and toss in the brandy, bourbon, and Apple Jack. Stir to combine.
3. For Serving:In a mug, add a tablespoon of the spiced brown butter. Top with a few ladles of blood orange mulled red wine. Grate some fresh nutmeg over the top and serve with a cinnamon stick for stirring. The ratio of the ingredients is really preference.