Showing posts with label Chocolate. Show all posts

Monday, June 8, 2015

Espresso Infused Dark Chocolate Cupcakes with Whipped Sea Salt Buttercream, Honey Caramel Sauce, Smoked Fleur de Sel, + Crispy Cake Crumbs

Y'ALL. I am a self-proclaimed cupcake hater. Feel free to glitter bomb if you please, but it's just not my thang. Buttttttttt, these cupcakes have changed my tune. They are by far the best cupcakes I have ever made. The base is a luxurious espresso infused dark chocolate cupcake that has a deep complex flavor, yet manages to stay utterly moist during the baking process. My secret for that texture... a little bit of mayo. I know some of you will squirm, maybe throw your hands up in the air, or scoff at the idea of putting in a condiment that normally belongs on a hamburger into cake batter. But hear me out, okay? My great grandmother, Mama Jones, always added some creamy mayo into her recipes for cake. This is especially important in red velvet cake + any kind of chocolate cake. Listen though, it isn't too weird if you really think about it... mayo is simply eggs + oil whipped together. And well, we already put that in a lot of our cakes from the get=go, so why not give it the little push it needs to make an extra moist cake. Now that you've gotten over the initial shock factor of the mayo, the res of the batter has dark cocoa powder, freshly brewed espresso, buttermilk, and other classic baking ingredients. The star of this show, however, is by far the whipped sea salt buttercream. Why, oh why, I had I never thought of the concept. I never really like buttercream... it was always far too sweet, to the point where I almost just drop dead on the spot. But with the sea salt whipped in, it makes it not too sweet, not too salty... just rightttttt. While living in Savannah, a little gourmet chocolate shop was down the street from our apartment. We went nearly every week, if not twice, just so I could get my favorite truffle that had dark chocolate and a gooey local honey center. It was the most mind-blowing combination that I have ever come across. So a light bulb went off in my head and I just had an itch to top the cupcakes with a homemade honey caramel sauce. It was the perfect. And all those cupcakes needed was a sprinkle of smoked fleur de sel and a crispy dark chocolate cake crumbs. Voila! The best cupcakes y'all will ever eat, and I mean it!! Enjoy :)


For the Espresso Infused Dark Chocolate Cupcakes:
1 ¾C AP Flour
2C Sugar
1C Dark Cocoa Powder (high quality)
2t Baking Soda
1t Baking Powder
1t Kosher Salt
1C Buttermilk, Well-Shaken
½C Mayo
½C Vegetable Oil
2 Extra Large Eggs, Beaten
1t Vanilla Extract
1C Freshly Brewed Espresso

For the Whipped Sea Salt Buttercream:
2 Sticks of Salted Butter, Room Temperature (very soft)
½t Kosher Salt (add a little at a time until you have reached your desired saltiness)
2t Vanilla Extract
4C Confectioners’ Sugar, Sifted
¼C Chilled Heavy Cream

For the Honey Caramel Sauce:
½C Honey
1 Stick of Unsalted Butter
¾C Light Brown Sugar, Packed
1 Can of Sweetened, Condensed Milk
¼t Kosher Salt   
Smoked Fleur de Sel, For Garnishing

Directions:
1. Preheat your oven to 350 degrees and line a cupcake pan with liners. Set this aside while you make the batter.
2. For the Espresso Infused Dark Chocolate Cake: Sift together the AP flour, sugar, dark cocoa powder, baking soda, baking powder, and salt into the bowl of a standing mixer (fitted with the paddle attachment). In another bowl, whisk together the buttermilk, mayo, vegetable oil, eggs, and vanilla extract until completely combined. With the mixer on low speed, slowly add the wet ingredients to the dry ingredients. With the mixer still on low, pour in the coffee and stir to combine, scraping the bottom of the bowl with a rubber spatula. Pour the finished batter into the cupcake liners and bake for 10-15 minutes until a cake tester comes out clean. Let the cupcakes cool completely before topping them with frosting.
3. For the Whipped Sea Salt Buttercream: In the bowl of a standing mixer, fitted with the whisk attachment, add the softened, salted butter and beat until creamy. Throw in the salt and vanilla, and beat again. Start by adding one cup of confectioners’ sugar at a time, whipping it until it is smooth and incorporate before the next addition. Repeat until all of the confectioners’ sugar has been used. Finally, whip in the heavy cream to loosen the texture (you can use a little more if you need to).
4. For the Honey Caramel Sauce: In a medium saucepan, melt the honey, butter, and brown sugar on medium heat. Once melted, let the mixture come to a rolling boil for 2 minutes while stirring continuously. Add in the sweetened, condensed milk and stir to combine. Allow it to cook for another minutes or two so that it will thicken slightly. Remove from the heat and stir in the salt. Let this mixture cool slightly before topping the Buttercream with it.
5. Finishing the Cupcakes: Using a large ice cream scoop, gather the whipped sea salt Buttercream and plop it on top of the cooled chocolate cupcakes. Using a knife or a spoon, smooth out the sides and create a hollowed out center. Pour a little bit of the honey caramel sauce into the center and garnish with a sprinkle of smoked fleur de sel. If you want to decorate them, you can sprinkle on some chocolate sprinkles or toasted cake crumbs.

Monday, May 18, 2015

Gourmet S'more Pie with Chunky 'Nilla Wafer-Graham Cracker Crust, Espresso Infused Brownie Truffle Filling, + a Toasted Homemade Vanilla Bean Marshmallow Topping

Look at me, being all crazy-like by talking about how spring is already here and what a glorious season it is... and then one week later, I'm on the summer bandwagon. But when a recipe, like this one, turns out so good that you can't stop eating it, well you just have to post it! S'mores are the absolute... the essential... the ultimate representation of what truly makes summer the best time season of the year. We have made a bunch of s'more inspired desserts, like this over-the-top s'mores layer cake or these gourmet s'more brownie bars, just to name a few. But this version easily takes the cake (or pie) for this summer sweet treat. There are are a few upgrades (because, well, I always like to put my own spin on every dish I make) and I think you'll love 'em just as much as we did! Now when talkin' s'mores, everybody and their grandma know the three necessary components... graham crackers, toasted marshmallows, + chocolate. Let's talk about the crust, baby. Don't get me wrong, I love a graham cracker crust just as much as the next guy, but I wanted a more toothsome + crunchy base to our filling. I know you're asking yourself, "How on earth is this crazy food blogger going to one of the best, classic pie crusts even better"? Well all the magic happens by simply adding in Vanilla Wafer Cookies. I have to insist that you don't pulverize the 'nilla cookies; you want them chunky and almost pebble-like in size. Add the cookie pebbles into a mixing bowl along with graham cracker crumbs (very fine, not chunky at all), a stick of melted browned butter, and a pinch of salt. So for all you naysayers out there upset about my minimal use of graham crackers... just chill a little bit, you will still get that iconic flavor + perfect texture in your crust. Press this mixture into a 9inch spring-form pan (like the one you use to make cheesecake) and work some of the crumbs up the sides until the whole-damn-thang is compacted in there. Okay it's onto the good stuff here, people. It's what y'all have all been waiting on... the espresso-infused brownie truffle filling. Yeah I know, I used so many delicious words to describe the chocolate middle layer. But it's all true, I found the so called "unicorn" of the culinary world. You can thank me later. Back to this crazy brownie filling, it has bittersweet chocolate, butter, dark cocoa powder, espresso powder, heavy cream, and Kahlua liqueur. Once your brownie filling is done + lusciously smooth, you're going to follow my lead and add in about a cup (or more if you're so inclined to do so) of some of those crunchy 'nilla wafer cookie pebbles right into the batter. This gives it a bit of crunch here + there, which I love because it's just like a little present every time you take a bite! After baking it just enough until it perfectly cooked with a semi-crackly top and a chocolate-like truffle filling, let it cool completely. Now, here on H+H, making homemade marshmallows is a top priority and one of my favorite things to whip up. So why not do it for the top of a gourmet s'more pie? This recipe makes a semi-thin layer to completely cover the brownie truffle filling, and that might be just enough for you, but it isn't for us. In the end, I decided to add a rim of good 'ole mini marshmallows (straight from the store). Not only did it give the pie a retro feel to it, but it doubled the ratio of amazing marshmallow goodness, and we all love the sound (and taste) of that. Before you get to toasting the top, you need to let the layer of marshmallow chill and firm up in the fridge. Guess what, you're essentially done, all you have to is melt, toast, or char (or all three) dem 'mallows until you've reached your favorite doneness. But unfortunately, this is start of that dreadful waiting game. As someone who has taken part of this mind game, you'll make it. I mean I did, long enough to tell the tale. All you gotta do next is slice up this masterpiece of a pie and completely inhale, all done respectfully of course. And just a quick trick for those who will be enjoying this gourmet s'more pie for a few days, you can make it taste exactly like the day you made it by heating it in the microwave until the marshmallow begins to melt and gets all-gooey-like. Don't forget because you will regret it!! Enjoy :)


For the Chunky ‘Nilla Cracker Crust:
4C Crushed ‘Nilla Water Cookies (make it a rough texture, for that perfect crisp crust)
10T Unsalted butter, Melted
½C Sugar
½t Kosher Salt

For the Chunk ‘Nilla Wafer-Graham Cracker Crust)
2C of the Chunky ‘Nilla Crust (already prepared above)
1C Graham Cracker Crumbs (pulverized into fine crumbs in a food processor)
1 Stick of Unsalted Butter, Melted
Generous Pinch of Kosher Salt
 
For the Espresso Infused Brownie Truffle Filling:
2 eggs
¾C Granulated Sugar
½t-1t Kosher Salt
4.5oz of 72% Chocolate, Roughly Chopped
6T Unsalted Butter, Cut into Tabs
¼C Cake Flour
3T Dark Cocoa Powder
1T Espresso Powder
½C Heavy Cream + 2T Kahlua Liquor
1C of the Chunky ‘Nilla Wafer

For the Homemade Vanilla Bean Marshmallow:
1t Unflavored Gelatin
½C Cold Water (separated into two ¼C)
¾C Sugar
¼C Light Corn Syrup
¼t Vanilla Extract
1 Vanilla Bean Pod, Sliced & Scraped For Seeds 
1 Bag of Mini Marshmallows (optional)

Directions:
1. Beginning of the Crust: Preheat your to 350 degrees. In a large mixing bowl, combine the crushed/chunky ‘Nilla wafer cookies, butter, sugar, and salt. Toss until everything is well incorporated. Set this aside until you are done with the graham cracker crumbs (and if you can wait, preferably 8-12 hours, so the cookies soak up all the butter). This batch of crunchy cookie piecrust yields enough for two pies; so you can save them for a rainy day baking project, press them into muffin tins for mini pies, or just some casual nibbling on the side. Also, make sure to save 1-2C of these vanilla wafer cookie crumbs to add into the brownie filling later on in the recipe.
2. Prepping of the Crust: While you wait for your ‘Nilla wafer crust cookies to soak up the butter and the granulated sugar has each piece nicely coated, place a sleeve of graham cracker cookies into a food processor and have become finely ground (almost like a thick sand). Keep doing this until you have reached 1C of graham cracker crumbs. If you don’t want to go through this process, no problem! Just go buy a box of store-bought graham cracker crumbs.
3. Finishing the Crust: Get out a 9-inch spring form pan (one that you use for a cheesecake) and spray heavily with Baking Pam Spray all around the edges. Combine the 2C crunchy ‘Nilla wafer cookies + 1C of the graham cookie sand together in a bowl. Now, like the crust couldn’t get any better, it’s time to add more butter (YESSSSSS, but shhh, don’t tell anyone). It’s totally worth every calorie. Press the ‘Nilla wafer + graham cracker cookie crumb mixture into the bottom and up the sides of the pan, packing it tightly, evenly, and firmly into the prepared spring form pan. Set this crust aside while you make the Espresso Infused Brownie Truffle Filling.
4. For the Espresso Infused Brownie Truffle Filling: Combine the chocolate and butter in a microwave-safe bowl, and gently melt them together on low for 30-50 second. Use a heatproof spatula to stir them together, working until the mixture is glossy and smooth. Combine the eggs and sugar in the bowl of a standing mixer, fitted with the whisk attachment, and whip together 3-5 minutes or until the mixture is fluffy and pale yellow and has reached the ribbon state. Replace the whisk with the paddle attachment. Dump the chocolate mixture into the eggs and briefly mix together on low speed. Increase the speed to medium and paddle the mixture for 1 minute or until it is brown and completely homogenous. Scrape down the sides of the bowl and sift in the cake flour, dark cocoa powder, espresso powder, and a pinch of salt. Paddle this mixture on low speed for 45-60 seconds. There should not be any clumps, if there is, paddle it again for another 30 seconds. Stream in heavy cream + Kahlua on low speed for 30-45 seconds, just until the batter has loosened and the white streaks from the cream have fully mixed in. Scrape down the sides of the bowl. Gently fold in the 1-2C of the chunky cookie crust (these crumbs add a little burst of flavor and texture into the pie filling).
5. Assembling the Pie: Pour the Espresso Infused Brownie Truffle Filling into the base of the chunky ‘Nilla wafer-graham cracker crust. Smooth out the top of the brownies. Bake in the preheated oven for 25-30 minutes or until the edges begin to puff slightly, yet still remain jiggly in the center. Cool the pie completely before finishing it.
6. For the Homemade Vanilla Bean Marshmallows: Make the marshmallow topping by adding ¼C to the bowl of a standing mixer, fitted with the paddle attachment.  Sprinkle the gelatin over the water and let it stand firm, for about 1 minute or so. Stir together the sugar, corn syrup, a pinch of salt, remaining ¼C cold water, and 1 vanilla bean pod (sliced and scraped for seeds) in a heavy saucepan. Bring to a boil over moderate heat, stirring until the dissolved. Keep boiling this mixture until a candy thermometer registers at 260 degrees, roughly 6-8 minutes. Begin beating the gelatin mixture on medium speed, and then carefully pour the syrup in (make sure to keep pouring in a slow steady stream, while trying to avoid the paddle and sides of the bowl). Once all he syrup has been added, continue beating it on medium speed until the marshmallow fluff has tripled in volume. Add in the vanilla and beat it until it has just combined, and then immediately pour the marshmallow on top of the brownie filling. It should be loose enough to evenly spread itself, but if not, use a well-greased rubber spatula or spoon to help aide in the process.
7. Finishing the S’more Pie: Refrigerate the pie for 1 hour, uncovered, and then cover it with plastic wrap that has been lightly coated in Pam Spray. And again, return the pie to the refrigerator and let it chill for 3 more hours. After the long chilling process, preheat the broiler to its highest heat setting. Once the oven is extremely hot, remove the plastic wrap, place the pie onto a cookie sheet, and distribute small mini marshmallows in a circle around the outside edge of the pie. We really love marshmallows, so we wanted to add more and I also love the retro vibe it gives off. Carefully rotate the pie/sheet pan about 3-4inches from the flame until the top is perfectly golden brown and melty underneath. This can take about 3-5 minutes to reach that toasted-charred-marshmallow-goodness.
8. Serving the S’more Pie: Allow the pie to cool for about 10-15 minutes before slicing it. In order to get a good, clean slice, dip your knife into hot water and spray it with Baking Pam Spray. This helps to avoid making a mess and getting all sticky from the marshmallows. Enjoy while it is still warm!  Keep in mind that after you have had some of the pie and have a few slices left, it is still just a delicious a couple days later. Cut a slice, plop it into a microwave (about 30 seconds or so), and your pie will be a dense like a fudge brownie + on top you will have an extra ooey-gooey marshmallow waterfall flowing down the slice. UM YUM!

Tuesday, March 17, 2015

Spicy Mexican Chocolate Silk Pie with Vanilla Bean Pâte Brisée , Salty Cajeta + Cajeta Infused Whipped Cream

Although it’s St. Patrick’s Day… I’m going way out-of-bounds and heading to a completely different area of the world… Mexico. Well, and America, too. Who doesn’t love chocolate? Everyone does. And chocolate pie, well it takes the cake (or pie) for me. This is a traditional recipe turned up a notch by taking Chocolate Silk Pie and making it spicy. It might sound crazy and a little insane, but bare with me a little bit as I explain it. I don’t know if y’all have been to (or heard of) Jeni’s Splendid Ice Cream, but we sure have. She recently opened up a shop in Atlanta and we nearly go every week. Our favorite flavors are her salty caramel, queen city cayenne, and the buckeye state. So, I took inspiration from two of those to make a pie. Chocolate Silk Pie is great on its’ own, don’t get me wrong. It’s luscious, smooth, and so-wrong-its-right in every kinda way. But why not make it spicy? You truly haven’t lived if you haven’t experienced Mexican chocolate or any spiced chocolate for that matter. So instead of using unsweetened chocolate, I bought some Taza Spicy Mexican Chocolate Discs and added some spices into the pie filling. It warms you deep into your bones and your soul, and well heats your mouth up a bit, but we like that, a lot. The whole thing is put into a pre-baked pie crust, I use my own recipe, but you could easily just do a store-bought crust to save time and effort. But the secret ingredient to this blissful pie is the Cajeta component. Cajeta is a thick Mexican caramel made with goat’s milk, very similar to a can of caramelized, sweetened condensed milk. But wayyyyyy better. We found our Cajeta at Whole Foods; however, you surely can make your own at home. We spread the Cajeta into the bottom of the pre-baked pie crust, so that there was a luscious layer of caramel with every bite. And shhh, we sprinkled a tad bit of sea salt on top to make it a salty Cajeta (and it was so yummy). Then we took it another step forward and infused our whipped cream topping with more Cajeta because, well, why the hell not? It’s practically a Cajeta party, YAY. The pie is finished with just some more of that fabulous spicy chocolate grated over the top. And you, my friend, will be in paradise along with us. You won’t regret making this pie, y’all, you just won’t!! Enjoy :)

For the Vanilla Bean Pâte Brisée:
3 ¾C AP Flour (plus extra for rolling)
3 Sticks of butter, Cut into ½inch Cubes & Chilled
1 ½t Salt
1T + 1 ½t Sugar
12-18T Ice Water, Very Cold
3 Vanilla Beans, Sliced & Scraped for Beans
For the Cajeta-Infused Whipped Cream:
2C Heavy Cream
¼C Sugar
½C Cajeta (we purchased some at whole foods)
Pinch of Salt (or to taste)
1t Vanilla

For the Mexican Chocolate Silk Pie:
4oz Spicy Mexican Chocolate, Chopped (we used Taza Chocolate Discs)
1C Salted Butter, Softened
1 ½C Sugar
½t Chili Powder, Cinnamon & Paprika (and a pinch of a cayenne)
4 Whole Eggs
½C Cajeta (to spread in the base of the pie shell)
Pre-Baked Vanilla Bean Pâte Brisée, Cooled

Directions:
1. For the Vanilla Bean Pâte Brisée: Start by cutting the sticks of butter into ½inch cubes and placing in the freezer bag, along with the flour, salt, and sugar. Place the bag of flour into the freezer and chill for at least 1-2 hours. In a food processor, pour the frozen flour bag in, as well as the scraped vanilla beans, and pulse 6-8 times until the mixture resembles a course meal, with pea size pieces of butter. Add water 1T at a time, pulsing until the mixture just begins to clump together. If you pinch of some of the crumbly dough and it holds together then it’s ready. Remove the dough from the machine and place on a clean surface. Carefully split the dough into three equal pieces and shape into discs (save the other two rounds of pie dough in plastic wrap and freeze them for a rainy day). Do not over knead the dough. You should still be able to see little bits of butter in the dough. Sprinkle the discs with a little flour on all sides and wrap it in plastic wrap and refrigerate at least an hour. Remove one of the discs from the refrigerator and let it sit at room temperature for 5-10 minutes. Sprinkle some flour on top of the disk. Roll out with a rolling pin on a lightly floured surface to a 12inch circle (1/8inch thick). Place the rolled out disc on to a pie dish, lining up the fold with the center of the pan, trimming the excess. Cover with plastic wrap and freeze for 30 minutes.
2. For the Cajeta-Infused Whipped Cream: The night before you make the pie, heat a small pot over medium-low heat. Add in the heavy cream, sugar, cajeta, & a pinch of salt to taste and whisk constantly until the cajeta has dissolved into the cream and has become smooth (it should be a light khaki color). Remove the heat from the pan and add vanilla extract. Pour cajeta-infused cream into and container and let it chill overnight. Firstly, make sure the cream is thoroughly chilled. Add it into the bowl of a standing mixer, fitted with the whisk attachment, and whip on high-speed until a fluffy, yet thick whipped cream. Season it with some sugar, vanilla extract, and salt if needed (really it’s up to your tastes).
3.  For the Mexican Chocolate Silk Pie: In small microwave safe bowl melt 4 ounces of the Mexican spicy chocolate until you can stir it (about 45 seconds on high). Set aside to cool. In a large bowl with an electric mixer beat 1 cup (2 sticks) of regular (salted) butter, spices, and 1½C of white sugar until fluffy (about 1 to 2 minutes). When melted chocolate is cooled, drizzle it over the butter/sugar mixture. Add 1 teaspoon of vanilla extract. Beat the mixture thoroughly until combined (on a Kitchen Aid mixer, you will be using the whisk attachment). Turn your mixer to a medium speed and over a period of 15 to 20 minutes add in the four eggs, one at a time, leaving about 5 minutes between each egg addition. Prepare your pie by spreading some of the Cajeta into the base of the pie shell, so that you will have a nice, thick layer of Cajeta when you slice & bite into a slice (and sprinkle a little fleur de sel on top). Once the pie filling is well mixed, pour it into the baked & Cajeta-filled pie shell, scraping every last speck of it out of the bowl. Smooth out the pie filling and place pie in the refrigerator to chill for at least two hours (preferably longer). Plop a heaping mound of Cajeta-infused whipped cream on top of the pie, smoothing it out so it completely covers the chocolate.
4.  Serving the Pie: Cut a slice of the pie and grate some more Mexican spicy chocolate on top and enjoy! 

Monday, February 16, 2015

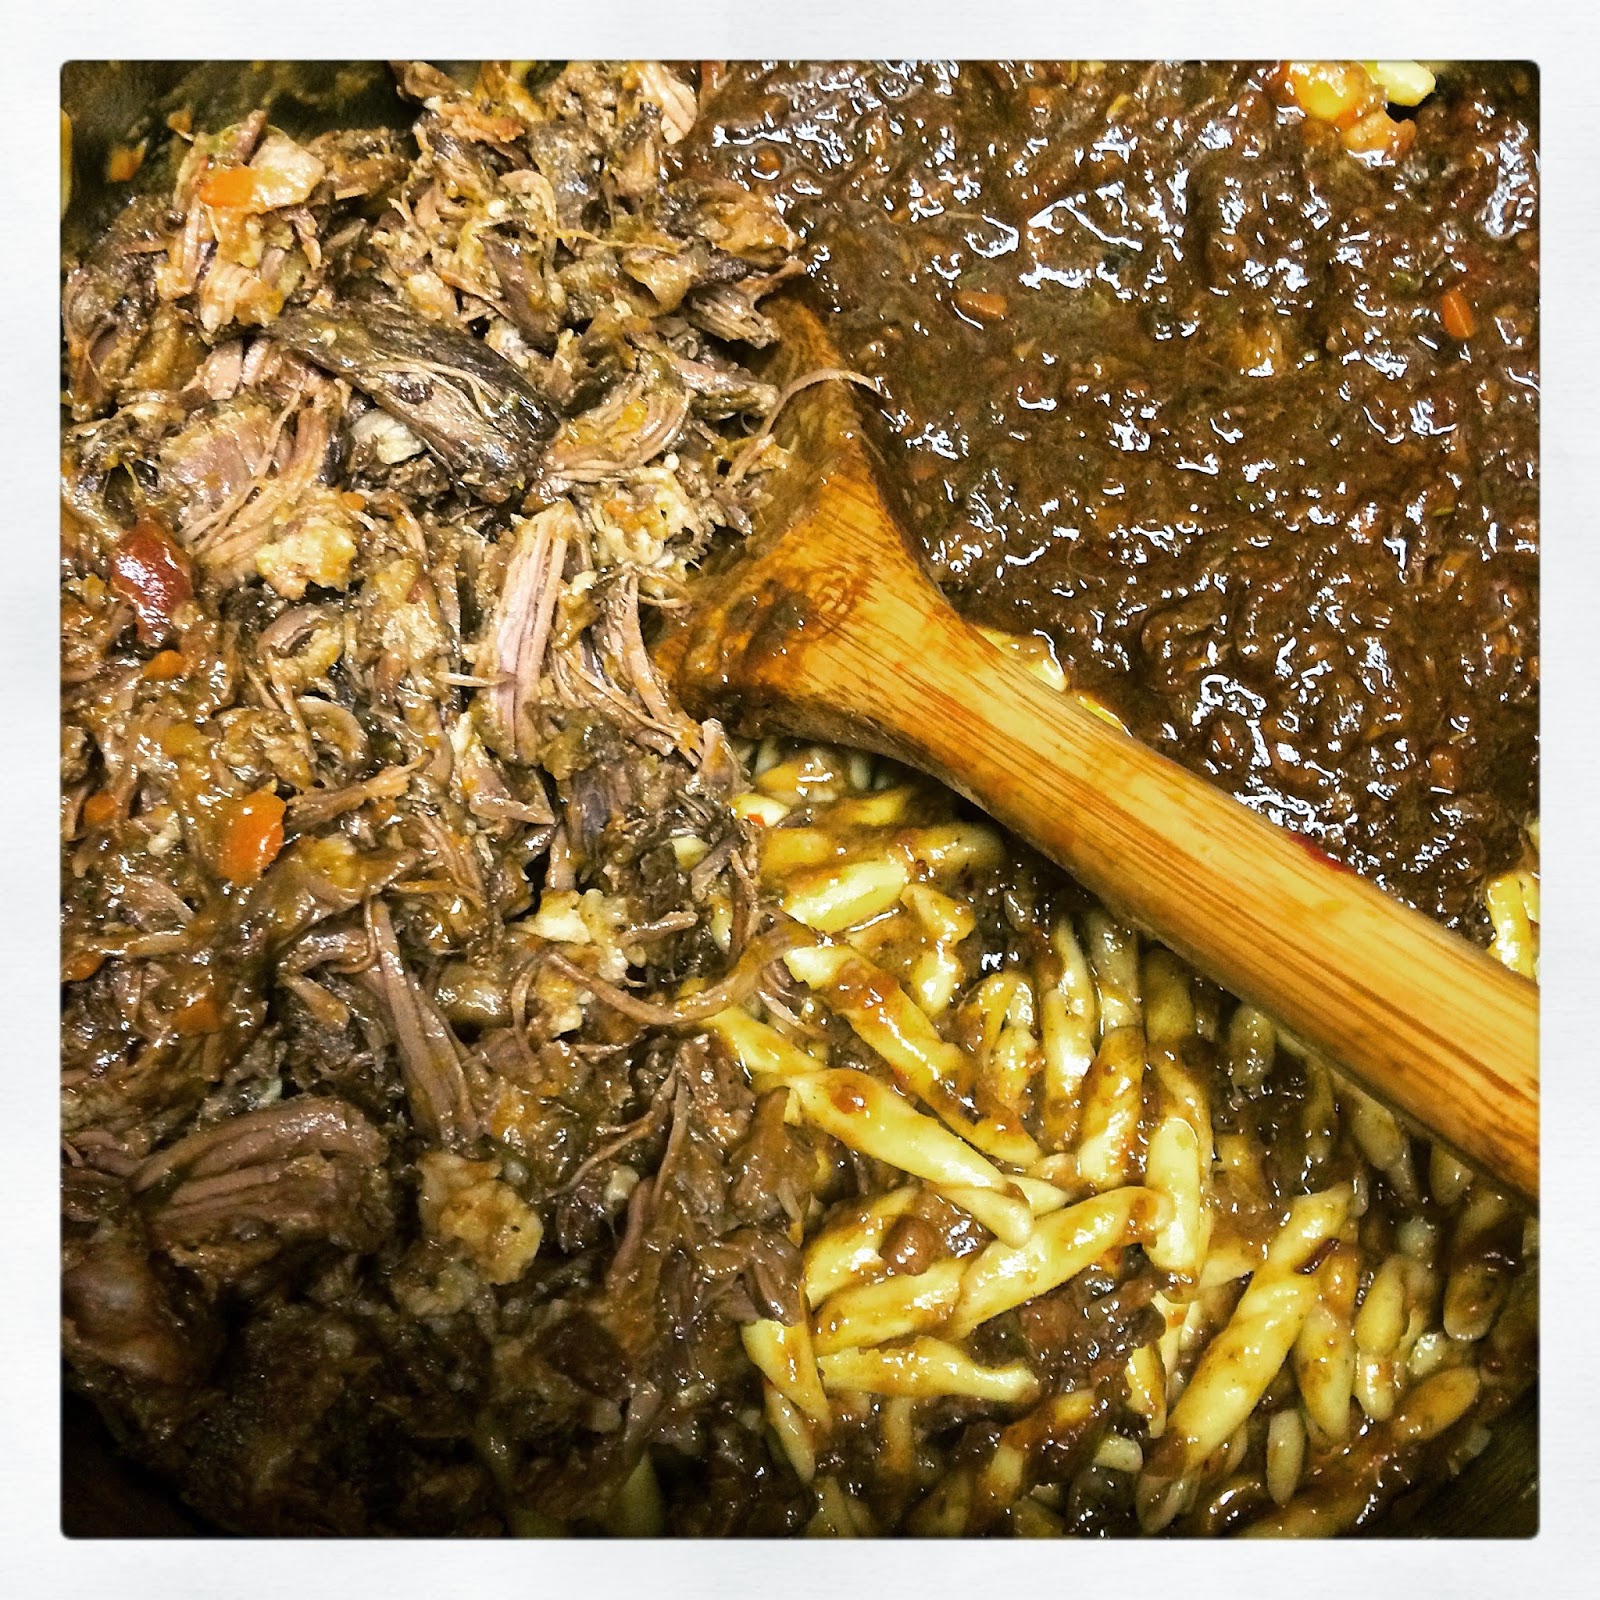
Braised Short Rib Ragu Pasta

There are some meals here on Haute + Heirloom that we tend to repeat... and repeat... and repeat. Like our favorite Fancy Pot Roast, we make this 3-4 times a month. Well this Braised Short Rib Ragu Pasta is also becoming a weekly tradition. It is something that you can start early on Sunday and by dinner time you just have to stir together everything for a super comforting + filling meal. There is something so magical about braised short ribs, and I can't really put my finger on it, but it is truly special. After browning the short ribs in a big pot, I added in a bunch of aromatics... carrots, garlic, leeks, onions, parsley, and celery. After they saute a bit, it's time to add in the pureed tomatoes, tomato paste, beef stock, and red wine.
Finally, it is all topped with the crucial "flavor"-producing components... herbs, bay leaves, cocoa powder, balsamic vinegar, fish sauce, and Worcestershire sauce. These all bring such depth to the dish, so don't skip out on any of them. I MEAN IT. Now this pot, it's gonna braise and braise and braise some more. Like 4-5 hours worth of braising is on the horizon, but to me, that's okay because I'm already doing some house cleaning and laundry, so I can keep an eye out on the pot as well. Eventually you get to that glorious part of the recipe where the braised short ribs are amazingly tender and forked off the bone tender. UM YUM. And then, you have to reduce this sauce down until it becomes chocolate brown and much thicker than where it started. I continuously stirred the sauce, so it would evenly reduce and not burn on the bottom. Once that sauce is ready, it's time to add in some more yummy stuff. Begin by browning a stick of butter in a separate pot, once it is just started to brown, add in the minced garlic and saute for just a minute or two. Throw in already cooked pasta, turn off the heat, and coat the pasta in the garlicky brown butter. And this, my friends, is where the magic begins to happen. Put the shredded short rib met on top of the pasta, along with as many scoops of your ragu sauce as you like, caramelized onions, red pepper flakes, shaved bittersweet chocolate, half of the grated Parmesan, some fresh herbs, and heavy cream (to make it extra luscious). Fold in all of the ingredients until you have a cohesive pasta dish. Spoon the finished pasta into serving bowls and garnish with a mound of freshly grated Parmesan + fresh herbs. Y'all are gonna LOVE it!! Enjoy :)
For the Braised Short Ribs:
¼C Extra Virgin Olive Oil
4oz Diced Pancetta + A Heavy Pinch of Cinnamon
4lbs Bone-In Short Ribs
Fleur de Sel + Fresh Cracked Pepper (to heavily season the short ribs)
½C AP Flour
1 Vidalia Onion, Finely Minced
1 Leek, Finely Minced
3 Carrots, Finely Minced
4 Cloves of Garlic, Finely Minced
3 Stalks of Celery, Finely Minced
½C Fresh Parsley
28oz Whole San Marzano Canned Tomatoes, Pureed until Smooth
3T Tomato Paste
2 ½C Beef Stock
1 ½C Red Wine
2 Sprigs Fresh Rosemary + Fresh Thyme
1t Dried Oregano
3 Bay Leaves
3T Cocoa Powder (sifted to remove clumps)
1T Balsamic Vinegar
1T Fish Sauce
1T Worcestershire Sauce

For the Braised Short Rib Pasta:
1 Stick of Unsalted Butter, Melted & Browned
4 Cloves of Garlic, Minced
1lb Pasta, Cooked Al Dente
Braised Short Ribs, Shredded into Bite Size Pieces (prepared above)
A Few Scoops of the Braised Short Rib Ragu Sauce (from the pot used above… to taste)
1C Caramelized Onions
½-1C Heavy Cream (depending on how creamy you like it)
1-2t Red Pepper Flakes (or as spicy as you like)
4-6t Shaved Bittersweet Chocolate
1C Freshly Grated Parmesan (divided)
Fresh Herbs, For Garnishing (we used parsley, basil, and chives)

Directions:
1. Preparing the Short Ribs: Place the olive oil in a large heavy soup pot over medium heat. Add in the Pancetta, with a pinch of cinnamon, and cook until the Pancetta is golden and crisp. This will take about 2-4 minutes. Meanwhile, season the short ribs with salt and pepper, and then dredge in flour (make sure to dust off any excess flour, so there is only a light coating). Using a slotted spoon, remove the Pancetta from the pan and put them into a small bowl, and reserve it for later. Add the short ribs to the pan and brown on all sides, about 10 minutes. Once all of the short ribs have evenly browned, take them out of the pot and place them on a plate or baking dish.
2. Making the Braised Short Rib Ragu: Meanwhile, place the onion, leek, carrots, garlic, celery, and parsley into a food processor and pulse until everything is finely diced, but definitely not pureed! Add these minced aromatics to the pot that the short ribs had been browning in and allow them to cook and caramelize some, just about 5-10 minutes over medium heat. After sautéing them, add the crispy pancetta, pureed tomatoes, tomato paste, beef stock, and red wine. Bring this mixture to a boil and reduce the heat to a simmer, before you submerge all of the browned short ribs into the braising liquid, and then top with fresh rosemary, fresh thyme, dried oregano, and bay leaves. Cover the pot and cook at a simmer for 2 hours. Remove the lid and simmer for another 2 hours, making sure to stir occasionally. After this period of cooking, remove the lid, and continue to cook for another 2 hours (while also making sure to occasionally stir the sauce). After their second cooking period, remove the meat and bones from the pot. Discard the meat and bones from the pot onto a large cutting board (making sure to throw away any fatty pieces as well). Shred the meat into bite-size pieces and let them rest while we reduce the ragu sauce. Stir in the cocoa powder, balsamic vinegar, fish sauce, and Worcestershire sauce, and bring the sauce up to a boil, and then back down to medium heat. You will need to remain near the pot to stir the sauce to ensure that it does not burn. Cook this sauce until it is much darker in color and reduced in volume. It should be quite thick. Remove the bay leaves, sprigs of rosemary, and sprigs of thyme. Season the sauce with some kosher salt and fresh cracked pepper (and sugar if you want it to be a little bit sweeter).
3. Assembling the Short Rib Pasta: In another pot, melt a stick of butter over medium heat until it begins to brown and release a nutty fragrance. Add the minced garlic and sauté just for a minute or so in the brown butter. Turn off the heat and quickly add the al dente pasta and coat it completely in the garlicky brown butter. Throw all the meat on top of the pasta, followed by some scoops of the reduced ragu sauce (as much as you want), caramelized onions, heavy cream, red pepper flakes, ½C grated Parmesan, shaved bittersweet chocolate, and fresh herbs. Fold the pasta gently to combine and until a luscious sauce has coated your pasta.
4. Serving the Pasta: Spoon the short rib pasta into serving bowls and add a heap of freshly grated Parmesan and some fresh herbs to garnish. Enjoy!