Showing posts with label Pistachios. Show all posts

Tuesday, November 8, 2016

Maple Roasted Pear Pizza with Pistachio Olive Oil, Caramelized Shallots, Crispy Prosciutto, + Crumbled Goat Cheese

Sweet + Salty is mah jam. I'm the weirdo that likes dipping french fries in a chocolate milkshake... adding salt to my lattes, pouring maple syrup on my bacon, and so on + so on. Last year, we went to our favorite pizza place, Hearth, and my dreams were made. Their pizza special that night was a pear pizza. What? PEAR ON A PIZZA.... that's genius! I knew then and there that I would have to recreate this masterpiece. I ending up changing most of the toppings to include my favorite ingredients, and you know what, I thought ours was even better. First, I started off by making a chunky pistachio olive oil by using a molcajete + pestle to pulverize the nuts into the oil. This serves as the base for your pizza. Next up is one of my go-to recipes as of lately... crispy prosciutto. If you don't have prosciutto on you though, you can always sub in some bacon... because... um, bacon is good on everything. It's also a personal belief that every single pizza should have caramelized onions, so I added lots of those too. Then there is the usual of fresh mozzarella and grated parmesan cheese, and for good measure, some tangy crumbled goat cheese (yum). The single most important ingredient has to be the bosc pear, which I shaved using a mandolin. Gently arrange the shaved pear on top of the pizza and brush a light coating of maple syrup over the fruit. The maple syrup not only sweetens the whole pie just a little bit, but helps the pears to beautifully caramelize in the oven. Lastly, you have to season the pizza with fresh thyme (an absolute must), crushed red pepper flake (for a slight kick), and a small sprinkle of kosher salt + fresh cracked pepper. After you have baked the pizza, all that there is left to do is to cut it into slices and devour it while it's still warm. We also loved putting some peppery baby arugula on top for garnish, but that step is completely up to you! I hope you love this ultimate autumn pizza as much as we do!! Enjoy :)
pre-baked pizza


this is what heaven looks like.
For the Pistachio Olive Oil:
1C Shelled Pistachios (can be unsalted or salted)
EVOO (enough to cover the pistachios)

For the Crispy Prosciutto:
6oz Shaved Prosciutto
4 Sprigs of Rosemary or 8 Leaves of Sage
EVOO, For Drizzling
Fresh Cracked Pepper, For Sprinkling

For the Maple Roasted Pear Pizza:
1 Batch of Homemade Extra Crispy Pizza Dough (made into two dough balls)
4 Cloves of Garlic, Minced
Prepared Pistachio Olive Oil
Caramelized Shallots
8oz Fresh Mozzarella, Shredded by Hand
Freshly Grated Parmesan
Prepared Crispy Prosciutto
1 Bosc Pear, Thinly Shaved Using a Mandolin
High Quality Maple Syrup, For Brushing
Crushed Red Pepper Flakes, To Taste
Minced Fresh Thyme, To Taste
Kosher Salt + Fresh Cracked Pepper, For Sprinkling
2oz Crumbled Goat Cheese
Fresh Baby Arugula, For Garnishing (optional)

Directions:
1. For the Extra-Crusting Pizza Dough: Whisk flour, salt, and yeast in a medium bowl. While stirring with a wooden spoon, gradually add 1.5 cups water; stir until well incorporated. Mix dough gently with your hands to bring it together and form into a rough ball. Transfer to a large clean bowl. Cover with plastic wrap and let dough rise at room temperature in a draft-free area until surface is covered with tiny bubbles and dough has more than doubled in size, preferably 18 hours (but anywhere between 12-18 hours would work as well). Transfer dough to a floured work surface. Gently shape into a rough rectangle. Divide into 2 equal portions (depending on thin or thick you want your pizza dough). Working with 1 portion at a time, gather 4 corners to center to create 4 folds. Turn seam side down and mold gently into a ball. Dust dough with flour; set aside on work surface or a floured baking sheet. Repeat with remaining portions. Let the dough balls rest, covered with plastic wrap or a damp kitchen towel, until soft and pliable, about 1 hour.
2. Prepping the Dough: During the last hour of the dough’s resting, preheat the oven to its hottest setting, around 500-550 degrees, and arrange a rack in the middle of the oven. Working with the dough, dust it generously with flour and place onto a floured work surface. Gently shape the dough balls into a two 10-inch disks. Press or spread the dough dish on top of a baking sheet or pizza stone. Now it’s time to add on the toppings.
3. For the Pistachio Olive Oil: In the bowl of a Molcajete, add in all of the shelled pistachios, and the pour in enough olive oil to just cover the pistachios. Using the pestle, crush the pistachios until they are rough and chunky in texture, and not smashed into a powder. Stir the crushed pistachios with the olive oil to make a cohesive mixture. Set this aside.
4. For the Crispy Prosciutto: Preheat the oven to 375 degrees and line two baking sheets with parchment paper. Divide the prosciutto evenly between both baking sheets, making sure to lay them flat. Brush the tops of the prosciutto with some EVOO and scatter the fresh sprigs of rosemary or sage on top. Bake the prosciutto until the fat turns golden and the meat is darker in color. This will take about 15 minutes (making sure to rotate baking sheets from top to bottom halfway through the baking time). Using tongs, carefully transfer the prosciutto to paper towels to drain (it will continue tot crisp as it cools). Set them aside until you are ready to assemble the pizza.
5. Assembling the Pizza: Get your two prepped pizza dough disks on baking sheets and press two cloves of minced garlic into each dough round. Place the pizzas into the preheated oven and bake for 7-9 minutes. Remove from the oven and begin assembling the toppings. Start by spooning and spreading the pistachio olive oil, followed by scattering the caramelized shallots evenly over the pizza dough. Next add on the shredded mozzarella, freshly great Parmesan, crispy prosciutto, and shaved pears. Brush the tops of sliced pears with some maple syrup, and then sprinkle the surface of the pizza with crushed red pepper flakes, fresh thyme, kosher salt, and fresh cracked pepper. Lastly, crumble the goat cheese on top to finish off the pizza. Boost the oven up to broil and place them back into the oven for about 3-5 minutes until the cheese has melted, the pears have begun to crisp around the edges, and the crust has a toasty golden brown color (make sure to rotate the pizza pans, so they evenly cook).
6. Remove the pizza from the oven and cut into slices. Garnish the pizza with fresh baby arugula on top, if you please! Enjoy!

Friday, January 23, 2015

Pizza "Rotolos" with Layered Pizza Dough, Homemade Creamy Ricotta Cheese, Slices of Mortadella, + Rustic Pistachio Pesto

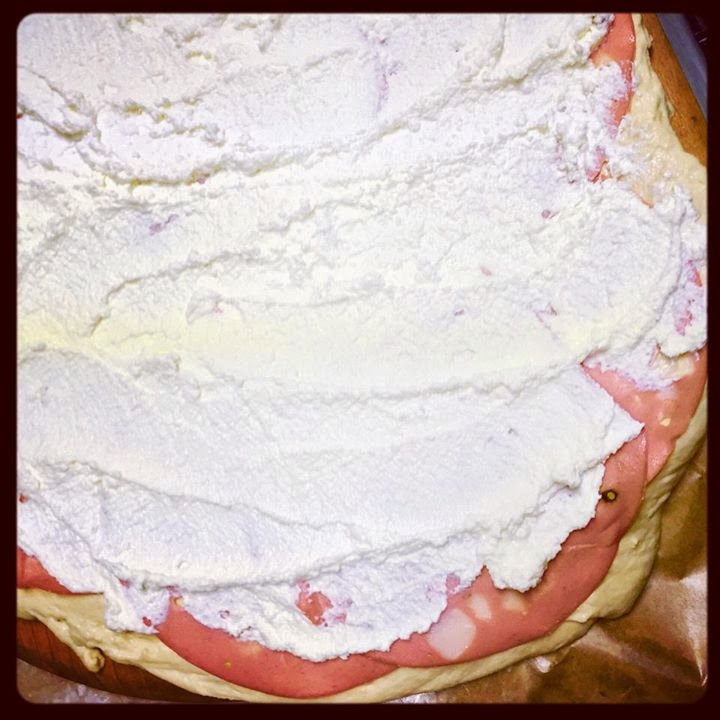
My inspiration for the recipe creations featured on H+H come from multiple places. But some of my favorite dishes come about by just eating at restaurants. And today's recipe is just exactly that. My Mountain Man and I were watching a new special series called "Best Ever" on the Food Network, and the first episode revolved around the best pizzas around the country. To be honest, all of them looked amazing, and even Antico Pizza from Atlanta made the top ten (yay). However, one specific idea stole my heart and practically peer pressured me to try and recreate it the next day. It hails from Pizza Vetri in Philadelphia and they are known for their pizza "rotolos". This signature dish is comprised of pizza dough, mortadella, ricotta cheese, and a topping of pistachio pesto. Think of it like a hybrid, combining the technique of making cinnamon rolls, but with the ingredients of a calzone. I started the process by making a batch of my favorite pizza dough recipe, letting it proof overnight, and then separating it into three equal dough balls. Next, roll out the pizza doughs into rectangles (try to use minimal flour because we want them to stick together), and then stack all of the dough rectangles on top of one another and, using the rolling pin again, make sure the layered dough is rolled out to about ¼ - ½ inch thick and rectangular in shape. This process is very similar to making homemade, laminated croissant dough, so that it creates a flakier pizza dough once it is baked. 
 After your dough has finished being prepped, it's time to add the yummy fillings in layers of sliced mortadella, followed by spreading on some homemade creamy ricotta cheese. Season the top of the ricotta with a little bit of kosher salt + cracked pepper and finish it all up with some freshly grated parmesan cheese. All you have to do now is roll this bad boy up into a long log. 
 Now that all the fillings are added to the mix, roll the dough (making sure to keep it as tight as possible) and pinch the seam, so that the ricotta cheese will not melt out onto your baking sheet. You can decide for yourself how thick/big you want each individual rotolo to be, but we decided to make eight rolls. Place the finished rotolos onto silpat-lined baking sheet and bake in the oven until they have reached a golden brown color on the outside, as well as some melting of the ricotta cheese, while also making sure that the center of the dough is completely cooked through (we don't want any gummy, unbaked pizza dough here). Remove them from the oven and top the rotolos with some homemade rustic pistachio pesto while they are still warm. I loved the texture of the pesto because it had such a nice crunch from the toasted pistachios, but was also just as aromatic as a blended pesto. Well, I'm glad to report that these rotolos turned out fabulous and we will most certainly be making these again in the near future. So, I think y'all should give it a try!! If you don't want to make every component by scratch, like I did, you could easily go pick up the pizza dough, ricotta, and pesto at your local grocery store. It's extremely versatile and could also be used with any type of charcuterie, creamy cheese, and Italian based sauce!! Enjoy :)

For the Pizza Dough:

3 ¾C AP Flour (plus a little extra for when you roll out the finished dough)

2t Sea Salt + 1t Sugar

¼t Active Dry Yeast

1 ½C Water


For the Homemade Creamy Ricotta:

3C Whole Milk

1C Heavy Cream

½t Kosher Salt

3T Freshly Squeezed Lemon Juice


For the Rustic Pistachio Pesto:

1C Shelled Pistachios (½C should be coarsely chopped & ½C should be finely chopped)

2C Fresh Basil, Finely Chopped

3-4 Larges Cloves of Garlic, Finely Minced (it can also be grated or pressed)

½t Dried Red Pepper Flakes

2T Fresh Lemon Juice (also zest the lemon before juicing it, and add it to the mixture)

2T White Balsamic Vinegar + 1T Honey (you can add more honey, if you like it sweeter like me)

¾C Extra Virgin Olive Oil

Kosher Salt & Fresh Cracked Pepper, To Taste


For the Pizza “Rotolos”:

Prepared Pizza Dough (the dough should be separated into three balls of dough)

1lb of Sliced Mortadella

Prepared Creamy Ricotta Cheese

Kosher Salt & Fresh Cracked Pepper, To Taste

Freshly Grated Parmesan (enough to cover the ricotta or to your preference)

Prepared Rustic Pistachio Pesto


Directions:
1. Preheat the oven to 450 degrees and line a baking sheet with a Silpat. Set it aside.
2. For the Pizza Dough: Whisk flour, salt, and yeast in a medium bowl. While stirring with a wooden spoon, gradually add 1.5 cups water; stir until well incorporated. Mix dough gently with your hands to bring it together and form into a rough ball. Transfer to a large clean bowl. Cover with plastic wrap and let dough rise at room temperature in a draft-free area until surface is covered with tiny bubbles and dough has more than doubled in size, preferably 18 hours (but anywhere between 12-18 hours would work as well). Transfer dough to a floured work surface. Gently shape into a rough rectangle. Divide into 3 equal portions. Working with 1 portion at a time, gather 4 corners to center to create 4 folds. Turn seam side down and mold gently into a ball. Dust dough with flour; set aside on work surface or a floured baking sheet. Repeat with remaining portions. Let dough rest, covered with plastic wrap or a damp kitchen towel, until soft and pliable, about 1 hour.
3. For the Homemade Creamy Ricotta Cheese: Pour the milk, heavy cream, and salt into a 3Q non-reactive saucepan. Attach a candy or deep-fryer thermometer. Heat the milk to 190 degrees, stirring it occasionally to keep it from scorching on the bottom. Remove from heat and add in the lemon juice, then stir it once or twice (gently + slowly). Let the pot sit undisturbed for about 5 minutes. Line a colander with a few layers of cheesecloth and place it over a large bowl (to catch the whey). Pour the curds and whey into the colander and let the curds strain for at least an hour. After an hour, you should have a tender, spreadable ricotta. At two hours, it will be spreadable, but a bit firmer (similar to the consistency of cream cheese). This ricotta will firm as it cools. Use the ricotta right away for maximum flavor + creaminess.
4. For the Rustic Pistachio Pesto: Place the shelled pistachios into a medium-sized sauté pan over medium heat (do not add oil). Toast the pistachios for 2-5 minutes until they are lightly browned + being to release a nutty fragrance. Coarsely chop half of the toasted pistachios, so that you’ll have some amazing texture when you spoon it over the tops of the “Rotolos”. Place the coarsely chopped pistachios into a mixing bowl and set it aside. In the bowl of a food processor, add in all of the fresh basil leaves, the 4 large cloves of garlic, the remaining half of the toasted pistachios, fleur de sel, + fresh cracked pepper. Pulse this mixture until every ingredient finely chopped/minced, but without turning it into a puree. You want this mixture to remain rustic + slightly chunky in texture. Using a rubber spatula, scoop out the minced basil-garlic-pistachio and put it into the bowl with the coarsely chopped pistachios. In a small bowl, whisk together the lemon juice, white balsamic vinegar, and honey. Then mix it until the honey completely dissolves into the lemon juice + white balsamic vinegar. Add this liquid mixture to the bowl of the prepped pesto components and stir to combine. Lastly, pour in the olive oil and gently stir until you reach a cohesive mixture. Season it with salt, pepper, and sugar to taste (if needed). Set this pistachio pesto aside until you begin assembling the “Rotolos".
5. Preparing & Assembling the “Rotolos”: After your dough as rested for one hour, it is time to layer the pizza dough for optimal texture. Take one of the pizza dough and roll it out to about ¼inch thick, and follow this process with the two remaining dough balls. Once they have been rolled out, stack the three rolled pizza dough balls on top of one another. Using the rolling pin again, roll the pizza dough stack out until the layers become one and also reach a thickness of ¼ to ½ inch thick (by stacking the dough and rolling it into one rectangle, you will create a flakier “rotolo”, similar to how a croissant is made with its’ buttery layers). Now, it’s time to assemble the “rotolos”. Evenly lay out the slices of Mortadella all over the pizza dough, followed by spreading (or using a dollop method) all of the ricotta on top of the Mortadella. Try to make sure that all of the dough is completely covered, but also leaving about ½-1inch borders, so that the ricotta cheese will not spill out. Sprinkle the top of the ricotta with some salt, pepper, & freshly grated Parmesan for extra seasoning. Lightly press down the grated Parmesan into the ricotta, in order to keep it from falling out. Now, starting at the opposite end, begin rolling the Mortadella + ricotta filled dough in a neat line towards you. Keep the roll relatively tight as you go. Next, pinch the seam of the rotolo to seal it. Cut the rotolo into rounds (you can do as thick or thin as you like, we ended up making 8 rotolos total). Place the rotolos onto your prepared silpat-line baking sheet. Sprinkle with the tops of the rotolos with a little more salt & pepper, if you like. 
6. Baking the “Rotolos”: Place the baking sheet into your preheated oven and bake the rotolos for 25-35 minutes (depending on the heat of your oven, the time can vary depending on how thick you cut them, so you have to watch them closely). You can tell that the rotolos are done when they have puffed up, reached a golden brown color, and the ricotta has begun to ooze out a little. Also, it is important that you allow the rotolos enough time in the oven, so that the middle of the rolls are completely cooked through and no raw dough remains in the center.
7. Serving the “Rotolos”: When the rotolos are done baking, generously spoon some of the rustic pistachio pesto over the tops of the rolls until the pesto cascades over and drips down the sides. Garnish the rotolos with a mound of freshly grated Parmesan and eat while they are still warm!

Friday, July 12, 2013

Cannoli Cronuts with Homemade Citrus-Mini Chocolate Chip Ricotta Filling, Tossed in Cinnamon Sugar with Bittersweet Ganache + Pistachio Confetti

Cannoli Cronuts with Homemade Citrus-Mini Chocolate Chip Ricotta Filling, Tossed in
Cinnamon Sugar with Bittersweet Ganache + Pistachio Confetti
My Cronut craze hasn't taken over my body, literally. I have this compulsion to make these. It's so unhealthy, but so satisfying. I mean, if I'm going over to the dark side, I'm taking one of these with me. Okay, scratch that maybe a dozen... a baker's dozen. Prior to last week, I hated Cannoli's. Mainly because I hate ricotta, so I just turned my nose up at them instead of actually giving them a shot. But then, we went to one of our favorite pizza places in Atlanta, Antico, and everything changed. I loved their cannoli's and I just had to make some for myself at home. But no no no, not any ordinary Italian cannoli... a CANNOLI CRONUT. Boom. Best idea ever. I followed my same recipe as before, but instead I filled it with a traditional ricotta cream that was kicked up a notch with tangy cream cheese, sweet mascarpone, citrus zest, & mini chocolate chips. After they were fried, I rolled them in cinnamon sugar and topped them with a sexy, sultry bittersweet chocolate ganache. And please don't forget the pistachio "confetti" (I know I'm just trying to sound fancy, you see right through me). I love the color the nuts provide and the slight crunchy texture. Why eat a cannoli when you can eat a cannoli cronut? There simply is no logical reasoning for that, trust me!! Enjoy :)


For the Quick Croissant Dough:
½C + 1t Lukewarm Whole Milk
6g Instant or Active Dry Yeast
1t Vanilla Extract
1C AP Flour
1C + 2T Bread Flour
2T Sugar
½t Salt
½C + 3T Unsalted Butter, Diced & Chilled
Canola Oil or Vegetable Oil, For Frying

For the Homemade Citrus-Mini Chocolate Chip Ricotta Filling:
1 ½C Homemade or Store-bought Ricotta (drained for 12-24 hours with a cheesecloth)
½C Homemade or Store-bought Mascarpone Cheese
4oz Cream Cheese, Room Temperature
¾C Confectioners’ Sugar, Sifted
½t Ground Cinnamon (scant)
¼t Ground Allspice
¼C Heavy Cream
1T Lemon Zest + 1t Orange Zest
Pinch of Salt (to taste)

For the Cinnamon Sugar:
½C Sugar
1-2T Ground Cinnamon
¼t Ground Allspice
Big Pinch of Salt (this is optional, but I love the balance)
 
For the Bittersweet Ganache:
½C Heavy Cream
4oz Bittersweet Chocolate, Finely Chopped
Pistachios, Chopped into Confetti

Directions:
1. For the Quick Croissant Dough: In a large mixing bowl, whisk together the warm milk, water, vanilla, and yeast until combined. Set it aside. In the bowl of a food processor, pulse together the AP flour, bread flour, sugar, and salt until mixed throughout. Add the chilled butter and pulse until the butter is in small pieces. It is very important that you do not over-process the mixture because you need to see chunks of butter, about 1cm in size. After you have processed the flour and butter mixture, add it into the bowl of the yeasted liquid. Using a rubber spatula, gently fold the dry ingredients into the wet ingredients, making sure to get the dough together without making the butter pieces any smaller. Once it is roughly combined, dump the mixture onto a floured work surface and lightly knead to form a ball of dough. Place the dough ball back into the mixing bowl and cover with plastic wrap. Chill in the refrigerator for 2-3 hours. After it has chilled, place the dough ball back again onto a well-floured surface. Roll the dough out into a rough 20x40cm rectangle. Fold the dough into thirds, like a business letter, making sure to brush off any excess flour. This is the first turn of a total three turns. Rotate the dough 90 degrees, so that the folds are facing you. Repeat the rolling and folding process two more times. Wrap the dough in plastic wrap and refrigerate overnight before using.
2. For the Ricotta Filling: In a medium bowl, beat together the ricotta, cream cheese, and mascarpone until smooth. Sift in the powdered sugar, cinnamon and allspice. Mix to blend. In a separate bowl (or in the bowl of an electric mixer fitted with the whisk attachment), beat the heavy cream until stiff peaks form. Using a rubber spatula, gently fold the cream into the ricotta mixture. Stir in the chocolate chips. Zest the lemon & orange and stir it into the ricotta. Season it with a pinch of salt to taste. Refrigerate for an hour or two. Place the ricotta filling into a piping bag or squeeze bottle (make sure the tip is large enough for the mini chocolate chips to push through though).
3. For the Cinnamon Sugar:Mix together all of the ingredients and put it into a mixing bowl, and use a spoon to toss the fried Cronuts.
4. The Next Day: Remove the dough from the refrigerator after it has chilled overnight and place it onto a well-floured surface. Roll it out into large rectangle that is roughly 1cm thick. Line a baking sheet with a Silpat and lightly flour it. Set it aside. Dip a doughnut cookie cutter into flour and cut out rounds from the rolled out dough, you should be able to get roughly 10-12 Cronuts from this batch of dough (not including a whole bunch of doughnut holes for snacking). Place the cut doughnuts onto the floured sheet pan and lightly cover with a kitchen towel. Let the Cronuts rest in a warm place until they have doubled in size, about 1-2 hours.
5. For the Bittersweet Ganache:Make the ganache by heating the cream in a small saucepan over medium heat. Remove before it starts boiling, and pour over chocolate setting in a bowl, let sit for a couple minutes, and then stir until chocolate is fully melted, and the ingredients are combined. Pour into a squeeze bottle for easy drizzling and decorating. Meanwhile, finely chop up some pistachios for a confetti garnish.
6. Frying the Cronuts: Heat the oil to 325 degrees in a deep pot or sauté pan while you’re Cronuts are almost done resting. Fry the Cronuts, two at a time, for 2-3 minutes on each side, or until they reach a deep golden brown color and are completely cooked through in the center. Remove from the oil to a baking sheet that is lined with paper towels and a wire rack. Let them cool enough to handle.
7. Assembling the Cronuts: It is now time to start filling the fried Cronuts. I did this “Twinkie-style” by using the squeeze bottle that is filled with the chilled Cannoli ricotta cream. Gently poke holes into the bottom of a Cronut and fill them all the way through with cream. Repeat this process until you have about 5-6 cream filling holes in each Cronut. Scrape off any excess cream that begins to ooze out. Now that all of the Cronuts have been filled, roll them in the cinnamon sugar until all the sides are covered. Place them back onto the cooling rack and squeeze some bittersweet ganache in a circle around the top of the Cronut. Garnish with pistachio confetti.

Friday, August 31, 2012

Gourmet Cheese Truffles with Goat Cheese, Triple Cream Cheese, Honeycomb, & Ground Pisatchio

Gourmet Cheese Truffles
Okay, so these would be the best little party appetizer. I mean, whenever I go to a party, there is always a big ole' plate of cheese and other what-not's that disappear within minutes. But, that can get a little messy when everyone is wanting to cut different cheese and spread on different condiments. Well, this solves the problem, friends. Meet Gourmet Cheese Truffles. The cheesy cousin to chocolate truffles. They are essentially your favorite soft cheese, stuffed with honeycomb, and rolled in ground nuts. I chose two cheeses because I couldn't decide what I wanted. I am a major sucker for goat cheese, so I knew that I wanted to try that, but I was intrigued by using Triple Cream Cheese. I also think that brie would work perfectly, as well as a soft blue cheese. You have to chill the honey into balls (which did by twisting it in plastic wrap) because it will be too runny to cover with cheese. You have to work kind of fast because the cheese and honey start to soften quite a bit, and then it gets a little messy from there. I decided to roll my truffles into ground pistachio because I love them and I thought they provided a great contrast of color. Pecans, walnuts, and almonds can be substituted as well if you like one of those better. Or you can just do a mix of a bunch of different cheeses &  nuts for a variety. That would be super fun. So, next time you are having a dinner party, cocktail party, or well, just happy hour, whip these out and your friends will be quite impressed with your mini cheese course!! Enjoy :)
I love the color of those bright green pistachios...
The truffles in the left & right rows are made with Triple Cream Cheese,
while the truffles in the middle are made with Goat Cheese
For the Cheese Truffles:
Goat Cheese or Triple Cream Cheese (as much as you want)
Honey Comb
Ground Pistachios (ground walnuts, almonds, or pecans can be substituted as well)

Directions:
1. To begin the truffles, place about ½-1t of honeycomb onto a piece of plastic wrap and tightly squeeze, while twisting the top, to form honeycomb balls. Place the wrapped balls into the freezer to chill & harden. This will make it easier to form the cheese around it.   
2. Slice off a tab of either goat cheese or triple cream cheese, about 1T of it, and begin to flatten it into a disc. Unwrap a honey ball from the freezer and place it into the center of the cheese. Gently wrap and shape the cheese around the honey. Roll in between your hands to make a round ball, making sure that the honey is completely concealed. Immediately roll in ground pistachios (or any other nut you prefer) and place into the refrigerator to chill completely before serving. Repeat with the cheese and honey until you have as many truffles as you want.
3. Keep them chilled until you are ready to serve. To serve, remove them from the refrigerator about 10 minutes before and place them onto a plate. Enjoy with a glass of wine!