Showing posts with label Icing. Show all posts

Wednesday, December 31, 2014

Homemade Peppermint Bark Topped Red Velvet Brownies with Chocolate Fudge Icing, White Chocolate, + Crushed Peppermint Candies

Homemade Peppermint Bark Topped Red Velvet Brownies with Chocolate Fudge Icing, White Chocolate, + Crushed Peppermint Candies
I come to you with a sad message today... it's the end of 2014, which means this is my last new recipe for the year :( But the good news is that I will be back tomorrow with out Top Ten Favorite Recipes: Salty + Sweet of the year... YAY!! This is by far our favorite post of the year because we get to reminisce and reflect back on all of the yummy food we were able to create, and more importantly, EAT. But before we get to talkin' about the festive Christmas-treat inspired red velvet brownies I made, let's talk about last night, shall we? As many of my followers know, my Mountain Man + I both attended the University of Alabama and are huge football fans, so we decided to travel down to New Orleans for the Sugar Bowl/First College Football Playoff Game where our Crimson Tide is taking on the Buckeyes of Ohio State. We woke up early, drove all day, unpacked our stuff, and got ready to head out for a night of good cajun food, lots of booze, and even more shenanigans. And I know as I type this story out to y'all, you are probably thinking... Oh man, New Orleans, she got hammered, what if she was arrested, did she get any beads? Well, my friends, the complete opposite happened. We had arrived at the restaurant and just ordered our food, and while waiting, I went outside to answer a phone call. I opened the door and assumed that there were at least 2-3 steps until the sidewalk, but there weren't any, just one largeeeeeeee drop off. I fell to the ground, rolled my ankle, and crashed it into the cement sidewalk. It was so bad that it immediately started swelling and I had to go to the Emergency Room. So, our first night in New Orleans, we spent it getting x-rays, crutches, finding an open pharmacy, and finished by icing my ankle for the rest of the night. Do I have the best luck or what? I mean, I guess I just like to make a big fat freakin' grand entrance wherever I go. Okay, the depressing start of my NYE vacation has come to an end, so let's get to that recipe. My Mountain Man's family always has a huge reunion Christmas party every year, and I knew I had to make a festive dessert to join in on the potluck. As we all know, my borderline-unhealthy relationship has taken over just about every type of dish you can think of, but I had yet to make red velvet brownies. I made them with the all classic "secret southern" ingredients Mama Jones used to make her red velvet cake with... red food coloring, white vinegar, buttermilk powder (instead of buttermilk for better brownie texture), and just a tad bit of mayo to keep it moist. After you mix up the batter, dump it into a prepared baking pan, bake them, and allow them to cool slightly... then you whip up my mother's easy-peasy chocolate fudge poured icing and drown the top of the red velvet brownies in a thick layer of sugary-chocolatey-heavenly goodness. While the fudge icing is beginning to set, yet still a little warm, scatter a thick layer of chopped up Ghirardelli white chocolate peppermint bark bars over the top. The peppermint will begin to melt as well, and that is the perfect time to top the white chocolate with some more crushed peppermint candies. All you gotta do now is wait for the icing and peppermint bark topping to set and firm up before lifting them out of the pan and cutting them into squares. I really think y'all are going to love these because you get to enjoy everything... layers of moist red velvet brownies, melt-on-your-tongue chocolate fudge icing, the texture of set peppermint bark, and the slight crunch/crackle/pop of the refreshing peppermint candies. Go on ahead and try to tell me who doesn't love red velvet + brownies + fudge frosting + peppermint bark... you can't because it's impossible :) So, it might be a little late to make now since the holiday season has passed us, but I could eat these bad boys all year long!! Enjoy :)


For the Red Velvet Brownies:
2 Large Eggs
2T Mayo
1 Stick of Unsalted Butter
2t Vanilla Extract
¼C Unsweetened Cocoa Powder (preferably high-quality)
Heavy Pinch of Salt (or to taste)
1T Red Food Coloring (or more until you reach your preferred, desired red color)
1t White Vinegar
¾C AP Flour 
2T Buttermilk Powder

For the Chocolate Fudge Icing:
1 Stick of Butter
1/3C Dark Cocoa Powder (preferably high-quality)
1 Box of Confectioners’ Sugar
1/3C Milk
Splash of Espresso
1t Vanilla
Pinches of Fleur de Sel, For Sprinkling (optional; but we love the balance)

For the Peppermint Bark Topping:
1-2C Chopped Ghirardelli White Chocolate Peppermint Bark (depending on your preference on how minty you want the brownies to taste, as well as how thick of a topping you want)
Extra Crushed Peppermint Candies, Crushed (for extra flavor and a nice crunch)

Directions:
1. Preheat your oven to 350 degrees and line 13x9 sized baking pan with foil (let it hang over top of pan) and spray with nonstick cooking/baking spray. Set it aside while you make the brownie batter.
2. For the Red Velvet Brownies: Whisk together the cocoa powder and boiling water together in large bowl until smooth. Add unsweetened chocolate and whisk until chocolate is melted. Whisk in melted butter and oil. (Mixture may look curdled.) Add eggs, yolks, and vanilla and continue to whisk until smooth and fully incorporated. Whisk in sugar until fully incorporated. Add flour and salt and mix with rubber spatula until combined.
3. Baking the Red Velvet Brownies: Scrape batter into prepared pan and bake until toothpick inserted halfway between edge and center comes out with just a few moist crumbs attached, 30 to 45 minutes (depending on the size of your pan and heat of your oven). Transfer the warm brownies to wire rack and let cool for 20-30 minutes.
4. To Make the Fudge Icing: Melt the butter in a large saucepan. Stir in the cocoa, keeping the mixture hot. Add in the remaining ingredients quickly and beat until smooth. Spread warm icing on the cooled brownies, and sprinkle with a little fleur del sel (optional).
5. Finishing the Brownies: While them icing begins to firm (yet is just slightly warm), scatter the chopped up white chocolate peppermint bark all over the fudge icing until you have a thick layer that begins to melt on top. Since the white chocolate is beginning to melt, sprinkle the tops of that with crushed up peppermint candies.
6. Serving the Brownies: Once the icing and peppermint back set, lift the brownies out of the pan, using the parchment paper, and cut them into squares. Serve immediately at y'all's Christmas parties!


Wednesday, January 16, 2013

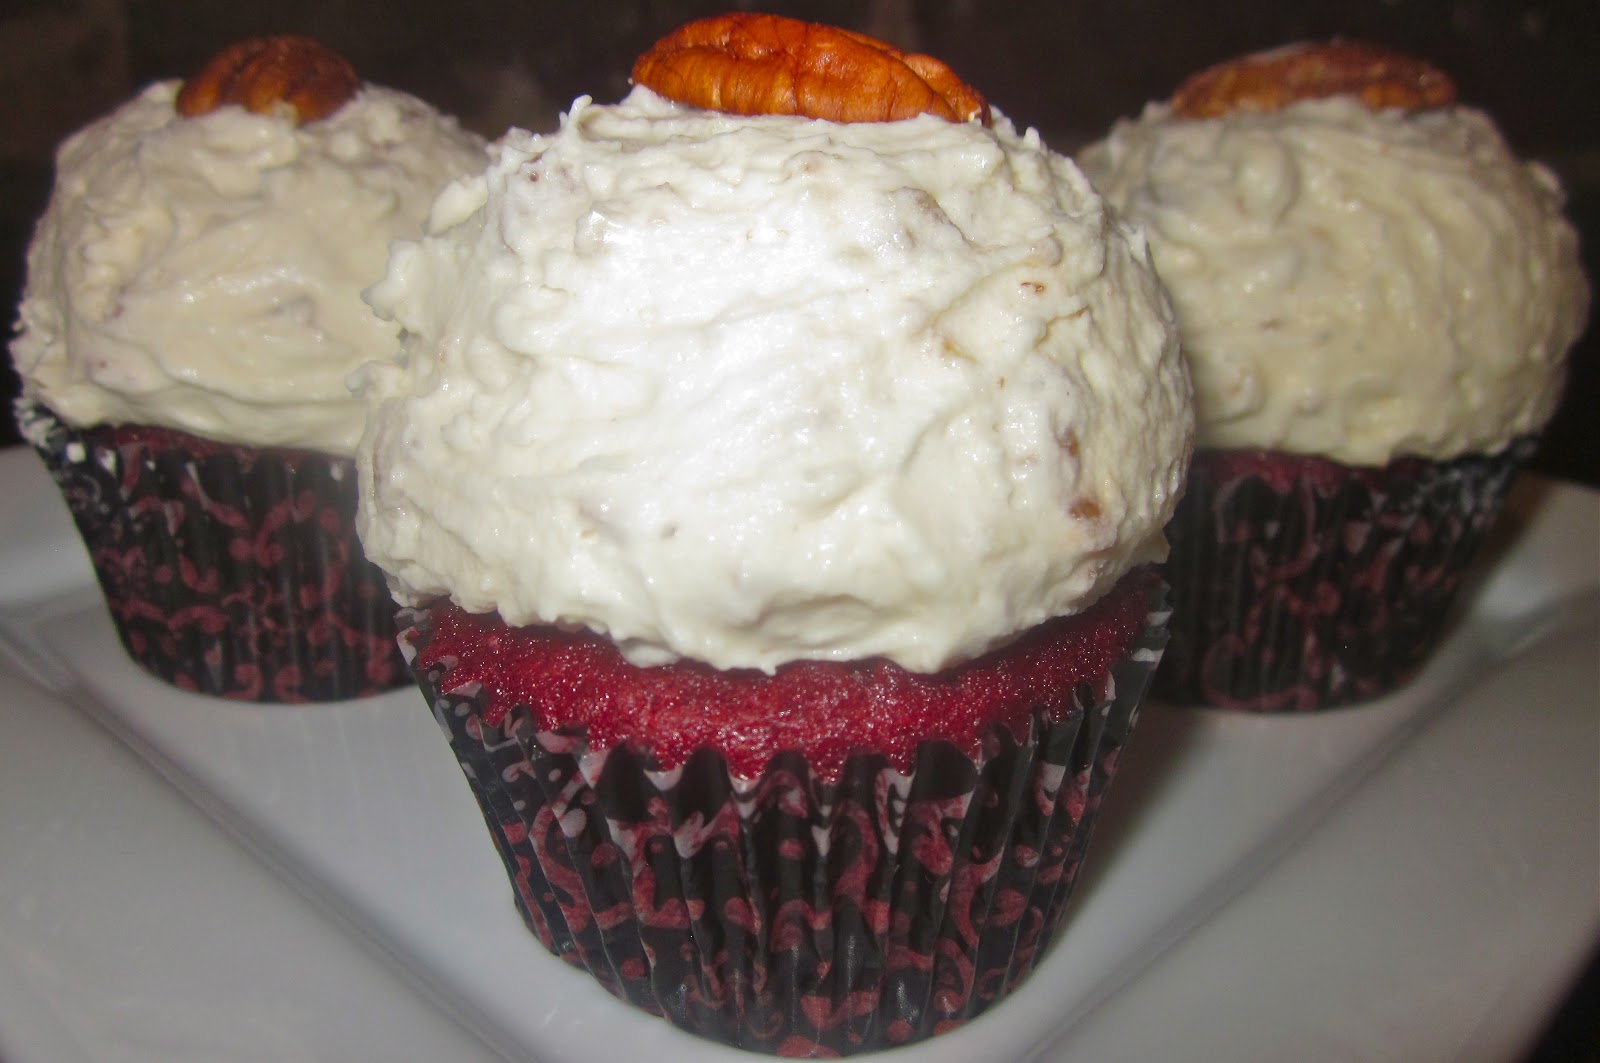
Classic Red Velvet Cupcakes with Whipped Cream Cheese-Pecan Frosting

Classic Red Velvet Cupcakes with Whipped Cream Cheese-Pecan Frosting
I consider myself a Red Velvet junkie or addict. I mean honestly, I've tried to make just about every recipe under the sun into a red velvet recipe. I've made red velvet crack pie, red velvet cookies, red velvet fried chicken, red velvet strawberry shortcake cake, red velvet cake truffles, red velvet whoopie pies, red velvet ebelskivers, rainbow velvet layer cake, red velvet gooey butter cake bars, and yall's personal favorite, red velvet cinnamon rolls. I might as well turn this into a red velvet blog at this rate. But, I noticed the other day that I didn't even have a classic red velvet cake recipe for y'all to make. That's just plain bat-shit crazy... excuse my french, but it is. These cupcakes are a go-to dessert for me. Whether it's a birthday party, tailgate, or holiday... these are usually at the top of my list. Everyone loves classic, good 'ole southern red velvet cupcakes. It's fool-proof. I like to mound a big fluffy pillow of frosting on top of my cupcakes and it most certainly, always has to be a cream cheese based frosting. I especially like this one because it is light & airy, but has that whipped decadence you want from an icing. And as any other southerner knows, pecans pretty much belong in any dessert, so I like to add finely chopped, toasted pecans into my frosting. I'm not too big on making my cupcakes look to gorgeous... I kind of like the homemade, rustic look, with a lot of frosting, ya know. The kinds that have an equal ratio of frosting to cake. That's my kind of cupcake, or you could just do like me, and eat it with a spoon. That'll work too!! Enjoy :)

For the Red Velvet Cupcakes:
2 ½C AP Flour
1 ½C Sugar
1t Baking Soda
1t Salt
1T Cocoa Powder
1 ½C Vegetable Oil
1C Buttermilk, Room Temperature
2 Large Eggs, Room Temperature
2T Red Food Coloring (1 oz)
1t White Distilled Vinegar
2t Vanilla

For the Whipped Cream Cheese-Pecan Frosting:
10T AP Flour
2C Milk
2t Vanilla
4 Sticks of Salted Butter (or you can use unsalted and just add salt to taste)
2C Sugar
16oz Whipped Cream Cheese
1-2C Toasted Pecans, Finely Chopped (you can decide how much pecans are in it)

Directions:
1. Preheat the oven to 350 degrees and line two cupcake pans with cupcake liners. This recipe makes roughly 24 cupcakes.
2. For the Red Velvet Cupcakes: In a large bowl, sift together the flour, sugar, baking soda, salt, and cocoa powder. In another large bowl, whisk together the oil, buttermilk, eggs, food coloring, vinegar, and vanilla. Using a standing mixer, mix the dry ingredients into the wet ingredients until just combined and a smooth batter is formed. Divide the batter evenly among the cupcake tins about 2/3 filled (I did this by using a large ice cream scoop to make sure there was an even amount of batter in each cupcake liner). Bake in oven for about 20 to 22 minutes, turning the pans once, half way through. Test the cupcakes with a toothpick for doneness. Remove from oven and cool completely before frosting.
3. For the Whipped Cream Cheese-Pecan Frosting: In a small saucepan, whisk flour into milk and heat, stirring constantly, until it thickens. You want it to be very thick, thicker than cake mix, more like a brownie mix is. Remove from heat and let it cool to room temperature. (If I’m in a hurry, I place the saucepan over ice in the sink for about 10 minutes or so until the mixture cools.) It must be completely cool before you use it in the next step. Stir in vanilla. While the mixture is cooling, cream the butter and sugar together until light and fluffy. You don’t want any sugar graininess left. Then add the completely cooled milk/flour/vanilla mixture and beat the living daylights out of it. If it looks separated, you haven’t beaten it enough! Beat it until it all combines and resembles whipped cream. Once it has reached the consistency you liked, gently adding in the whipped cream cheese and beating to combine. It should be fluffy and light, but smooth. Right before you are ready to serve, fold in the finely chopped, toasted pecan bits.
4. Assembling the Cupcakes: Using a large ice cream scoop, gather the frosting and plop it on top of the cooled cupcake. You can also do any decorative work that you like, but I like my cupcakes to look homemade and rustic. You can also top your cupcakes with a whole toasted pecan, pecan bits, or sprinkles if you like. Enjoy these little cakes at your next tailgate :)

Tuesday, July 10, 2012

Mixed Berry Shortcake Layer Cake with Fresh Berries, Lemon Soaking Syrup, & Whipped Mascarpone Frosting

Mixed Berry Shortcake Layer Cake with Fresh Berries, Lemon Soaking Syrup, & Whipped Mascarpone Frosting
I know that the Fourth of July has come and passed us now, but I still have one more festive recipe to post. For our meal on the 4th, we enjoyed jello shots & fried chicken and this cake for dessert. This cake is so simple, yet so flavorful. Sometimes you don't want a cake with a bunch of crazy components... you just want a vanilla cake with a bunch of fresh berries and a killer frosting. I mean the frosting was divine. I used  this frosting as the base, but I added in a whole bunch of mascarpone, so it's like ten times better than before. We were literally eating it with a spoon. And it might seem like there's a lot of the frosting on the cake, but trust me, you want it there. I love the balance of flavors in this cake. And hey, it's patriotic to boot! I know I'm a little late, but it'd be a great cake for next year's celebration!! Enjoy :)


For the Vanilla Cake:
5 Large Egg Whites, Room Temperature
¾C Whole Milk, Room Temperature
1 Lemon, Zested
2 ¼t Vanilla
2 ¾C Cake Flour, Sifted
1 ¾C Sugar
1T + 1t Baking Powder
¾t Salt
12T Unsalted Butter, Room Temperature & Cut into Cubes

For the Lemon Soaking Syrup:
¼C Sugar
3T Fresh Lemon Juice

For the Whipped Mascarpone Frosting:
10T AP Flour
2C Milk
2t Vanilla
4 Sticks of Salted Butter (or you can use unsalted and just add salt to taste)
2C Sugar
16oz Mascarpone

For the Mixed Berry Shortcake:
Prepared Three Layers of Vanilla Cake
Prepared Whipped Mascarpone Frosting
Lemon Soaking Syrup
Fresh Blueberries, Blackberries, Strawberries, & Raspberries, For Garnishing

Directions:
1. Preheat the oven to 350 degrees and line 3 round cake pans with parchment paper and spray with Pam and set aside.
2. For the Cake: In a medium bowl, combine and stir the egg whites, ¼C of milk, lemon zest, and the vanilla. Set it aside. In the bowl of an electric mixer, fitted with the paddle attachment, combine the dry ingredients together on low speed for 30 second. Add the butter and remaining ½C of milk, and mix on low speed until just moistened. Increase to medium speed and mix for 1½ minutes. Scrape the side of the bowl and begin to add in the egg mixture in 3 separate batches; beat on medium speed for 20 seconds after each addition. Divide the batter evenly into the three prepared cake pans. Bake each cake for 15-20 minutes or until a toothpick comes out clean when inserted into the center (do not over-bake). Let the cakes cool on racks for 10 minutes before loosening the sides with a knife, and invert onto greased wire racks.
3. For the Lemon Soaking Syrup: In a small bowl, combine the sugar and lemon juice, stir with a fork until the sugar dissolves. Set it aside until ready to use.
4. For the Whipped Mascarpone Frosting: In a small saucepan, whisk flour into milk and heat, stirring constantly, until it thickens. You want it to be very thick, thicker than cake mix, more like a brownie mix is. Remove from heat and let it cool to room temperature. (If I’m in a hurry, I place the saucepan over ice in the sink for about 10 minutes or so until the mixture cools.) It must be completely cool before you use it in the next step. Stir in vanilla. While the mixture is cooling, cream the butter and sugar together until light and fluffy. You don’t want any sugar graininess left. Then add the completely cooled milk/flour/vanilla mixture and beat the living daylights out of it. If it looks separated, you haven’t beaten it enough! Beat it until it all combines and resembles whipped cream. Once it has reached the consistency you liked, gently adding in the mascarpone and beating to combine. It should be fluffy and light, but smooth.

Thursday, March 29, 2012

Birthday Cake Batter Ice Cream with Gooey Butter Cake Bites & Rainbow Buttercream Pieces

As I sit outside in the hot weather, I'm totally hating that I have to be at school all day. It's literally 85 degrees and perfect for a day out at the beach. Instead of focusing on classes, all I can think about is some fruity cocktails and some yummy ice cream. But, unfortunately for me, I'm enjoying a tall glass of a protein smoothie with a side of carrots. Delicious, right? Absolutely not. So, as I sit here and pity myself, I knew that I just had to post my recipe for Birthday Cake Batter Ice Cream with Gooey Butter Cake Bites & Rainbow Buttercream Pieces. I have this ice cream sitting in my freezer at home and I all that's running through my mind is how I can get my hands on some it. But, I can't... or at least not until 6:30. This amazing ice cream is a cake batter custard base, which is usually enough on its own. No no no, that will not work for me, I have to add in wayyyy more stuff. So I baked up a gooey butter cake and cut it into little cubes and tossed those in. Next, I made homemade buttercream and dyed it with all colors of the rainbow and froze them. Once they were solid and slightly hard, I tossed those into the base as well. Lastly, you gotta add some rainbow sprinkles because it would not be birthday cake without some damn sprinkles. This ice cream is a technicolor dream. It's literally the best treat you can have at the end of a long, hot day. If you're a sucker for cake batter, make it. Make it now. And once you make it, put a big scoop on an sugar cone and go at it (before it melts all over your hands). You'll seriously be in heaven!! Enjoy :)
Birthday Cake Batter Ice Cream in a Cone
Starting to melt...
Birthday Cake Batter Ice Cream with Gooey Butter Cake Bites & Rainbow Buttercream Pieces
So excited to dig in to his ice cream after a day at the beach!
For the Gooey Butter Cake Chunks:
1 Box of Golden Butter Cake Mix
1 Egg
1 Stick of Butter, Melted
2T Milk
8oz Cream Cheese, Softened
2 Eggs
1 Box of Confectioners’ Sugar
1t Vanilla

For the Rainbow Buttercream Pieces:
1C Homemade Icing (either Buttercream or cream cheese)
Different Color Dyes (for the rainbow effect)

For the Cake Batter Ice Cream:
4C Heavy Cream, Divided
1C White Cake Mix
1C Sugar
¼t Salt
6 Egg Yolks 
1T Vanilla
3C Whole Milk
2C Prepared Gooey Butter Cake Chunks
Prepared Rainbow Buttercream Pieces
½-1C Rainbow Sprinkles

Directions:
1. For the Gooey Butter Cake Chunks: Preheat the oven to 350 and spray a pan with Pam, then set aside. In a medium mixing bowl, mix together the cake mix, egg, melted butter, and milk until combined. Press the dough into the prepared pan, so that there is an even layer. In another mixing bowl, beat together the cream cheese, eggs, sugar, and vanilla until smooth and creamy. Pour over the cake. Bake in the oven for 30-45 minutes until the middle has barely set (do not over bake). Let the cake completely cool before cutting into bite size chunks. Set the cake chunks aside until you are ready to fold them in to the cake base.
2. For the Rainbow Buttercream Pieces: To prepare your Buttercream to be used in the ice cream, put a small amount in a piping bag and pipe Buttercream lines onto a cutting board covered in cling film. I used different colored dyes to make different batches of rainbow icing; however, you can just chose one color if you like. Put the cutting board in the freezer for an hour or two so the icing can freeze.  Using a sharp knife, cut the Buttercream icing lines into 1/2 inch (approx 1cm) pieces, transfer to a small dish and pop them back in the freezer until you’re ready to fold them into the ice cream base.
3. For the Cake Batter Ice Cream: In a medium saucepan, combine 2 cups of the heavy cream with the white cake mix, sugar, and salt.  Heat over medium heat until warmed through.  Meanwhile, place the egg yolks in a medium bowl and whisk until smooth.  Combine the remaining heavy cream, vanilla, and whole milk in a large mixing bowl with a fine mesh sieve set over the top. When the mixture in the saucepan is warm, slowly pour a small amount into the bowl with the egg yolks to temper them, whisking constantly.  Continue pouring the cream mixture in a steady stream, whisking continuously until completely combined.  Return the mixture to the saucepan over medium heat.  Continue heating, stirring and scraping the bottom of the pan, until the mixture thickens slightly and reads 170-175˚F on an instant-read thermometer. Immediately pour the custard mixture through the mesh sieve into the bowl with the remaining cream and milk and mix to blend.  Cover and chill the mixture thoroughly in the refrigerator.  Once the mixture is chilled through, freeze in an ice cream maker according to the manufacturer’s instructions. At the end of the freezing process, fold in the gooey butter cake chunks, rainbow Buttercream pieces, and sprinkles until the ingredients are mixed throughout. Store in an airtight container in the freezer for at least 3 hours before enjoying.


Sunday, February 12, 2012

Red Hot Velvet Cinnamon Rolls with Cinnamon-Cream Cheese Frosting

PLEASE REFER TO THE NEW REVAMPED VERSION OF THESE RED HOT VELVET CINNAMON ROLLS HERE!! THEY ARE PERFECTION :)

Here's an early Valentine's Day for all you lovers out there... Red Hot Velvet Cinnamon Rolls with Cinnamon-Cream Cheese Frosting!! They are a play off of one of our favorite recipes, Red Hot Velvet Whoopie Pies with Cinnamon-Cream Cheese Frosting. That combination was so delicious before, so why  not use it again? Well, this time I applied it to everyone's favorite breakfast treat, cinnamon rolls. I made the dough with classic red velvet ingredients... buttermilk, white vinegar, red food coloring, and just a little bit of cocoa powder. I let the dough rest overnight, and then I rolled them out this morning and filled them with melted butter, sugar, and lots of cinnamon. I cut them into 12 large rolls, but you could easily make smaller ones if you would like, but what's the fun in that? The cinnamon rolls are slathered in a tangy cinnamon-cream cheese frosting, which just makes them that much better. Duh. These Red Velvet Cinnamon Rolls are little bit cake-ier than the classic recipes, but still delicious! I love the bright color, it just screams "love" doesn't it? I hope you will enjoy these will someone you love because I am right now, and they are wonderful!! Enjoy :)
Red Hot Velvet Cinnamon Rolls 
Up Close
A Thick Layer of Cinnamon-Cream Cheese Frosting
Red Hot Velvet Cinnamon Rolls with Cinnamon-Cream Cheese Frosting
Ready to Eat!!
For the Cinnamon Rolls:
2C Buttermilk (minus 2T)
2T White Distilled Vinegar
½C Vegetable Oil
½C Sugar
2-3oz Red Food Coloring (or to the color of your liking)
1 Package of Active Dry Yeast (0.25oz Packets)
3 ¾C AP Flour + ½C AP Flour
¼C Unsweetened Cocoa Powder
½t Baking Powder, Heaping
½t Baking Soda, Scant
1t Salt, Heaping

For the Filling:
1-2C Butter, Melted or Completely Softened**
1C Sugar
Generous Sprinkling of Cinnamon

For the Frosting:
8oz Cream Cheese, Room Temperature
2C Confectioners’ Sugar
Cinnamon (to your liking)
1 Stick of Unsalted Butter, Room Temperature
½t Vanilla
Festive Valentine’s Day Sprinkles & Crushed Red Hot Candies, For Decoration

Directions:
1. For the Rolls: Measure out the 2C buttermilk in a large measuring cup, and then remove 2T of the buttermilk and substitute by adding in the 2T of white vinegar. Mix the buttermilk, vinegar, vegetable oil, sugar, and red food coloring in a pot. Heat the mixture until just before the boiling point. Turn off the heat and leave to cool for 45 minutes to an hour. Meanwhile, sift together the 3 ¾C AP flour with the ¼C unsweetened cocoa powder, and set it aside. When the milk mixture is warm (but not hot), sprinkle in the package of yeast. Let it sit for a minute or two, and then add in the sifted flour-cocoa powder. Stir the mixture and cover, and then let it rise for at least an hour.
2. After rising for an hour, add in ½C AP Flour, baking powder, baking soda, and salt. Stir the mixture together. Refrigerate the dough overnight to help it become firm and better for presentation.
3. The next day, sprinkle a rolling surface generously with flour. Take the dough and form a rough rectangle, and then roll the dough out to about ¼-½inch thick (depending on your preference), while making sure to maintain a rough rectangular shape from before. Once rolled out, proceed to the filling step.
4. For the Filling: Smear or spread on the amount of butter you prefer over your rectangular dough, either one to two cups. I used 1C of the very soft butter (but some people prefer melted, I find that melted butter is more messy and harder to work with). Now, sprinkle 1C of sugar over the butter, followed by a generous sprinkling of cinnamon (this is up to how much cinnamon you like, we like a lot).
5. Now, starting at the opposite end, begin rolling the dough in a neat line toward you. Keep the roll relatively tight as you go. Next, pinch the seam of the roll to seal it. Spray a 13x9-baking pan with Pam, and set it aside. Then, begin cutting the rolls into approximately 10-12 thick round rolls and place them into the prepared buttered pans. Let the rolls rise for an hour.
6. Preheat the oven to 375 degrees.
7. Bake the cinnamon rolls for 15-20 minutes or until light golden brown.
8. To Make the Frosting: Mix together all of the ingredients and stir well until smooth. Generously drizzle over the warm rolls. 
9. Serve immediately and enjoy while they are still warm. 

PLEASE REFER TO THE NEW REVAMPED VERSION OF THESE RED HOT VELVET CINNAMON ROLLS HERE!! THEY ARE PERFECTION :)

**This is where you need to make a decision. I myself prefer to work with very, very soft butter because every time I have used melted butter, the buns turn out very messy and hard to roll, etc. But, I know that other cooks, like the Pioneer Woman and Paula Deen prefer melted. It is truly up to you. I also referred to a few recipes and many of them used up to TWO CUPS of butter for their rolls. I didn't want to use that amount (because it would get messy and I felt that it was not necessary), so I only used 1C of butter, but if you feel that you need a little more, then you can obviously do so. When it comes to cinnamon, we like a lot, but this once again comes to taste, so use your best judgement and whether or not you like a good bit of cinnamon (keep in mind that the frosting does have cinnamon as well). Another method that I have recently tried and liked is making a compound butter to spread between the rolls. I cream together the very soft butter, sugar, and cinnamon (and sometimes a little more cocoa powder for an extra chocolate-y taste) in a standing mixer until light, fluffy, and completely incorporated and gently spread/smear that compound butter on the dough. I preferred this because the sugar and cinnamon do not fall out like I have experienced in the past. So, I would urge you to give that a try because I really do think the rolls have a better presentation. I hope that this can clear up any misunderstandings regarding the recipe. Please comment below if there are any questions that need to be answered. XOXO, Juliana (9/23/12)**


source: cinnamon rolls

Red Hot Velvet Cinnamon Rolls with Cinnamon-Cream Cheese Frosting

Here's an early Valentine's Day for all you lovers out there... Red Hot Velvet Cinnamon Rolls with Cinnamon-Cream Cheese Frosting!! They are a play off of one of our favorite recipes, Red Hot Velvet Whoopie Pies with Cinnamon-Cream Cheese Frosting. That combination was so delicious before, so why  not use it again? Well, this time I applied it to everyone's favorite breakfast treat, cinnamon rolls. I made the dough with classic red velvet ingredients... buttermilk, white vinegar, red food coloring, and just a little bit of cocoa powder. I let the dough rest overnight, and then I rolled them out this morning and filled them with melted butter, sugar, and lots of cinnamon. I cut them into 12 large rolls, but you could easily make smaller ones if you would like, but what's the fun in that? The cinnamon rolls are slathered in a tangy cinnamon-cream cheese frosting, which just makes them that much better. Duh. These Red Velvet Cinnamon Rolls are little bit cake-ier than the classic recipes, but still delicious! I love the bright color, it just screams "love" doesn't it? I hope you will enjoy these will someone you love because I am right now, and they are wonderful!! Enjoy :)
Red Hot Velvet Cinnamon Rolls 
Up Close
A Thick Layer of Cinnamon-Cream Cheese Frosting
Red Hot Velvet Cinnamon Rolls with Cinnamon-Cream Cheese Frosting
Ready to Eat!!
For the Cinnamon Rolls:
2C Buttermilk (minus 2T)
2T White Distilled Vinegar
½C Vegetable Oil
½C Sugar
2-3oz Red Food Coloring (or to the color of your liking)
1 Package of Active Dry Yeast (0.25oz Packets)
3 ¾C AP Flour + ½C AP Flour
¼C Unsweetened Cocoa Powder
½t Baking Powder, Heaping
½t Baking Soda, Scant
1t Salt, Heaping

For the Filling:
1-2C Butter, Melted or Completely Softened**
1C Sugar
Generous Sprinkling of Cinnamon

For the Frosting:
8oz Cream Cheese, Room Temperature
2C Confectioners’ Sugar
Cinnamon (to your liking)
1 Stick of Unsalted Butter, Room Temperature
½t Vanilla
Festive Valentine’s Day Sprinkles & Crushed Red Hot Candies, For Decoration

Directions:
1. For the Rolls: Measure out the 2C buttermilk in a large measuring cup, and then remove 2T of the buttermilk and substitute by adding in the 2T of white vinegar. Mix the buttermilk, vinegar, vegetable oil, sugar, and red food coloring in a pot. Heat the mixture until just before the boiling point. Turn off the heat and leave to cool for 45 minutes to an hour. Meanwhile, sift together the 3 ¾C AP flour with the ¼C unsweetened cocoa powder, and set it aside. When the milk mixture is warm (but not hot), sprinkle in the package of yeast. Let it sit for a minute or two, and then add in the sifted flour-cocoa powder. Stir the mixture and cover, and then let it rise for at least an hour.
2. After rising for an hour, add in ½C AP Flour, baking powder, baking soda, and salt. Stir the mixture together. Refrigerate the dough overnight to help it become firm and better for presentation.
3. The next day, sprinkle a rolling surface generously with flour. Take the dough and form a rough rectangle, and then roll the dough out to about ¼-½inch thick (depending on your preference), while making sure to maintain a rough rectangular shape from before. Once rolled out, proceed to the filling step.
4. For the Filling: Smear or spread on the amount of butter you prefer over your rectangular dough, either one to two cups. I used 1C of the very soft butter (but some people prefer melted, I find that melted butter is more messy and harder to work with). Now, sprinkle 1C of sugar over the butter, followed by a generous sprinkling of cinnamon (this is up to how much cinnamon you like, we like a lot).
5. Now, starting at the opposite end, begin rolling the dough in a neat line toward you. Keep the roll relatively tight as you go. Next, pinch the seam of the roll to seal it. Spray a 13x9-baking pan with Pam, and set it aside. Then, begin cutting the rolls into approximately 10-12 thick round rolls and place them into the prepared buttered pans. Let the rolls rise for an hour.
6. Preheat the oven to 375 degrees.
7. Bake the cinnamon rolls for 15-20 minutes or until light golden brown.
8. To Make the Frosting: Mix together all of the ingredients and stir well until smooth. Generously drizzle over the warm rolls. 
9. Serve immediately and enjoy while they are still warm. 

**This is where you need to make a decision. I myself prefer to work with very, very soft butter because every time I have used melted butter, the buns turn out very messy and hard to roll, etc. But, I know that other cooks, like the Pioneer Woman and Paula Deen prefer melted. It is truly up to you. I also referred to a few recipes and many of them used up to TWO CUPS of butter for their rolls. I didn't want to use that amount (because it would get messy and I felt that it was not necessary), so I only used 1C of butter, but if you feel that you need a little more, then you can obviously do so. When it comes to cinnamon, we like a lot, but this once again comes to taste, so use your best judgement and whether or not you like a good bit of cinnamon (keep in mind that the frosting does have cinnamon as well). Another method that I have recently tried and liked is making a compound butter to spread between the rolls. I cream together the very soft butter, sugar, and cinnamon (and sometimes a little more cocoa powder for an extra chocolate-y taste) in a standing mixer until light, fluffy, and completely incorporated and gently spread/smear that compound butter on the dough. I preferred this because the sugar and cinnamon do not fall out like I have experienced in the past. So, I would urge you to give that a try because I really do think the rolls have a better presentation. I hope that this can clear up any misunderstandings regarding the recipe. Please comment below if there are any questions that need to be answered. XOXO, Juliana (9/23/12)**


source: cinnamon rolls

Friday, September 23, 2011

Rainbow Chip Birthday Layer Cake

I have the most wonderful neighbor, I actually call her my roommate sometimes, even though we don't live with each other... but she lives above me in the same townhouse, and we're only separated by a door, so she's kind of one. Anyway, it was her birthday in July, and I missed her birthday celebration :( So, once she came back into town for school, I promised her that I would bake her a birthday cake. Oddly enough, I had been wanting to make a homemade funfetti-rainbow chip birthday cake for a while, and that's one of her favorite cakes, so it was perfect! Rainbow chip icing is my absolute favorite, like that's the only icing that will actually buy from the store and use. I just love those little pieces hidden in my icing. And then I stumbled across a recipe for HOMEMADE rainbow chips. Um yes please?!? Well, I couldn't just do one cake flavor (I have a tendency of making different cake layers), so I did layers of rainbow chip poundcake & chocolate chip-chocolate poundcake with rainbow chip-cream cheese frosting. I know so many things in one little cake... but that's how I like my cakes, okay? Got it? Good. Well, I definitely suggest you make this for someone's birthday very soon because it was so delicious! Enjoy :) Oh and happy late birthday Kate!!
Lots of Rainbow Chips & Sprinkles!!
See all them chips hidin' in the icing... that's yumminess. 
Rainbow makes everything better
Chocolate Chip-Chocolate Poundcake & Rainbow Chip Poundcake with Rainbow Chip-Cream Cheese Frosting

For the Rainbow Chips
2 11oz Bags of White Chocolate Chips
Food Coloring (pick your favorite colors)

For the Cream Cheese Poundcake Layers:
1 ½ Sticks of Unsalted Butter, Softened
1 8oz Package of Cream Cheese, Softened
1 ½C Sugar
3 Large Eggs, Room Temperature  
1 ½C AP Flour
Pinch of Salt
2t Vanilla
1C (heaping) Prepared Rainbow Chips

For the Chocolate-Chocolate Chip Cream Cheese Poundcake Layers:
1 ½ Sticks of Unsalted Butter, Softened
1 8oz Package of Cream Cheese, Softened
1 ½C Sugar
3 Large Eggs, Room Temperature  
1 ½C AP Flour
½C Cocoa Powder
Pinch of Salt
2t Vanilla
1C (heaping) Mini Chocolate Chips

For the Rainbow Chip-Cream Cheese Frosting:
4 8oz Packages of Cream Cheese, Softened
2 Sticks of Butter, Softened
4C Confectioners’ Sugar, Sifted
2t Vanilla
2C Prepared Rainbow Chips

For the Cake:
2 Prepared Rainbow Chip Cream Cheese Poundcake Layers
2 Prepared Chocolate-Chocolate Chip Cream Cheese Poundcake Layers
Prepared Rainbow Chip-Cream Cheese Frosting
Rainbow Chips, For Garnishing
Sprinkles, For Garnishing

Directions:
1. To Make the Rainbow Chips: In a microwave safe bowl, melt the white chocolate in 20-second intervals. Stir well. Continue to heat until all the chips are melted. Divide the melted white chocolate into small bowls, and add 5-7 drops of colors into each bowl. Stir to combine. The white chocolate will seize up a bit but it should still be pliable. On a baking sheet, covered with parchment paper, empty out each bowl of the colored chocolate. Using an offset spatula form it into a rough rectangle about ¼inch thick. Place into the freezer for about 10-15 minutes or until set. Once set, chop up each color into little pieces and set aside.
2. To Make the Rainbow Chip-Cream Cheese Poundcake: Preheat the oven to 300 degrees and spray 2 cake pans with Pam and set them aside. In an electric mixer, beat the butter and cream cheese at medium speed until creamy, about 2-3 minutes. Gradually add in the sugar, beating well. Add in the eggs, one at a time, until each egg is completely incorporated before adding the next; beat until just combined. Combine the flour and salt in a small bowl, and then gradually add it to the butter mixture, beating at a low speed just until blended after each addition. Stir in the vanilla. Fold in the prepared rainbow chips. Pour the batter into the two prepared pans and bake for about 45 minutes to an hour each, or until a toothpick inserted in the center comes out clean. Cool in the pan for 10-15 minutes and then invert on a wire rack to cool completely (before layering).
3. To Make the Chocolate-Chocolate Chip Cream Cheese Poundcake: Preheat the oven to 300 degrees and spray 2 cake pans with Pam and set them aside. In an electric mixer, beat the butter and cream cheese at medium speed until creamy, about 2-3 minutes. Gradually add in the sugar, beating well. Add in the eggs, one at a time, until each egg is completely incorporated before adding the next; beat until just combined. Combine the flour, cocoa powder, and salt in a small bowl, and then gradually add it to the butter mixture, beating at a low speed just until blended after each addition. Stir in the vanilla. Fold in the mini chocolate chips. Pour the batter into the two prepared pans and bake for about 45 minutes to an hour each, or until a toothpick inserted in the center comes out clean. Cool in the pan for 10-15 minutes and then invert on a wire rack to cool completely (before layering).
4. To Make the Rainbow Chip-Cream Cheese Frosting: In a medium mixing bowl, cream together the cream cheese and butter until light and fluffy. Mix in the vanilla, and then gradually stir in the confectioners’ sugar. Fold in the rainbow chips.
5. To Layer the Cake: Place 1 layer of the rainbow chip-cream cheese Poundcake, rounded side down, in the middle of a cake stand. Using a spatula spread a thick layer of cream cheese frosting on top of the cake and sprinkle some more rainbow chips on top. Carefully set 1 layer of chocolate-chocolate chip cream cheese Poundcake, rounded side down, on top of the frosting and spread another thick layer of frosting and rainbow chips. Repeat this pattern until all the cake layers have been used. Once you have finished layering & stacking the cake, spread this softened cream cheese frosting over the entire cake. This first layer of cream cheese frosting should be very thin (make sure to scrape of excess with a knife). Place the cake in the refrigerator for an hour to harden. By doing this, this will form a hard layer around the cake, which will help with the cake crumbs to not be visible in your frosting. Remove the cake from the refrigerator and spread the remaining cream cheese frosting over the cake in a thick coating (make sure it is even and smooth). Once all the frosting has been used, garnish with sprinkles and more rainbow chips.
6. Refrigerate the cake for 30 minutes to set up the frosting, but then let the cake come to room temperature for 15-20 minutes before eating.
7. Serve and enjoy your beautiful cake!