Saturday, December 24, 2011

Christmas Cranberry Sangria

I've got to keep this short & sweet since it's Christmas Eve n' all!! Happy holidays to everyone out there, and I hope that you are having a blast with your family and friends. We're actually enjoying this drink right now as I type and it really is just perfect for a Christmas party or a family meal. It's easy to make and definitely easy to slurp down!! Enjoy :)
Christmas Cranberry Sangria with Vanilla Bean
For the Sangria:
1 Large Orange, Sliced
1 Large Apple, Chopped
1 Large Pear, Chopped
12oz Bag of Fresh Cranberries
2 Cinnamon Sticks
2 Vanilla Beans
1 ½C Bottles of Red Wine
2C of Sparkling Cranberry Soda
½C Brandy
½C Sugar
1T Vanilla

Directions:
1. Add orange slices, apples, pears, cinnamon sticks and cranberries to the bottom of a big pitcher. Pour wine, cranberry soda, brandy, sugar and vanilla extract over top. Scrape vanilla beans out of their pods and add to the mix. Then throw the entire empty vanilla beans in. Mix with a giant spoon to really combine everything.
2. Place in the fridge for about 1 hour before serving. Taste to determine if you’d like more sugar, and if so – add it! Spoon some of the fruit into glasses before pouring, then add ice and sangria on top. 


source: winter sangria

Thursday, December 22, 2011

Peppermint Bark Mint Oreos

Another day... another type of Oreo. However, these are the real Oreos and way easier!! I wanted to make more Christmas cookies, but I wanted something easy, and this is pretty dang simple. I bought a bag of mint Oreos (because they are the best everrrr), and I covered them in chocolate, sprinkled them with a little fleur de sel, topped them with white chocolate & some crushed peppermint. I know they are nothin' extravagant, but they are still quite tasty. Next year, I'm going to make this recipe, but instead I want to make a Girl Scout "Thin Mint" cookie and top it with the same peppermint bark topping. Yummmm. Is it sad I'm already looking forward to next year's Christmas? Probably!! Oh well, enjoy :)
Peppermint Bark Mint Oreos
So festive :)
For the Peppermint Bark Mint Oreos:
1 Bag of Mint Oreos
Milk Chocolate Bark, Melted
Fleur de Sel, For Sprinkling
White Chocolate Bark or Candy Cane Hershey Kisses, Melted
Red & Green Dye (optional)
Peppermint Candies, Crushed

Directions:
1. Melt the milk chocolate bark in a large mixing bowl until smooth. Dip each cookie into the melted chocolate, turn with a fork to coat, and then shake the excess chocolate off by slightly banging the cookie against the side of the bowl (this will help the cookie to not develop a ring around itself). Transfer the cookies to parchment paper to set up until hard. Before they harden, sprinkle with a little fleur de sel.
2. Once the milk chocolate coating has set, melt the white chocolate in another mixing bowl until smooth. Spoon the white chocolate on top of the milk chocolate-fleur de sel into a thick layer. If you are going to use dye, drop 1-2 drops of each color dye on top of the white chocolate, and using a toothpick, swirl the colors to make a pretty design on top (however, you can skip this for a plain cookie). Garnish with crushed peppermint candies to your liking.
3. Let the white chocolate harden on top, and then enjoy!

Tuesday, December 20, 2011

Gourmet Gingerbread Men "Oreos" with Eggnog Ganache

Here's another Christmas cookie recipe for your enjoyment... my Gingerbread Men "Oreos" with Eggnog Ganache. Honestly, when I think of Christmas, the first things that pop into my head are gingerbread cookies & drinking eggnog. The funny coincidence is that I really dislike eggnog, like I absolutely can not drink the stuff. The thick texture just really puts me off; however, I love the flavor and the idea of using it in Christmas baking. And one of my all-time favorites during the holidays are gingerbread cookies. I love their spicy flavor, deep molasses sweetness, and crispy texture. So, I knew that I just had to "spice" up these cookies at little bit more, and I immediately thought about making gingerbread men into Oreo-type cookies with some kind of velvety filling. The gingerbread cookies are similar in texture to the chocolate wafer that is popular in Oreos, so I knew that it would work out perfectly. As for the filling, I had to make an Eggnog Ganache with some gourmet eggnog, white chocolate, and a little nutmeg. Because the ganache can be somewhat temperamental, it is a little difficult to pipe or spread onto the many edges of the gingerbread men cutouts (as opposed to a simple round disc, like an Oreo), so if you would prefer to make square or circular cookie sandwiches, it would probably be easier, but not as visually appealing. But, just work with it, take your time, and spread it on as best as you can, following the lines of the men. Also, keep the cookies refrigerated, so that the filling will stay firm & not spill over the edges. Lastly, make sure to use a mini gingerbread men cookie cutter because two large cookies sandwiched together would be huge and not as cute, which is veryyyyy important... right?! Anyway, enjoy this taste of the season because Christmas is close to being over, and it will be another whole year before we can make them again!!
All of the Gingerbread Men "Oreos" Lined Up
Sprinkle them with a little bourbon vanilla sugar for presentation 
Close Up of the Gingerbread Men "Oreos" with Eggnog Ganache
For the Gingerbread Men:
2C AP Flour (plus more for rolling)
2t Ground Ginger
1t Ground Cinnamon
½t Ground Nutmeg
¼t Ground Cloves
¼t Baking Soda
¼t Salt
1 Stick of Unsalted Butter, Room Temperature
1/3C Dark Brown Sugar, Packed
1/3C Molasses, Unsulfured
1 Large Egg

For the Eggnog Ganache:
16oz White Chocolate, Finely Chopped
1C Eggnog
Ground Nutmeg

Directions:
1. To Make the Eggnog Ganache: Place the chopped white chocolate in a bowl. Put the eggnog in a small saucepan and heat until it just begins to bubble around the edges. Pour the hot eggnog over the white chocolate and let it melt for a few minutes. Whisk the mixture carefully until it is smooth and mixed. Sprinkle the nutmeg over the mixture and stir until mixed. Cover the top of the bowl with plastic wrap and allow it to cool to room temperature. Once it is lukewarm, place it in the refrigerator to firm up for at least 4 hours or preferably overnight.
2. To Make the Cookie Dough: In a medium bowl, whisk together flour, spices, baking soda, and salt; set aside. With an electric mixer, beat butter and brown sugar until smooth. Beat in molasses and egg. With mixer on low, add dry ingredients; mix just until the dough forms. Place dough on floured plastic wrap; pat into an 8-inch square. Wrap well; chill until firm, 1 to 2 hours.
3. Preheat oven to 350 degrees. Divide dough in half. Working with one half at a time (rewrap and refrigerate other half), place dough on floured parchment or waxed paper; roll out 1/8 inch thick, turning, lifting, and flouring dough (and rolling pin) as needed. Freeze dough (on paper) until firm, about 20 minutes. Loosen dough from paper. Cut out mini-gingerbread men shapes (or an easier shape if preferred), and transfer to baking sheets. Decorate with vanilla sugar or fleur de sel, as desired.
4. Bake the cookies until firm and the edges are just beginning to darken, about 10-18 minutes, depending on their size. Cool completely on the baking sheets.
5. To Assemble the Gingerbread Men Oreos: Once the cookies have cooled completely and the eggnog ganache has chilled, using a small hand-held mixer, whip the ganache until firm peaks form. Fill a pastry bag with a ½inch round tip with the whipped eggnog ganache or simply use a knife or spoon to spread it on. Pipe or spoon small dollops of the filling into the center of one cookie (or in the shape of the cookie) and sprinkle with a little extra nutmeg. Place another cookie on top of the ganache. Lightly press down to work the filling evenly to the outsides of the cookie. Continue this process until all the cookies have been sandwiched with ganache.
6. Refrigerate the Oreos for about an hour or longer (I like them best cold, so I kept mine in the refrigerator) and serve with a large glass of milk!


Sunday, December 18, 2011

Soup Sunday: Hearty Vegetable Beef Soup with Meatballs & Parmesan Rinds

Vegetable Beef soup is one of my absolute favorite soups that my mom made us when I was growing up. I'm kind of a veggie junkie, so I love that fact that this soup has so many different components to it, which makes you feel like you're eating a huge meal. I decided to add ground beed and mini meatballs to make it extra-hearty. But the very best part of this soup, are the cubes of parmesan rind that are cooked until slightly soft & chewy. We always had this in our recipe, and people always think we are crazy for eating it, but it really is delicious! My family and I would fight over these little nuggets, no lie. So, so just give it a try, it gives it a nice salty flavor. Enjoy :)
Hearty Vegetable Beef Soup with Meatballs & Parmesan Rinds

Yummy Vegetables & Meatballs :)
For the Soup:
Olive Oil
1C Onion, Chopped
½C Celery, Chopped
½C Green Bell Pepper, Chopped
1 ½lbs Ground Beef
1T Garlic, Minced
1 14.5oz Can of Beef Stock
1 14.5oz Can of Vegetable Stock
1Q Water
1-2T Chicken Base
28oz Can of Diced or Crushed Tomatoes
1lb Frozen Peas & Carrots
2C Corn, Okra, Roasted Mushrooms, & Chopped Haricot Verts
1-2C Parmesan Rinds, Cut into Small Cubes
16oz Mini Pasta, Cooked
15-20 Mini Meatballs, Cooked
Salt & Pepper, To Taste
Hot Sauce & Worcestershire Sauce, To Taste
Fresh Parsley, Chopped

Directions: 
1. In a large pot, heat some olive oil over medium-high heat. Add the onions, celery, and pepper and sauté until tender, about 2 minutes. Add the ground beef and brown the meat until cooked through. Add in the garlic and cook another minute. Stir in the beef stock, vegetable stock, water, chicken base, and crushed tomatoes. Bring to a boil over high heat, and reduce the heat, so that the liquid simmers. Add in the peas & carrots, corn okra, mushrooms, haricot verts, and Parmesan rinds. Simmer for 30-45 minutes or until the vegetables are cooked, but still have some bite, and the Parmesan rinds are slightly soft and chewy. Lastly, stir in the cooked mini pasta and meatballs. Cook on medium heat for another 10-15 minutes. Just before serving season with salt, pepper, hot sauce, Worcestershire, and parsley to taste.

Friday, December 16, 2011

Date Night : Coffee-Rubbed Rib Eyes with Beer Battered-Chipotle Onion Rings, Potato Puree, & Balsamic-Red Wine Reduction

Here's another romantic date night with the boyfriend, and we decided to go with the classic steak & potatoes combination, but with a little twist :) We purchased some beautiful thick-cut rib eyes and rubbed them with a chili-coffee seasoning mix. The rub is surprisingly sweet, but so smoky & delicious, which perfectly compliments the fatty rib eye. The seared steak is served on top of a bed of the creamiest potato puree that will surely bust your jeans open... it is just that unbelievably smooth. We topped the sliced rib eyes with huge beer battered-chipotle onion rings that have a nice kick, but aren't too spicy. I mean what is better than some red meat & crispy onions? Nothing, I'm pretty sure. Finally we drizzled the plate with a balsamic-red wine reduction, just for a touch of sweetness, which really brings out the great natural flavor of the steak. I also served our dinner with some easy sauteed garlic haricot verts because you just have to have some kind of greens to make you feel a little bit better about yourself. This is the perfect meal to serve up to a hungry man (especially anyone who can eat like my Mountain Man), he was stuffed to the brim!! Enjoy :)
Coffee-Rubbed Rib Eyes with Beer Battered-Chipotle Onion Rings, Potato Puree, & Balsamic-Red Wine Reduction
If you look very closely, you can see the potato puree peeking out just a bit!
For the Coffee-Rubbed Ribeyes:
¼C Chili Powder
¼C Ground Espresso
2T Paprika
2T Dark Brown Sugar
1T Dry Mustard
1T Salt
1T Pepper
1T Dried Oregano
2t Ground Ginger
2 Ribeyes (2 inches thick & 1 ½lbs each)
Canola Oil & Butter, For Frying

For the Balsamic-Red Wine Reduction:
½C Balsamic Vinegar
½C Red Wine
2-4T Brown Sugar (to taste)
 
For the Tequila Battered Chipotle Onion Rings:
1 Large Vidalia Onion, Cut into ½inch Thick Rings
1C Buttermilk
1C AP Flour
1C Cake Flour
½t Salt
¼t Baking Powder
½C Mexican Beer
2T Tequila
2T Chipotle Adobo Sauce
Cajun Seasoning & Parsley, For Garnishing
    
For the Potato Puree:
2 Large Baking Potatoes, Peeled & Cubed
1 Stick of Butter
4oz Cream Cheese
¼C Sour Cream
¼C Whole Milk
Salt & Pepper, To Taste 

Directions:
1. To Make the Coffee-Rubbed Ribeyes: Combine all of the spices in a bowl. Preheat the oven to 425 degrees. Preheat a cast iron pan over high heat with canola oil and butter. Brush each side of the steak with oil and season each side liberally with salt and pepper. Rub 2T of the coffee rub onto each side. Cook the steaks on the first side for about 3-4 minutes. Flip the steak over and cook for another 2 minutes. Transfer the steaks to a baking sheet and cook in the oven to medium-rare doneness, about 8-10 minutes. Remove from the oven and let it rest for 10 minutes before slicing.
2. For the Balsamic-Red Wine Reduction: In a small sauce pot over medium-high heat, bring the vinegar and wine to a boil. Let it boil for about 5 minutes, and then add the brown sugar. Reduce to a simmer and continue reducing the mixture until it thickens to a syrup, about 5-10 minutes. Set it aside until ready to garnish. 
3. For the Beer Battered-Chipotle Onion Rings: Marinate the onion rings in buttermilk for an hour. Heat the peanut oil in a deep fryer to 350 degrees. Once marinated, drain them from the milk and dredge in flour. Shake of excess flour. Meanwhile, whisk together the flour, salt, and baking powder in a medium bowl. Add the beer, tequila, and adobo sauce. Whisk until just blended. Dip the dredged onion rings into the batter, shake off the excess, and gently drop them into the oil. Fry until golden brown, about 2-4 minutes. Transfer the onion rings to paper towels to drain and sprinkle with Cajun seasoning. Keep the fried onion rings warm in the oven while you cook your remaining meal. Garnish with chopped parsley.
4. For the Potato Puree: Bring a large saucepan of water to a boil. Add the whole potatoes and cook over moderate heat until tender, 20 minutes. Drain and wipe out the saucepan. Working with 1 potato at a time, pass the potatoes through a ricer into the saucepan. In a small saucepan, melt the butter, cream cheese, and sour cream in the milk over moderate heat. Gradually whisk the hot milk-cheese mixture into the potatoes and season generously with salt. Cook over moderate heat, whisking, until hot. Serve with the steak.
5. Serving the Steak: Spoon some of the potato puree onto the plate. Place a cooked steak on top of the potatoes. Top with the crispy onion rings and drizzle the reduction around the plate. Serve with sautéed green beans.

Wednesday, December 14, 2011

Festive White Chocolate-Cherry Shortbread Cookies

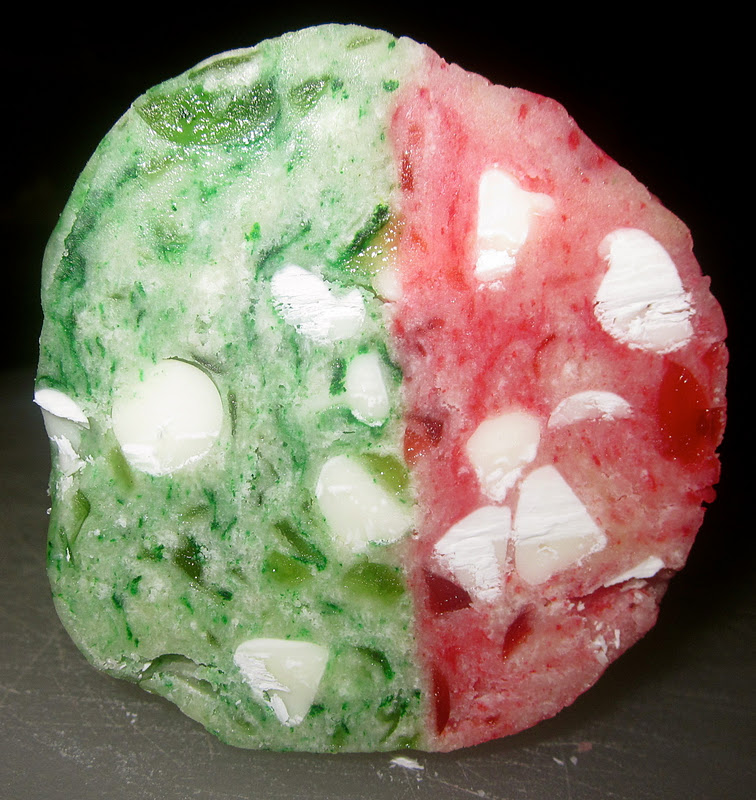
The Christmas cookie marathon continues... second up are Festive White Chocolate-Cherry Shortbread Cookies. I have mentioned before of my obsession with Pinterest. And I will urge all of y'all to go get an account because I assure you people that it is more addictive than Facebook. So just do it. Well, I have seen  this recipe for white chocolate-cherry shortbread floating around titled as "the best Christmas cookie", and that simply screams to me that I needed to make these. And so I did. I had to put my little twist on it and I wasn't quite sure what that would be until I arrived at the grocery store and saw green maraschino cherries. I suddenly thought that I should make red & green cookie dough and combine them together to make a super festive cookie (unlike the plain red cookie that I had seen). The cookies were perfectly buttery and sweet from the white chocolate. The only complaint I had was that they did not have enough cherry flavor, which I think could be solved by adding some cherry syrup or extract. So definitely give that a go if you want stronger fruit flavor. Also, the dough is extremely crumbly and tough at first, but just keep working it and it will come together. Otherwise, we enjoyed these cookies a lot and they were a nice added surprise to my Christmas cookie recipes!! Enjoy :)
The two doughs rolled together
Ready to be baked!
Decorating the cookies 
Red, white, & green 
Lots & lots of sprinkles
The finished product

Festive White Chocolate-Cherry Shortbread Cookies
For the Red Cookies:
¾C Red Maraschino Cherries, Drained & Finely Chopped
2 ½C AP Flour
½C Sugar
1C Butter, Very Cold
2/3C White Chocolate, Finely Chopped
½t Almond Extract (or cherry extract)
Red Food Coloring

For the Green Cookies:
¾C Green Maraschino Cherries, Drained & Finely Chopped
2 ½C AP Flour
½C Sugar
1C Butter, Very Cold
2/3C White Chocolate, Finely Chopped
½t Almond Extract (or cherry extract)
Green Food Coloring

For Decoration:
16oz White Chocolate, Finely Chopped
4t Shortening
Sprinkles & Glitter, For Decorating

Directions:
1. Preheat the oven to 325 degrees and spread cherries on a paper towel to drain well.
2. In a large bowl, combine flour and sugar. Using a pastry blender, cut in the butter until mixture resembles fine crumbs. Stir in drained cherries and 4 ounces (2/3 cup) of the chopped chocolate. Stir in almond extract and, if desired, food coloring. Knead mixture until it forms a smooth ball. Repeat with the same ingredients to make the green dough.
3. Place both doughs onto parchment paper or plastic wrap and form to halves of a round log. Place the doughs on top of each other and press together. Roll the dough into a smooth, long log again and wrap tightly. Place into the refrigerator and chill for 30 minutes to an hour. 
4. Once chilled, cut the dough into thin, even slices and place about 2 inches a part on a baking sheet that is lined with a silpat or parchment paper.
5. Bake in preheated oven for 10 to 12 minutes or until centers are set. Cool for 1 minute on cookie sheet. Transfer cookies to a wire rack and let cool.
6. In a small saucepan, combine remaining 8 ounces white chocolate and the shortening. Cook and stir over low heat until melted. Dip half of each cookie into chocolate, allowing excess to drip off. If desired, roll dipped edge in sprinkles and/or edible glitter. Place the cookies on waxed paper until chocolate is set.

Tuesday, December 13, 2011

Grown-Up Gourmet Monster Cookies

It's beginning to look a lot like Christmas y'all. Except for it's like sunny & about 70 degrees here in Savannah. We probably should just decorate palm trees here, it seems more fitting. But unfortunately, I've been hit with a bug and haven't been feeling very festive. Finally though, we got around to buying a christmas tree, hanging ornaments, and putting up other holiday decorations. What are some of your Christmas traditions? We have a few. I always have to bake cookies & make apple cider to enjoy while we are doing the heavy labor, and after the decorations are finished, we enjoy a large pizza and just stare at the lights while listening to Christmas music.


Also, the man of the house always has to put the angel on top of the tree when it is all dressed up. So, here are some action shots of my Mountain Man doing his manly duty (even though it's not so manly).


We took a few family portraits with our baby, Eloise. Taz wasn't been too cooperative because he's a cat.   I wish we would take a really tacky Christmas picture like the ones I've seen floating around the internet. Maybe like the one below? I mean how hilarious is that picture. I want to meet these people either because they aren't being serious, which is brilliant. Or they are being serious... and I will love them even more. Do you realize she is holding a goat? Yes, a goat. I can't even make this up. So, put this on the to-do list for our Christmas card next year. Classic.


The Mountain Man is really enjoying pizza, can't you tell? And if you're wondering, which you probably are... it's a pizza with pesto, sundried tomatoes, italian sausage, and pineapple with NO CHEESE. We realize it is the weirdest combination ever, but it is our favorite and that's why were probably dating, haha.


Don't you love our little Christmas apartment? I do. I never want to leave because it's just so festive & cozy. Anyway, the rest of this week I will be featuring some Christmas cookie recipes that I made while we were decorating. The first cookie that I will be posting are my Grown-Up Gourmet Monster cookies. As a kid, Peej and I always made monster cookies during the holidays. You know the ones with oatmeal, peanut butter, m&m's, and lots of other things. So I thought why not make an adult version of the monster cookie with gourmet and trendy ingredients, instead of the gimmicky ones. There's definitely nothin' wrong with the original recipe because they truly are delicious. I browned the butter, and then added in biscoff spread (instead of peanut butter), toffee bits, milk chocolate truffles, bittersweet chocolate, chocolate covered espresso beans, potato chips, and pretzels. I especially love the chocolate covered espresso beans. It made the cookies taste exactly like Java Chip Ice Cream. I think I'm going to add the espresso beans into my chocolate cookie recipe next, but that's for a different day. Make these cookies for yourself, or they would be great to give out as gifts to friends & neighbors!! Enjoy :)


Grown-Up Gourmet Monster Cookies
For the Cookies:
2 Sticks of Unsalted Butter
1 Stick of Melted, Browned Butter
¼C Gourmet Raw Bourbon Vanilla Sugar
¼C Granulated Sugar
1 ¾C Light Brown Sugar
2 Eggs + 1 Egg Yolk
1C Biscoff Spread
2t Vanilla
1t Sea Salt
2C Cake Flour
1C Bread Flour
½C AP Flour
1 ½t Baking Soda
3C Gourmet Baking Ingredients: (1C Toffee Bits, 3.5oz Chopped Milk Chocolate Truffles, 4oz Chopped 70% Chocolate, and 1C Roughly Chopped Chocolate Covered Espresso Beans)
2C Gourmet Snack Foods: (1C Cape Cod Plain Potato Chips and 1C Chopped Pretzels)
Fleur de Sel, For Sprinkling     

Directions:
1. Preheat the oven to 365 degrees F and line a baking sheet with parchment paper and spray with Pam, then set aside.
2. To Brown the Butter: Heat a thick-bottomed skillet on medium heat. Add the sliced butter, whisking it frequently. Continue to cook the butter. Once the butter has melted, it will foam up a bit, and then subside. Watch it carefully as lightly browned specks begin to form at the bottom of the pan. You should smell a nutty aroma and it should be golden-brown in color. Remove from heat and let it completely cool before adding it to the cookie dough.
3. Cream the 2 sticks of butter and browned butter with the gourmet vanilla sugar, granulated sugar, and brown sugar until light and fluffy (about 3 minutes). Scrape down the sides of the mixer then add the two eggs and egg yolk one at a time, incorporating each one completely before adding the next. Scrape down the bowl. Mix in the Biscoff spread, vanilla and sea salt.
4. In a separate bowl, whisk together the cake flour, bread flour, AP flour, and baking soda.
5. With the mixer on the lowest speed, slowly add the flour mixture to the butter mixture until just incorporated (don’t over mix).
6. Fold or beat in your choices of the gourmet baking ingredients until it’s completely incorporated and the ingredients are evenly dispersed throughout the dough. Lastly, lightly beat in cape cod potato chips and chopped pretzels until just combined (don’t beat it too much or your won’t have chunks of snacks). Cover the dough with plastic wrap and refrigerate the dough for at least 4 hours, but preferably 24-48 hours. Once chilled, scoop the dough into roughly ¼C balls (or I used a large ice cream scoop), and then using your fingers crimp the tops of the cookies to make them more jagged (this will make them look more homemade). Because the cookies are quite large, I only put 6 cookies per sheet tray, so that when they cook & spread, they will not touch each other.
7. Sprinkle the fleur de sel on top of the cookie dough balls, then bake the for 12-14 minutes (cook them for 6-7 minutes, then rotate the pan 180 degrees, and cook for another 6-7 minutes), until it is slightly golden brown on the edges, but still soft (slightly undercooked) on the inside. Leave the cookies on the sheet tray for 10 minutes, so that the cookies will finish baking.
8. Once the cookies have rested on the sheet tray, move the finished cookies to a cooling rack, and let them completely cool completely before eating.