Friday, January 18, 2013

Fried Sriracha-Bread n’ Butter Pickles with Homemade Buttermilk Ranch Dressing Ice Cream & Sriracha-Cajun Seasoning

Fried Sriracha-Bread n’ Butter Pickles with Homemade Buttermilk Ranch Dressing
 Ice Cream & Sriracha-Cajun Seasoning 
I think I may be pregnant... Nahhhhhh, just kidding. Always kidding about that. But, I really start to question my cravings because this is just not normal. I mean, fried pickles + ice cream, those are go-to's for me when I get that itch to eat something unhealthy. The list usually goes chocolate, ice cream, fried pickles, french fries, teriyaki sauce... yeah, I would like that all on one plate, for delivery, to be eaten in my pajamas, while watching lifetime movies. But that's besides that point. Why not put two of my favorite junk foods into one dish and call it dinner? I think it's necessary, and for those of you who don't, move along and stop judging us please (thankyouverymuch). So let's get down to the nitty-gritty, I made some bomb-ass pickles two weeks ago. They are my official addiction because they are a sweet bread n' butter pickle spiced up with a'whole'lotta Sriracha and yummy pickling spices. We had gone through majority of the jars, but I just knew I had to save them for some fried pickles, and I'm so glad we did. I dunked them in an egg batter and coated them in my "demon flour", which is just code for really spicy flour, and then fried them up until they were golden brown + gorgeously crispy. We played around with it a little bit and this dredging method was the best combination of all of them. When they are hot out of the fryer, you've got to sprinkle them with some homemade Sriracha Cajun Seasoning, just for a little extra kick (and let me tell you, this cajun seasoning will be on many more recipes this year). But with all this spice, you hav'ta have somethin' to cool it down y'all!! And that's where the Homemade Buttermilk Ranch Dressing Ice Cream comes into play. Yeap, I made ice cream... outta ranch. I get that it sounds absolutely disgusting, but it isn't. The ice cream is perfectly dreamy & creamy, melting just perfectly on top of a fried pickle chip. So, in essence, savory ice creams are the new jam, my people. Get on my level, okay? Because you and I both know that I will be making some buffalo wings, burgers, and chili-cheese fries with a big 'ole scoop of this bad stuff on top, just sayin'. Give a shot, it's totally worth every jean-huggin' calorie, y'all!! Enjoy :)
A big 'ole plate of fried pickles... and ice cream.
Oh hey, that's ranch dressing ice cream!
Fried Pickles + Ice Cream can be fancy too, y'all :) 
Fry... Scoop... Nosh...

For the Homemade Sriracha-Bread n’ Butter Pickles:
5C Sliced Cucumbers, Sliced to ¼-½inch Thick Slices (depending on your preference)
1 Large Sweet Onion, Thinly Sliced
¼C Kosher Salt
2C Sugar
2C White Vinegar + 1C Apple Cider Vinegar
½C Light Brown Sugar, Packed
½C Sriracha
2T Pickling Spices
2t Mustard Seeds & Coriander Seeds
5 Black Peppercorns & 5 Pink Peppercorns
¼t Ground Turmeric
1 Cinnamon Stick (per pickle jar)
5-10 Garlic Cloves (per pickle jar… depending on how garlicky you want them)
1T Chili-Garlic Sauce (per pickle jar)

For the Homemade Buttermilk Ranch Dressing Ice Cream:
1C Buttermilk, Well-Shaken
2T Heavy Cream
½C Mayo
¼C Sour Cream
1t Lemon Juice
2T Buttermilk Powder
½t Ground Mustard, Garlic Powder, Onion Powder, & White Pepper
¼t Paprika
1T Fresh Parsley, Minced
1t Fresh Dill & Fresh Chives, Minced
1 Small Garlic Clove, Minced into a Paste
Salt, Fresh Cracked Black Pepper, & Sugar, To Taste

For the “Demon Flour” Fried Pickles:
Prepared Sriracha-Bread n’ Butter Pickles
1C AP Flour
2T Cornstarch
½t Each of Ground Mustard, White Pepper, Paprika, Cayenne, Chile Powder,
Onion Powder, & Garlic Powder
Salt & Pepper, To Taste (I roughly did 1T salt and 1t Black Pepper)
2T Buttermilk, Well-Shaken
Vegetable Oil, For Frying

For the Wet Batter:
2 Eggs
1C Buttermilk, Well-Shaken
2T Sriracha

For the Sriracha Cajun Seasoning:
2T Sea Salt
1T Homemade Sriracha Powder
1t Garlic Powder & Onion Powder
1t Black Pepper
½t Ground Mustard
Pinch of Ground Chinese Five Spices

Directions:
1. For the Homemade Sriracha-Bread n’ Butter Pickles: In a medium bowl, combine the cucumbers, onion and salt. Mix well. Cover the mixture with ice. Let stand at room temperature for two hours. In a pot, bring sugar, vinegars, Sriracha, and spices to a boil. Drain cucumbers and onions in a colander and place into a large bowl. Pour the hot vinegar mixture over the cucumbers and onions, and then let it cool completely to room temperature. This recipe made roughly 3-4 jars of pickles, so make sure to boil the jars in hot water to sanitize them before filling them. In the bottoms of the clean jars, pour in 1T of the Asian Chili-Garlic Sauce, and then drop in some cloves of garlic, and a cinnamon stick. Ladle in the room temperature pickle slices and Sriracha pickling liquid to fill the jar. Process them in a hot bath and make sure the top has sealed before storing them. I like to let my pickles marinate for 1-2 weeks before enjoying them, but they will begin to taste pickled after about 4 hours.
2. For the Homemade Buttermilk Ranch Dressing Ice Cream: In a medium bowl, stir together the buttermilk, heavy cream, mayo, sour cream, and buttermilk powder until smooth. Add in the other ingredients until it is completely incorporated, adjusting for taste with the salt, pepper, and sugar. Once you have reached your desired ranch dressing, cool the custard base until completely chilled. Once the mixture is chilled, freeze in an ice cream maker according to the manufacturer’s instructions. As soon as the mixture is done churning, transfer to a bowl or airtight container. Store in the freezer until firm.
3. For the Fried Pickles: Heat the vegetable oil over medium heat in a pot to 350 degrees. Next, you have to set up a battering station. I use two pie tins. For the first station, I mix the flour and cornstarch with seasonings to make “demon flour” or really spicy flour mix. . Drizzle the 2T of buttermilk into this last pie tin, and using a fork, and mix until little shaggy pieces form (these will help build a nice crunch to the pickles). For the second station, I whisk together the eggs, buttermilk, and Sriracha. Now, place the Sriracha Pickles into the egg batter, then into the demon flour, making sure to completely coat and press the pickles into the flour. Fry the breaded pickles for 2-4 minutes or until golden brown and crispy on all sides. Once cooked, remove from the oil to drain and sprinkle with some Sriracha Cajun Seasoning. Keep warm until ready to serve.
4. For the Sriracha Cajun Seasoning: Combine all of the seasonings together in a bowl and mix until completely incorporated. You can also pulse with a food processor to make a finer texture for sprinkling. Store in an airtight container.
5. For Serving: Serve the hot fried pickles with a scoop of the homemade ranch dressing ice cream. You can either dip the pickle chips into it or scoop ice cream on top of an individual pickle.

Wednesday, January 16, 2013

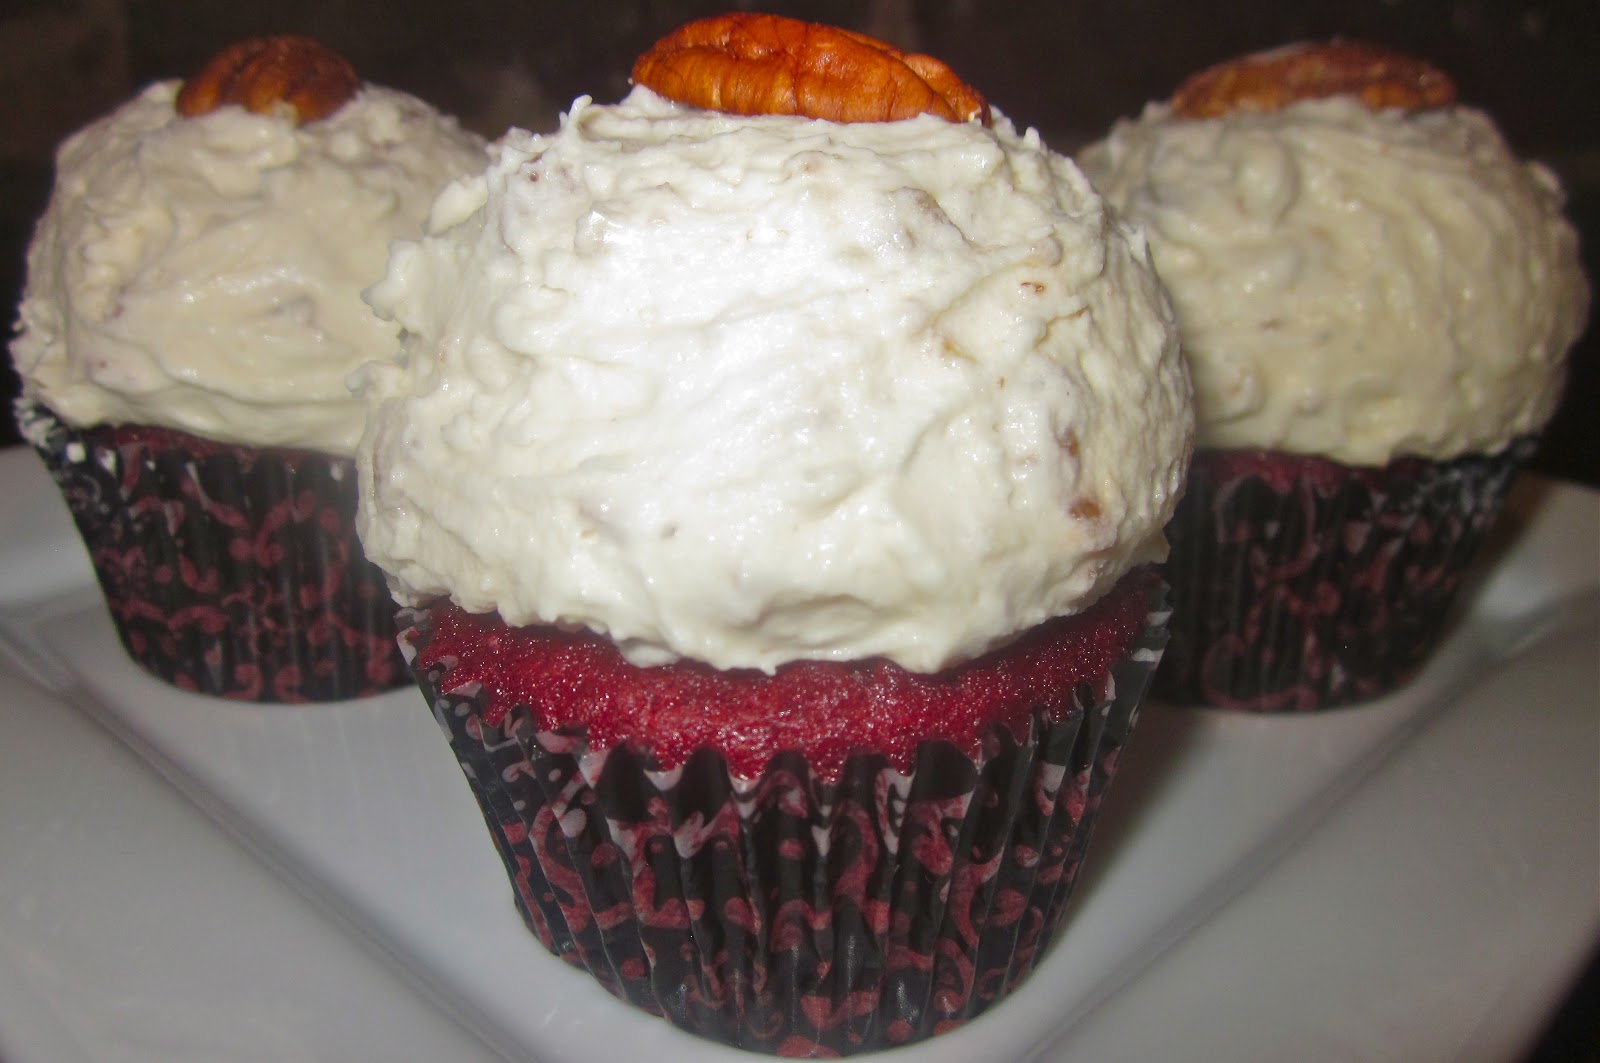
Classic Red Velvet Cupcakes with Whipped Cream Cheese-Pecan Frosting

Classic Red Velvet Cupcakes with Whipped Cream Cheese-Pecan Frosting
I consider myself a Red Velvet junkie or addict. I mean honestly, I've tried to make just about every recipe under the sun into a red velvet recipe. I've made red velvet crack pie, red velvet cookies, red velvet fried chicken, red velvet strawberry shortcake cake, red velvet cake truffles, red velvet whoopie pies, red velvet ebelskivers, rainbow velvet layer cake, red velvet gooey butter cake bars, and yall's personal favorite, red velvet cinnamon rolls. I might as well turn this into a red velvet blog at this rate. But, I noticed the other day that I didn't even have a classic red velvet cake recipe for y'all to make. That's just plain bat-shit crazy... excuse my french, but it is. These cupcakes are a go-to dessert for me. Whether it's a birthday party, tailgate, or holiday... these are usually at the top of my list. Everyone loves classic, good 'ole southern red velvet cupcakes. It's fool-proof. I like to mound a big fluffy pillow of frosting on top of my cupcakes and it most certainly, always has to be a cream cheese based frosting. I especially like this one because it is light & airy, but has that whipped decadence you want from an icing. And as any other southerner knows, pecans pretty much belong in any dessert, so I like to add finely chopped, toasted pecans into my frosting. I'm not too big on making my cupcakes look to gorgeous... I kind of like the homemade, rustic look, with a lot of frosting, ya know. The kinds that have an equal ratio of frosting to cake. That's my kind of cupcake, or you could just do like me, and eat it with a spoon. That'll work too!! Enjoy :)

For the Red Velvet Cupcakes:
2 ½C AP Flour
1 ½C Sugar
1t Baking Soda
1t Salt
1T Cocoa Powder
1 ½C Vegetable Oil
1C Buttermilk, Room Temperature
2 Large Eggs, Room Temperature
2T Red Food Coloring (1 oz)
1t White Distilled Vinegar
2t Vanilla

For the Whipped Cream Cheese-Pecan Frosting:
10T AP Flour
2C Milk
2t Vanilla
4 Sticks of Salted Butter (or you can use unsalted and just add salt to taste)
2C Sugar
16oz Whipped Cream Cheese
1-2C Toasted Pecans, Finely Chopped (you can decide how much pecans are in it)

Directions:
1. Preheat the oven to 350 degrees and line two cupcake pans with cupcake liners. This recipe makes roughly 24 cupcakes.
2. For the Red Velvet Cupcakes: In a large bowl, sift together the flour, sugar, baking soda, salt, and cocoa powder. In another large bowl, whisk together the oil, buttermilk, eggs, food coloring, vinegar, and vanilla. Using a standing mixer, mix the dry ingredients into the wet ingredients until just combined and a smooth batter is formed. Divide the batter evenly among the cupcake tins about 2/3 filled (I did this by using a large ice cream scoop to make sure there was an even amount of batter in each cupcake liner). Bake in oven for about 20 to 22 minutes, turning the pans once, half way through. Test the cupcakes with a toothpick for doneness. Remove from oven and cool completely before frosting.
3. For the Whipped Cream Cheese-Pecan Frosting: In a small saucepan, whisk flour into milk and heat, stirring constantly, until it thickens. You want it to be very thick, thicker than cake mix, more like a brownie mix is. Remove from heat and let it cool to room temperature. (If I’m in a hurry, I place the saucepan over ice in the sink for about 10 minutes or so until the mixture cools.) It must be completely cool before you use it in the next step. Stir in vanilla. While the mixture is cooling, cream the butter and sugar together until light and fluffy. You don’t want any sugar graininess left. Then add the completely cooled milk/flour/vanilla mixture and beat the living daylights out of it. If it looks separated, you haven’t beaten it enough! Beat it until it all combines and resembles whipped cream. Once it has reached the consistency you liked, gently adding in the whipped cream cheese and beating to combine. It should be fluffy and light, but smooth. Right before you are ready to serve, fold in the finely chopped, toasted pecan bits.
4. Assembling the Cupcakes: Using a large ice cream scoop, gather the frosting and plop it on top of the cooled cupcake. You can also do any decorative work that you like, but I like my cupcakes to look homemade and rustic. You can also top your cupcakes with a whole toasted pecan, pecan bits, or sprinkles if you like. Enjoy these little cakes at your next tailgate :)

Sunday, January 13, 2013

Cider Beer Battered & Panko Crusted Apple Fritter Rings Tossed in Cinnamon-Sugar with Salted Caramel Sauce + Candied Bacon

Cider Beer Battered & Panko Crusted Apple Fritter Rings Tossed in Cinnamon-Sugar
with Salted Caramel Sauce + Candied Bacon
Apple Fritters bring up a lot of memories of my childhood. I actually have never had any other apple fritter recipe besides the ones I was made by my uncle on his farm in the mountains of Georgia. Back then, I dreaded going to his farm because it barely had any electricity and more importantly, no TV to watch. Now, I wish I could go back... it's so funny how you change so much. I would so enjoy to go back and have some of his homemade goat cheese or use his homemade shampoos, lotions, and soap when taking a hot shower. But, what I miss most, were those apple fritters that he fried up for breakfast every morning. The best part was running out to his apple tree and picking the ones that we would end up frying. There was something so comforting about watching him spoon a delicate batter into a hot cast-iron skillet, the popping & sizzling played like a symphony, and the grand finale was shoving a huge fork full of crispy dough into my mouth. This recipe is not his, but it is my little gourmet on a Southern classic. With the use of cider beer, cornstarch, stiff egg whites, and Panko crumbs, these fritters are seriously crunchy and oh-so-delicious. And don't worry, they are just as comforting as the ones your mama made. The Panko are really the key in texture, so don't leave them out!! I also had to put my own little spin on it, of course, by coating them a cinnamon-sugar, drizzling the whole plate with some salted caramel, and topping the apple fritter stack with a big ole' pile of candied bacon. I just love the combination of bacon + apples together, so why not add them to this traditional breakfast treat? I mean, you probably would make some bacon as a side to enjoy with it, so it's time to just throw them on top, people!! All of these fritters were gobbled up so fast I couldn't make them quick enough. I really think you'll enjoy the sweet & salty flavors, along with the smoky notes the bacon provides. Enjoy :)


For the Cider Beer Batter:
2/3C Cider Beer
2 Large Eggs, Separated
2T Brown Butter, Melted
3T Sugar
¾t Ground Ginger & Cinnamon
¼t Grated Nutmeg & Ground Allspice
¼t Salt (heaping)
1C AP Flour
1T Cornstarch

For the Apple Fritter Rings:
3 Peeled Apples, Cut into Slices & Cored (we used Granny Smith apples)
Prepared Cider Beer Batter
Panko Breadcrumbs
Vegetable Oil, For Frying (or you can be crazy and fry them in bacon fat)
Prepared Cinnamon Sugar, For Coating

For the Cinnamon Sugar:
1C Sugar
2T Cinnamon
Pinch of Salt

For the Candied Bacon:
8 Strips Of Thick Applewood Smoked Bacon
2t Light Brown Sugar (per slice of bacon)

For Serving:
Apple Fritter Rings, Fried until Crispy & Coated in Cinnamon-Sugar
Salted Caramel Sauce, For Drizzling
Candied Bacon, Diced into Cubes

Directions:
1. For the Cider Beer Batter: Whisk the beer, egg yolks, melted butter, sugar, ginger, cinnamon, nutmeg, allspice, and salt together in a medium bowl. Whisk the flour and cornstarch in until just blended. Cover the bowl with a kitchen towel and let the batter sit for 30 minutes.
2. For the Apple Fritter Rings: Peel and core the apples, or if you don’t have a proper corer, just peel the apples. Slice the apples along latitudinal lines into ½inch thick slices. If you don’t have a corer, now is when you can use a round cutter to punch out the core of each slice. Set the slices on paper towels to drain excess moisture. Flip them over after a few minutes. Heat an inch of vegetable oil in a deep and wide pan or a deep-fat fryer to 365°F. Beat the egg whites to stiff peaks (but not dry – dry is when it looks clumpy) and fold the whites into the batter. You can preheat your oven to 250°F for keeping the fritters warm as you will have to fry them in batches. Dip each apple ring into the batter to coat, and then let any excess drip off before coating them in the panko breadcrumbs (this will be kind of messy, but try your best to cover the wet batter with the breadcrumbs, and then quickly drop them into the hot oil). Once they are completed crusted in panko, carefully place it in the hot oil and fry for a few minutes on each side. When the bottoms turn a deep golden color, use tongs or chopsticks to flip the fritters over. Let the other side turn deep golden and remove from the oil to the cooling rack or paper towels. Repeat until done (store the cooked fritters in the oven if you like). When the fritters are still slightly hot, place them into the bowl of cinnamon-sugar and toss to completely coat.
3. For the Cinnamon-Sugar: Combine the sugar, cinnamon, and a pinch of salt in a bowl and whisk to combine. Once you fry the fritters, let some of the excess oil drip off, and then toss them completely in the cinnamon-sugar until coated.
4. For the Candied Bacon: Preheat the oven to 400 degrees. Lay the strips of bacon on a baking sheet lined with a silicone mat. Sprinkle each slice of bacon with 2t of brown sugar. Bake for 12-16 minutes. Midway, flip the bacon over and drag them through the dark, syrupy liquid that’s collected on the baking sheet. Continue to bake until it is as dark as mahogany. Remove from the oven and cool the strips on a wire rack. Once the bacon is cool and crisp, chop into cubes.
5. For Serving: Stack the crispy, cinnamon-sugar coated apple fritter rings onto the center of a plate. Drizzle the plate and fritters with some homemade salted caramel sauce and sprinkle the candied bacon all over the pate and mound some more on top of the fritter stack. Enjoy immediately while they are still hot!

source: apple fritters.

Thursday, January 10, 2013

Fried Chicken Strawberry Shortcakes with Fluffy Buttermilk Biscuits, Fried Chicken, Boursin Cheese Whipped Cream, & Strawberry-Balsamic-Pink Peppercorn Preserves

Fried Chicken Strawberry Shortcakes with Fluffy Buttermilk Biscuits, Fried Chicken,
Boursin Cheese Whipped Cream, & Strawberry-Balsamic-Pink Peppercorn Preserves
I have totally lost track of time lately. So much so, that I even forgot this little blog's anniversary. I'm officially on my third year of sharing my recipes, and I didn't even realize it. What a sad day. How do you celebrate a "blog-a-verisary"... do you bake a cake for it? I should probably find out if that's the case. Instead I baked a shortcake for it, a savory shortcake in fact. Have y'all ever seen or had a savory shortcake? I haven't seen many or tasted any, so I though it would be something I would want to make. Why not put some fried chicken on a shortcake, that's the normal thought process, isn't it? Well, for all y'all skeptics out there, it's wonderful!! It's like a play off of chicken & biscuits, but slightly sweet... and you can eat it for dinner. I made light-as-air, fluffy buttermilk biscuits and topped them with crispy, fried chicken, a whipped cream made with boursin cheese, and an eat-it-with-a-spoon strawberry jam. By the way, I'm so into pickling, preserving, and processing right now. I just got the hang of it, but I've already made Candied Jalapenos, Spicy Pepper Jelly, Triple Citrus-Champagne Marmalade, Blood Orange-Vanilla Bean Marmalade, Pickled Mean Beans, and the Strawberry-Balsamic-Pink Peppercorn Preserves that I'm posting today. Here is a picture of everything I've canned...
Homemade Pickles, Jams, Preserves, & Jellies
Borderline obsessive, right? Oh well, they are all delicious and it is my new favorite hobby. Now I just have to think of recipes to use all of them. My Fried Chicken Shortcake was inspired by these strawberry preserves, that's how much I liked it. I thought to myself, "Dang, this jam would be damn good on some fried chicken." And it was. Strawberry + Balsamic are a match made in heaven. The vinegar really brings out the sweetness of the berries and the crushed pink peppercorn adds a depth of flavor that cannot be matched! Just a note, while I was making the huge batch of strawberry preserves, I reserved some that I didn't thicken as much, so it would be more of a sauce. The rest of them I reduced down to a thick jam that would be spreadable on toast... it's honestly up to you, but it does make an awesome strawberry sauce. I think it would be heavenly on some homemade goat cheese ice cream (odd, i know). Anyway, make these preserves... put them on everything. Especially this shortcake. All of the elements go together, I promise. I can guarantee it will be weird eating a salty whipped cream though. You definitely need the creamy, herbed element though. It creates such balance. We loved everything about this meal, and heck, why not make a dessert into dinner? It totally works!! Enjoy :)

Marinating the Chicken:
1Q Buttermilk
¼C Hot Sauce
1T Cajun Seasoning
4-6 Chicken Cutlets (pounded thinly)

For the Strawberry-Balsamic-Pink Peppercorn Preserves:
1Q Strawberries, Cut into Halves or Quarters
2 ½C Sugar
1 Lemon, Zested & Juiced
2T Balsamic Vinegar + ¼C Balsamic Reduction
½-1t Crushed Pink Peppercorn (start off with a little and add until your liking)

For the Fluffy Buttermilk Biscuits:
2 ¼C Cake Flour, Sifted
1T Baking Powder
1T + 1t Sugar
1t Salt
6T Unsalted Butter, Cut into Cubes & Frozen
1T Bacon Fat, Frozen
¾C Cold Buttermilk, Well-Shaken
Melted Butter, For Brushing 

For the Boursin Cheese Whipped Cream:
6T Heavy Whipping Cream, Cold
4oz Herbed Boursin Cheese, Softened
Salt & Pepper, To Taste

For the Fried Chicken Cutlets:
1C AP Flour
Salt & Pepper, To Taste
2 Eggs
1C + 2T Buttermilk
2T Hot Sauce
1C AP Flour
2T Cornstarch
1T Salt & Pepper
1t Cayenne, Paprika, Cajun Seasoning
Vegetable Oil, For Frying

For the Fried Chicken Strawberry Shortcakes:
Fluffy Buttermilk Biscuits, Baked until Golden Brown
Fried Chicken Cutlets
Boursin Cheese Whipped Cream, Chilled
Strawberry-Balsamic-Pink Peppercorn Preserves, Warmed
Chives, For Garnishing

Directions:
1. Marinating the Chicken: Place the chicken cutlets in a large plastic bag and add in the buttermilk, hot sauce, and seasoning. Marinate overnight in the refrigerator.
2. For the Strawberry-Balsamic-Pink Peppercorn Preserves: Rinse the berries and slice them into halves or quarters, depending on their size. Combine the berries, sugar, lemon juice and zest, and balsamic vinegar. Toss to coat the berries. Cover and let them macerate in the refrigerator overnight. The next day, put the berry mixture into a large saucepan and bring it to a gentle simmer. Stir occasionally until the sugar dissolves then remove from heat. Using a sieve, separate the berries from the juice. Return the liquid to the pan, along with the balsamic reduction, and bring it to a boil. Cook on high until concentrated or the mixture reaches a temperature of 221 degrees. Add the reserved strawberries and pink peppercorn back into the syrup and allow the mixture to boil for about 10-15 minutes. (Start off with a small amount of crushed pink peppercorns and keep adding until you have reached your desired strength). Process the jam immediately or refrigerate until it is thick.
3. For the Fluffy Buttermilk Biscuits: Preheat the oven to 400 degrees. In a mixing bowl, whisk together the flour, baking powder, sugar and salt. Add in the frozen butter and bacon fat, and cut the fat in using a pastry cutter until the mixture resembles coarse crumbs, but pea-sized pieces of butter still remain. Pour in the buttermilk and use a fork to mix it until the dough just comes together. Turn the dough out onto a floured surface, knead with floured hands, and pat into a thick square. Using a large, floured biscuit cutter, cut the biscuits from the dough and place them about 1-2inches apart on an ungreased baking sheet (I made about 5-6 very large biscuits). Brush the tops of the biscuits with some melted butter and bake for 20-30 minutes, depending on their side, or until the tops are golden brown. Just before serving, brush the tops of the biscuits with more melted butter.
4. For the Boursin Cheese Whipped Cream: In the bowl of a standing mixer, whip the heavy whipping cream until it forms stiff peaks. Slowly add in the softened Boursin cheese and beat until a whipped cream is formed. Season to taste with salt and pepper. Keep chilled until ready to serve.
5. For the Fried Chicken Cutlets: Heat the vegetable oil over medium heat in a deep sauté pan. Next, you have to set up a battering station. I use 3 pie tins. For the first station, I mix the flour with salt and pepper. For the second station, I whisk together the eggs, buttermilk, and hot sauce. For the third station, whisk together the flour, cornstarch, and seasonings. Drizzle the 2T of buttermilk into this last pie tin, and using a fork, mix until little shaggy pieces form (these will help build a nice crunch to the chicken). Now, place the marinated chicken cutlets into the flour mixture, then into the egg wash, and finally the shaggy flour mixture. Fry the breaded chicken cutlets for 3-5 minutes on each side, or until golden brown and crispy. Once cooked, remove from the oil to drain and sprinkle with a little salt and pepper. Keep warm until ready to serve.
6. Assembling the Fried Chicken Strawberry Shortcakes: Cut a warm biscuit in half and top the bottom half of the biscuit with a fried chicken cutlet, a spoonful of strawberry-balsamic-pink peppercorn preserve sauce, a dollop of Boursin cheese whipped cream, and top with the other half of the biscuit. Garnish the top with more strawberry sauce, whipped cream, and minced chives. Enjoy immediately.

Tuesday, January 8, 2013

Tailgatin' Pressed Sandwich Bites

Pressed Sub Sandwich Bites... Perfect for Tailgatin'
My Alabama Crimson Tide did it AGAIN last night, y'all!! Three National Championships in four years. I mean, that just doesn't happen easily. But, it feels oh-so-good to be apart of the University of Alabama. And what better than watching the game with some friends + some awesome tailgating food. Our menu consisted of these Pressed Sandwich Bites, Jalapeno Popper Dip, Pan-Fried Onion Dip, Cream Cheese + Homemade Pepper Jelly, Candied Bacon Wrapped Sausages, and Red Velvet Cupcakes with Whipped Cream Cheese-Pecan Frosting. We were certainly stuffed. Here is our feast from last night...
So. Much. Food.
Anyway, I had never made these Pressed Sub Sandwich Bites before, but I know I will be making them again because they are so easy to assemble and everyone loved them... especially the guys. Normally, sandwiches are so clunky and take up all your time (and the room in your fridge), but these are pressed for a whole day before, so you cut down on your prep time and cooking time during the day of the big game. These would be especially easy to make for a picnic or a tailgate on the Quad. We layered ours with our favorite Italian Sub Sandwich ingredients... lots of deli meat, smoked provolone, goat cheese, hot pepper spread, fig preserves, and marinated onions, all on some ciabatta bread. But, I think a Caprese version or even a BLT pressed sandwich would be delish as well!! I didn't have exact measurements, I just kind of loaded them up with as much as the bread would hold :) I hope y'all had some good tailgatin' food for yesterday as well, I mean it is practically a national holiday in this household. Oh, and we had a few leftover that had gotten a little stale, so I threw them in a skillet to fry in some oil, and they were mighty fine as well, but let's just keep that our dirty little secret... ROLL TIDE ROLL!! Enjoy :)
Before the big sandwich had been cut into bites...
Don't forget the fancy toothpicks, they really help for serving a big crowd :)
For the Italian Sub Sandwiches:
1 Large Loaf of Ciabatta Bread, Sliced Lengthwise
Fig Preserves or Apricot Preserves
Italian Hot Pepper Spread (we like Wickles)
Smoked Provolone Slices
Assorted Deli Meats
Goat Cheese, Room Temperature
Sweet Onion, Shaved Thinly & Tossed in Olive Oil, Vinegar, and Dried Oregano

For the Caprese Sandwiches:
1 Large Loaf of Ciabatta Bread, Sliced Lengthwise
Homemade Pesto
Fresh Buffalo Mozzarella or Sliced Mozzarella
Shaved Parmesan Cheese
Fresh Basil Leaves
Sun Dried Tomatoes or Slow Roasted Tomatoes
Balsamic Reduction, For Garnishing

Directions:
1. For the Pressed Sandwiches: Cut your loaf of Ciabatta bread in half, lengthwise. Spread on all of the condiments, and then layer all of the ingredients onto the bread. Wrap the large, assembled loaf tightly with plastic wrap, and then weigh the sandwich down with really heavy pots or pans (or even weights would work). This will help the ingredients together, helping to infuse all of the flavors together. It also creates a compact sandwich, so that when it is cut, none of the ingredients will fall out.
2. For Serving: Once your sandwich has been pressed overnight, cut away all of the plastic wrap, and then using a sharp knife, trim away all of the outside edges, and finally, into small, hand-held sandwich. I like to place a large toothpick into the sandwiches to hold them together while people are grabbing them up.

Thursday, January 3, 2013

"Not Your Granny's" Pimento Cheese with Pickled, Roasted Red Peppers, Candied Jalapenos, Green Onion, Crispy Bacon, & Toasted Pecans

"Not Your Granny's" Pimento Cheese with Pickled, Roasted Red Peppers, Candied Jalapenos,
Green Onion, Crispy Bacon, & Toasted Pecans
Do y'all love Pimento Cheese as much as me? I mean, I know if you're a Southerner, then you most certainly do. It doesn't matter how it's served to me, I want it. It makes a sandwich better, apparently it also makes shrimp & grits better too. But ya know, sometimes old classics need some jazzin' up, especially when you have company over. We made this three times in December... all for holiday parties, and it was a hit every time. Now, I'm sure you have a family recipe that has been handed down to you and never fails, but I'm telling you... this ain't your granny's pimento cheese. Why? Because it has pickled roasted red peppers, candied jalapenos, green onion, crispy bacon, toasted pecans, and a big ole' scoop of bacon jam on top. This dip is a meal on its' own and every time you take a bite, you get a different surprise. And hey, if you don't have a certain ingredient, you can always substitute it with something else!! We served this chunky pimento cheese with toasted cornbread and Frito's (we like the big scoop kind, so we can get a heaping spoonful in our mouth), but it was also great as a grilled cheese the next day. The bacon jam is optional, but I definitely recommend it because I'm tellin' you everyone will be fighting over it. And if you don't want to make a batch of bacon jam, serve it alongside some strawberry preserves... I know that might sound bizarre, but it is absolutely delish that way as well. So, maybe it isn't your granny's heirloom recipe; however, it might be your new favorite party dip!! Enjoy :)
A Big Ole' Scoop of Bacon Jam
For the Loaded Pimento Cheese:
4oz Cream Cheese, Softened
½C Mayo + ½C Sour Cream
¼t Garlic Powder, Pepper, & Paprika
1T Hot Sauce (or to taste)
1t Worcestershire
8oz Pepperjack Cheese, Shredded  
8oz White Cheddar Cheese, Shredded
8oz Sharp Yellow Cheddar Cheese, Shredded
1C Marinated or Pickled Roasted Red Peppers, Diced
½C Candied Jalapenos, Diced
5-6 Green Onions, Thinly Sliced
8 Strips of Applewood Smoked Bacon, Cooked until Crispy & Chopped into Bacon Bits
½C Pecans, Toasted & Coarsely Chopped
Salt & Pepper, To Taste
Homemade Bacon Jam, For Serving (optional)
Strawberry Preserves, For Serving (optional)
Toasted Bread, Frito's Scoops, or Crackers, For Dipping

Directions:
1. In a big mixing bowl, mix together the cream cheese, mayo, sour cream, garlic powder, pepper, paprika, hot sauce, and Worcestershire. 
2. Separately, shred the three blocks of cheese and put in the bowl with the seasoned creamy mixture. (I use the normal shredding side because I like it more that way for this dip). Toss the mixture together until the mayo is covering all of the cheese. 
3. Add in the marinated roasted red peppers, candied jalapeno, green onions, bacon bits, and toasted pecans. Toss until it’s evenly incorporated. 
4. Season the dip with any additional seasonings if needed. Refrigerate until ready to use, but let it come to room temperature before serving, so that it is easier to spread on the crackers.
5. Garnish the top of the pimento cheese with some Homemade Bacon Jam or Strawberry Preserves and serve with some Frito's for dipping.