Tuesday, June 18, 2013

Whipped Roasted Garlic Goat Cheese with Candied Jalapenos + Red Onion Marmalade

Whipped Roasted Garlic Goat Cheese with Candied Jalapenos + Red Onion Marmalade
This dip is easy. This dip is tasty. This dip is worth the little work that it takes to make it. If that's not convincing enough, then get'outta'here. As I mentioned yesterday, candied jalapenos are a regular 'round this joint. And even though I'm typically a planner that never forgets an occasion, cream cheese + candied jalapenos is a go-to appetizer that you can throw together 5 minutes before a party and people gobble it all up. So, I got to thinkin' how I wanted to put a gourmet twist to this dish and revamp the recipe for y'all, and this is the way I went. Instead of cream cheese, I made a Whipped Roasted Garlic Goat Cheese for the base. I first fell in love with whipped goat cheese when I ordered my new-favorite panini from a cafe in Savannah. I'm pretty sure it's what baby angels are made up of... or something I could easily lay my head down on and take a nap. This goat cheese cloud is oh-so-smooth & light as a feather. Heck, whip up a double batch and store it in the fridge for sandwiches, crostini, and salads like we do. So, you spoon the whipped garlic-y goodness onto a plate and generously pile a big 'ole stack of homemade candied jalapenos on top. I finished my dip off with some homemade red onion marmalade, which perfectly balances with the spiciness of the peppers. This marmalade is fabulous on sandwiches and burgers as well, so don't discriminate!! I sprinkled the dish with fresh cracked pepper and served it with grilled bread + fancy crackers for schmearing. Between the candied drippy jalapeno goodness + creamy cheese, this will sure to please any guest!! Enjoy :)

For the Whipped Roasted Garlic Goat Cheese:
Half of a Head of Roasted Garlic Cloves, Cooled
4oz Softened Cream Cheese
½C Heavy Cream
10z Goat Cheese
Salt & Pepper, To Taste

For the Red Onion Marmalade:
2 Large Red Onions, Thinly Sliced
¾C Red Wine Vinegar
½C Light Brown Sugar, Packed
Salt & Pepper, To Taste

For the Dip:
Prepared Whipped Roasted Garlic Goat Cheese, Chilled
Homemade Candied Jalapenos
Prepared Red Onion Marmalade, Chilled
Fresh Cracked Pepper, For Sprinkling
Grilled Crostini, For Serving

Directions:
1. For the Red Onion Marmalade: In a deep pot, bring the red wine vinegar and brown sugar to a simmer over medium-high heat. Add in the thinly sliced onions. Cook them, stirring frequently, for about 10 minutes. Reduce the heat and continue cooking for 15-20 minutes or until it has thickened and the onions have candied & caramelized.
2. For the Whipped Roasted Garlic Goat Cheese: In the bowl of a standing mixer fitted with the whisk attachment, beat together the softened cream cheese, roasted garlic cloves, and salt until thoroughly mixed. Scrape down the sides and turn the mixer to medium-high speed and add in ¼C heavy cream. Continue whipping, while continuously adding a little bit of crumbled goat cheese at a time, until the goat cheese is combined throughout. Add in the remaining ¼C heavy cream and beat on high until it is light & fluffy. Season with salt & pepper to taste. Spoon this mixture onto a serving plate.
3. For Serving: Spoon some chilled, candied jalapeno slices on top of the whipped goat cheese. Top it with a spoonful or dollop of red onion marmalade. Serve with grilled Crostini.

Sunday, June 16, 2013

Homemade Candied Jalapenos

Homemade Candied Jalapenos
Happy Father's Day to all of the wonderful dad's out there!! I hope y'all are celebratin' the men in your life by cooking them some good 'ole grub. My dad is personally a meat guy, so we're grillin' out some burgers and serving them with corn on the cob, caprese pasta salad with spicy Italian dressing, and brownie pudding a la mode. While we're cooking, we will be snacking on candied jalapeno dip. This dish makes an appearance at almost every party, holiday, tailgate, or cookout we have. That's saying a lot since it's really nothin' that special... softened cream cheese topped with sweet + spicy candied jalapenos. Until today when I decided to mix it up a bit and put my own little twist on it by revamping the idea into a "gourmet" version. I'll get to posting that next, but I suddenly realized that I had never given y'all a recipe for homemade candied jalapenos. In the South, most farmer's markets or road side stands have mason jars of candied jalapenos during the hot summer months. But, why spend five bucks on a jar, when you can make a big batch at home? That's just plain silly. So, just sit a spell and read this recipe because you'll make it until the sun don't come up no more. Now honestly, all candied jalapenos are, are some fresh jalapenos cooked in a spiced vinegar syrup until slightly softened. Then, you just preserve them and let 'em mellow for two weeks before you can enjoy them. I don't want to break your heart, but waiting is certainly the hardest part. But afterwards, you'll be so happy that you have these at your disposal, it won't even matter that you hide them in the pantry. I put these in homemade sauces/mayos, coleslaw, dips, etc. The uses are endless. I'll post the recipe for my Whipped Roasted Garlic Goat Cheese with Candied Jalapenos + Red Onion Marmalade Dip tomorrow!! Enjoy :)
Fresh Rainbow Jalapenos
Candied Rainbow Jalapenos
For the Homemade Candied Jalapenos:
3lbs Fresh Jalapenos, Thinly Sliced (about ¼inch)
Peeled, Fresh Garlic Cloves (about 4-6 per jar)
2C Apple Cider Vinegar
6C Sugar
½t Turmeric + Celery Seed
1T Garlic Powder
1t Cayenne + Paprika
2 Cinnamon Sticks

Directions:
1. Thinly slice the jalapeno peppers. In a large pot, bring the cider vinegar, sugar, turmeric, celery seed, garlic powder, paprika, cayenne pepper, and cinnamon sticks to a boil. Reduce heat and simmer for 5 minutes. Add the pepper slices and simmer for exactly 4 minutes. Use a slotted spoon to transfer the peppers, loading into clean, sterile canning jars to within 1/4 inch of the upper rim of the jar. Top with some peeled garlic cloves to each jar. Turn heat up under the pot with the syrup and bring to a full rolling boil. Boil hard for 6 minutes.
2. Use a ladle to pour the boiling syrup into the jars over the jalapeno slices. Insert a cooking chopstick to the bottom of the jar two or three times to release any trapped pockets of air. Adjust the level of the syrup if necessary. Wipe the rims of the jars with a clean, damp paper towel and fix on new, two-piece lids to finger-tip tightness.
3. Place jars in a canner, cover with water by 2-inches. Bring the water to a full rolling boil. When it reaches a full rolling boil, set the timer for 10 minutes for half-pints or 15 minutes for pints. When timer goes off, use canning tongs to transfer the jars to a cooling rack. Leave them to cool, undisturbed, for 24 hours. When fully cooled, wipe them with a clean, damp washcloth then label.
4. Allow the candied jalapenos to mellow for at least two weeks, but preferably a month before eating!!

Friday, June 14, 2013

Crème Brûlée Cronut's made with Quick Croissant Dough, Flaky + Fried, Filled with Vanilla Bean Cream, Rolled in Vanilla Sugar, & Torched Sugar Topping

OMG!! I MADE CRONUTS!!
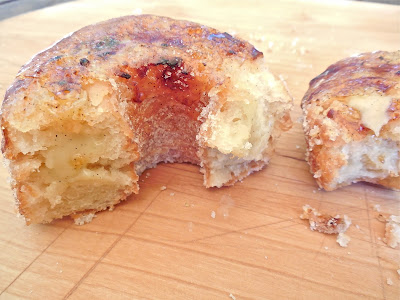
It's aliveeeeeeeeeeeeeeeee... and it's called the Cronut, or the Doissant, or flaky fried deliciousness. Have y'all heard about it? It's all the rage in New York and it's spreading like wild fire. It's got a Contagion-like movie quality to it really, which is quite creepy. But, exciting nonetheless!! The "Cronut" was brought into the world in May and I have honestly thought about it each + every day since I read about it. The descriptions have proclaimed it the new "cupcake" and the glorious marriage between half-croissant and half-doughnuts. UM what? A croissant fried + dressed up like a doughnut... what doesn't sound amazing about that. I've heard that if you do live in NYC and want a Cronut you can expect at least a 2 hour line, a two-cronut-limit, and a hefty bill for just a tiny 'ole pastry. That's when I got to searchin' for a copy cat recipe, but the guy who dreamed of this concoction is keepin' it hush-hush (I don't blame him), so it was slim-pickins for a while until I strolled across a blog that had recreated it to perfection. Me: 1, Cronut: 0. I started last night by making a quick 20 minute croissant dough recipe. The dough is a cinch to make, but does require some primping after chilling. Like any buttery croissant, it must be rolled and folded numerous times in order to create those extra-flaky layers. After you have done the heavy lifting, wrap that sucker up in plastic wrap and refrigerate it overnight. The next day, all you have to do is roll it out, cut it out, and proof it in a warm spot until they have doubled in size. Plop them into the fryer and they instantly crisp + brown up into Cronut gorgeousness. The bakery where this treat originated from fills it with pastry cream and some rose flavoring. I wanted to change it up a bit and finally landed on the idea of making one with Creme Brulee components (because I have a minor obsession with it). I filled my Cronuts with creme brulee pastry cream, rolled them in homemade vanilla bean sugar, and torched the tops until they were super crackly. Once you bite into this, you may never want to eat anything ever again. The pastry cream perfectly oozes throughout the buttery layers, yet still maintains the ultimate crispy crust. This may have been the best thing I've made all year... and I can't wait for all of the other varieties I'm going to make as well!! Enjoy :)


For the Quick Croissant Dough:
¼C Whole Milk, Room Temperature
¼C + 1t Luke Warm Water (or room temperature)
6g Instant Dry Yeast (or a heaping 2t... or one 7g packet of yeast with a little bit removed)
1t Vanilla Extract
1C AP Flour
1C + 2T Bread Flour
2T Sugar
½t Salt
½C + 3T Unsalted Butter, Diced & Chilled
Canola Oil or Vegetable Oil, For Frying

For the Vanilla Bean Cream:
1 ½C Whole Milk
½C Sugar
¼C Cake Flour
½t Sea Salt
4 Large Egg Yolks
1t Vanilla Extract
1 Vanilla Bean, Split & Scraped for Seeds

For the Vanilla Bean Infused Sugar:
1 ½C Sugar
1 Vanilla Bean, Split & Scraped for Seeds
¼t Sea Salt

Directions:
1. For the Quick Croissant Dough: In a large mixing bowl, whisk together the warm milk, water, vanilla, and yeast until combined. Set it aside. In the bowl of a food processor, pulse together the AP flour, bread flour, sugar, and salt until mixed throughout. Add the chilled butter and pulse until the butter is in small pieces. It is very important that you do not over-process the mixture because you need to see chunks of butter, about 1cm in size. After you have processed the flour and butter mixture, add it into the bowl of the yeasted liquid. Using a rubber spatula, gently fold the dry ingredients into the wet ingredients, making sure to get the dough together without making the butter pieces any smaller. Once it is roughly combined, dump the mixture onto a floured work surface and lightly knead to form a ball of dough. Place the dough ball back into the mixing bowl and cover with plastic wrap. Chill in the refrigerator for 2-3 hours. After it has chilled, place the dough ball back again onto a well-floured surface. Roll the dough out into a rough 20x40cm rectangle. Fold the dough into thirds, like a business letter, making sure to brush off any excess flour. This is the first turn of a total three turns. Rotate the dough 90 degrees, so that the folds are facing you. Repeat the rolling and folding process two more times. Wrap the dough in plastic wrap and refrigerate overnight before using.
2. For the Crème Brulee Pastry Cream: In a medium saucepan, heat milk over medium-high heat until bubbles just start to form around the edges but milk is not yet boiling. Meanwhile, in a small bowl, stir together sugar, flour, and salt. In a medium bowl, whisk together egg yolks and vanilla bean seeds until well combined; slowly whisk in flour mixture until thick and pasty. Remove milk from heat and slowly add to egg mixture, whisking constantly. Transfer egg mixture to saucepan and place over medium heat, whisking constantly until mixture thickens and comes to a boil, about 3 minutes. Boil, whisking, for 10 seconds, and immediately remove from heat. Pour mixture through a fine mesh sieve set over a small heatproof bowl; stir in vanilla. Strain into a plastic squeeze bottle and refrigerate for at least 4 hours, but preferably overnight.
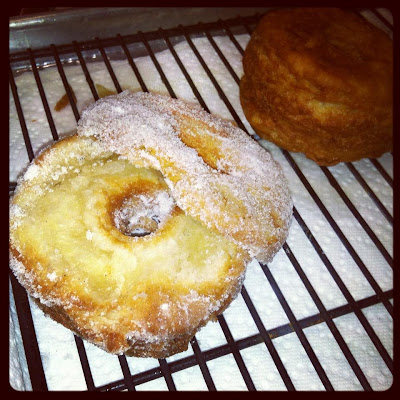
3. For the Vanilla Bean Sugar: Place the sugar, vanilla bean seeds, and salt into a food processor and pulse until all of the ingredients are combined and evenly mixed. Pour the sugar into a dish that you can dip the doughnuts into after frying.
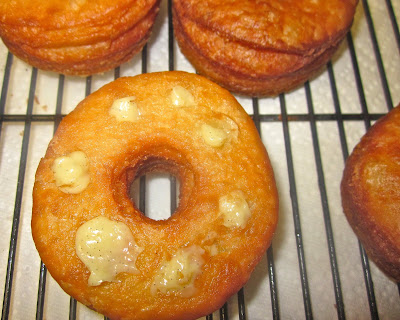
4. The Next Day: Remove the dough from the refrigerator after it has chilled overnight and place it onto a well-floured surface. Roll it out into large rectangle that is roughly 1cm thick. Line a baking sheet with a Silpat and lightly flour it. Set it aside. Dip a doughnut cookie cutter into flour and cut out rounds from the rolled out dough, you should be able to get roughly 10-12 Cronuts from this batch of dough (not including a whole bunch of doughnut holes for snacking). Place the cut doughnuts onto the floured sheet pan and lightly cover with a kitchen towel. Let the Cronuts rest in a warm place until they have doubled in size, about 1-2 hours.
5. Frying the Cronuts: Heat the oil to 325 degrees in a deep pot or sauté pan while you’re Cronuts are almost done resting. Fry the Cronuts, two at a time, for 2-3 minutes on each side, or until they reach a deep golden brown color and are completely cooked through in the center. Remove from the oil to a baking sheet that is lined with paper towels and a wire rack. Let them cool enough to handle.
6. Assembling the Cronuts: It is now time to start filling the fried Cronuts. I did this “Twinkie-style” by using the squeeze bottle that is filled with the chilled crème brulee pastry cream. Gently poke holes into the bottom of a Cronut and fill them all the way through with cream. Repeat this process until you have about 5-6 cream filling holes in each Cronut. Scrape off any excess cream that begins to ooze out. Now that all of the Cronuts have been filled, roll them in the vanilla bean sugar until all the sides are covered. Place them back onto the cooling rack and use a spoon to sprinkle an even (but semi-thick) layer of sugar on top of the Cronut. Using a kitchen torch, caramelize the sugar until golden brown and extremely crackly. Let the sugar topping cool for a minute before eating.
7. Enjoy while the Cronuts are still warm & crunchy!!
Cronut Holes For Snackin' :)

Tuesday, June 11, 2013

Crispy "Chicken Fried" Chicken Skins with Homemade "Wrecked Junction" Hot Sauce

Crispy "Chicken Fried" Chicken Skins with Homemade "Wrecked Junction" Hot Sauce
We all love fried chicken... and if you don't well you're either A. lying to yourself or B. un-American. That might be a little drastic, but us Southerners live + die by our fried chicken recipes. It's practically a religion. Any who, I'm gonna be the first one that will put this out there, the main reason why fried chicken is so coveted is because of the crispy, juicy, evil, bootyliciously yummy chicken skins. There aren't make things that are more satisfying the fried chicken skin; it'd certainly be at the top of my list. So, why not skip over the whole boring meat situation and skip right to the goodies... CRISPY "CHICKEN FRIED" CHICKEN SKINS. This really is the best thang since fried chicken or potato chips or sliced bread (pick + choose from the list that applies to your childhood). These are the perfect little Southern appetizer without all the hassle of frying bone-in chicken for a couple hours. All you need is a bunch of skin-on chicken breasts, so that you can peel off the skins to marinate. The leftover meat from the skins was used for other recipes throughout the week... no need to waste here, people! The skins are soaked in buttermilk & hot sauce (just like most fried chicken recipes) and coated in my favorite "nibblet" dredging flour. Then, they are plopped into hot peanut oil and fried to golden brown perfection and sprinkled with just the smallest bit of salt and fresh cracked pepper. We served ours with our new favorite "wrecked junction" hot sauce, but a drizzle of fancy infused honey or sorghum molasses would be excellent for a sweet twist!! This is my heaven people... chicken skins, perfectly fried, and crispy with lots of "nibblets". Enjoy until you're heart gives out, literally!! Enjoy :)


perfect nibblet achievement.

don't forget to dip!! 

Marinating the Chicken Skins:
12-15 Chicken Skins (cut off of chicken breasts since they tend to be thinner & flatter)
1C Buttermilk
¼C-½C Hot Sauce 

For the Crispy Breading:
2C Self Rising Flour (AP Flour can be substituted)
½C Cornstarch
½t Ground Thyme, Garlic Powder, & Cayenne
Salt & Pepper, To Tasted
¼C Buttermilk (to be used in the last step)

For the Chicken Fried Chicken Skins:
Marinated Chicken Skins
Crispy Breading
Peanut Oil, For Frying
Homemade “Wrecked Junction” Hot Sauce, For Dipping
Honey, For Drizzling (optional)
Salt & Pepper, To Taste

Directions:
1. Marinating the Chicken Skins: Using a sharp knife or your hands peel of the skins from the meat (keeping the chicken to be roasted or used in a different recipe altogether). Use the backside of the knife or a dull butter knife to scrape off any excess pieces or clumps of fat. If you would like the skins in a bite size shape, cut them in half. In a mixing bowl, whisk together the buttermilk and hot sauce. Place the chicken skins into the buttermilk marinade, making sure they are completely covered. Marinate the skins for at least 12 hours or overnight.
2. Prepping: Once it has marinated, remove it from the refrigerator, drain & dry off the buttermilk brine. Meanwhile, heat the peanut oil in a deep fryer or skillet to 375 degrees.
3. Breading the Chicken Skins: In a brown paper bag, combine the flour, cornstarch, thyme, garlic powder, cayenne, salt, and pepper. Shake the dried chicken skins in the flour mixture and get rid of the excess flour from the chicken, and then place them into the same buttermilk marinade you used previously. Dip the chicken into the wet batter and let the excess batter drip off.  Right before you are ready to fry, drizzle in some of the excess buttermilk into your breading flour mixture. Using a whisk or a fork, stir it around and mash up the larger pieces of flour chunks to form chicken “nibblets” or extra crispy pieces of batter. Finally dredge the skins in the remaining “nibblet” flour and coat them well. Gently shake off anything excess, but don’t waist no “nibblets”, ya hear!
4. Frying the Skins: Place the coated chicken skins into the preheated oil and fry until crispy and golden brown, anywhere from 2-5 minutes, depending on the size of the skins. Remove from the crispy skins from the oil and let them drain on a paper towel-lined plate. Immediately salt and pepper to taste. Repeat with the remaining chicken skins.
5. Serving the Crispy “Chicken Fried” Chicken Skins: Place the crispy chicken skins onto a serving plate with homemade “wrecked junction” hot sauce for dipping!

Sunday, June 9, 2013

Homemade "Wrecked Junction" Hot Sauce

Homemade "Wrecked Junction" Hot Sauce or Spicy Green Tomato-Serrano Hot Sauce
I have never ventured into making my own homemade hot sauces... yet. But, I'm so glad I decided to give it a go because this stuff is kick-ya-in-tha-face delicious. Getting kicked in the face is obviously a positive thing here, even though you wouldn't normally think so. This hot sauce gets your stomach wrecked because of its extra-spicy component of serrano peppers. No worries though, it is all mellowed out through the work of some nifty green tomatoes, shallots, and honey. I personally liked that this hot sauce had some "body" to it after it was pureed in the food processor. But, if you want to go for the "classic" hot sauce texture, you could easily pass it through a strainer or a cheesecloth. It's really up to you! We served this spicy companion with some super devilish chicken fried chicken skins, but I'm tellin' ya, it is AMAZING with some southern fried chicken or even as a dip with some tortilla chips. I'm lovin' how versatile this recipe is and will use it over + over in the future!! Enjoy :)


For the Hot Sauce:
½lb Firm Green Tomatoes, Cut into Slices (this was about 3 large tomatoes for me)
4 Large Shallots, Cut into Slices
½lb Fresh Serranos
Extra Virgin Olive Oil
Salt & Pepper, To Taste
2 Large Cloves of Fresh Garlic, Minced
1C Cider Vinegar + 1C White Vinegar
1C Honey (or to taste)
1 Lime, Zested
1T Fresh Cilantro, Minced

Directions:
1. Roasting the Vegetables: Preheat the oven to broil or 500 degrees. Line a baking sheet with a silpat and spread the slices of green tomatoes and shallots evenly on the pan. Drizzle them with olive oil and sprinkle with salt& pepper. Cook them until they are softened and starting to char slightly, about 7-10 minutes, depending on your oven. Scrape the cooked tomatoes and shallots into a food processor. Next, add on the fresh Serranos and toss them with olive oil, salt, and pepper. Cook the peppers until blackened and charred, about 10-12 minutes. Remove them from the oven and let them cool, and then peel off the skins and place them into the food processor along with the tomatoes and shallots.
2. Making the Hot Sauce: Add the minced garlic into the food processor and pulse until the mixture is pureed, but still has a slightly chunky consistency. Blend or whisk in the vinegars, honey, lime zest, and fresh cilantro. Season to taste with salt, pepper, sugar or honey. Pour into jars and preserve.
3. Serve with chicken fried chicken skins or your favorite fried chicken recipe!