Showing posts with label Beef. Show all posts

Friday, January 20, 2017

Instagrub: Sticky + Garlicky Korean Beef Noodles

And here's the last recipe to kick off our week of Asian dishes! Remember how I mentioned on Wednesday that I would post my Sticky + Garlicky Korean Beef Noodles? Well, here they are! There are very few recipes that we make more than once. My husband hates me for that because I'll make something so delicious, and then when he requests it again, I have to tell him that I've already made that and I'm a food blogger who needs to constantly come up with new recipes for all of my followers! However, there are a few exceptions to that argument, and one of them is certainly this Asian pasta dish. We have made these Korean Beef Noodles every week for the last six months! We think it's pretty easy-peasy to make and it makes enough to feed an army! The sauce is pretty straight forward, as I already went into how to make it on my post for the Asian Chicken Lettuce Wraps with Sweet + Salty Sauce (literally, it is the exact same sauce). As for the pasta, I really love to use Trader Joe's Pappardelle Pasta for this recipe, but honestly, any kind of noodles will do! The most important cooking process is by far the beef component. I start off by cooking the ground beef in a cast iron skillet until it has just barely finished cooking, and then I drain the excess fat out of the pan, using a pasta strainer. While the beef is separating from the extra fat and liquid, wipe down the cast iron skillet, so that it is completely dry. Return the skillet to your stovetop and crank up the heat to as high as it will go. Once it is screeching hot, add the ground beef back in, along with the minced garlic. Quickly pour in half of the sweet + salty sauce and stir to coat the ground beef. I find that if you cook this at a very high heat, the sauce will perfectly caramelized onto the meat and deepen the flavor. Really all that is left to do is to combine all of the components... al dente pasta, caramelized onions, charred green onions, minced green onions, sweet + salty sauce, caramelized ground beef, + seasonings. We really like to overdo it with the minced, dried garlic, toasted sesame seeds, and red pepper flakes, so I'll leave that up to you on how much you want to put in. Now all you have to do is eat the Sticky + Garlicky Korean Beef Noodles while they are still hot!! Enjoy :)
For the Sweet + Salty Sauce:
1C Light Brown Sugar
½C Soy Sauce
¼C Hoisin Sauce
1T Toasted Sesame Oil
1-2T Sriracha (depending on how spicy you like it)
1T Rice Wine Vinegar
1t Freshly Grated Ginger
1t Red Pepper Flakes (less or more to your preferred spiciness)
4 Large Cloves of Garlic, Minced

For the Caramelized Onions:
2 Vidalia Onions, Sliced
4T Unsalted Butter
2T Vegetable Oil
1t Kosher Salt
1T Sugar

For the Korean Beef Noodles:
1T Canola Oil
2 Bunches of Green Onions (1 bunch finely sliced + 1 bunch cut into 1-inch pieces)
1T Toasted Sesame Oil
2-3lbs 80/20 Ground Chuck
4 Large Cloves of Garlic, Minced
16oz Pappardelle Noodles (I like Trader Joe’s brand, but really any kind of pasta will work)
2T Korean Chili Seasoning
Prepared Sweet + Salty Sauce
Prepared Caramelized Onions
2T Minced, Dried Garlic (or to taste, but we love adding a bunch to this pasta)
1T Toasted Sesame Seeds
1t Red Pepper Flakes (this is optional, but you can add more or less to your liking)

Directions:
1. For the Sweet + Salty Sauce: In a small pot, whisk together all of the sauce ingredients until it is well incorporated. Bring the sauce to a boil over medium-low heat, making sure to continuously whisk. Reduce to a simmer and cook for another 1-2 minutes. Turn off the heat and let the sauce cool for a few minutes. Repeat this process of bringing it to a boil and simmering the sauce three more times. After you have done this, allow the sauce to cool while you make the Korean Beef Noodles.
2. For the Caramelized Onions: Heat the butter and oil in a large soup pot over medium heat. Add in the sliced onions, salt, and sugar. Cook for 10 minutes, and then reduce the heat to medium-low and continue to caramelize, stirring occasionally, for 20 more minutes. The onions should be browned and caramelized. If at all during the cooking the onions begin to darken or burn, just add a few tablespoons of water. After they are done, turn off the heat and leave the caramelized onions in the pot.
3. Charring the Green Onions: In a cast iron skillet, over high heat, add in the canola oil. Take the one bunch of green onions that were cut into 1-inch pieces (leave the other bunch of thinly sliced green onions uncooked) and put them in the searing hot pan. Stir the onions around for a minute or two until they have begun to char and slightly soften. Remove the charred green onions from the pan and place them into the pot with the caramelized onions.
4. Preparing the Pasta: Boil your pasta according to the package directions. Once they have cooked to al dente, strain the noodles and add them into the pot with the onions. Sprinkle the Korean chili seasoning on top of the pasta and toss to combine all of the ingredients in the pot (that way the noodles won’t stick together).
5. Cooking the Ground Beef: Heat 1T of toasted sesame oil, in the same cast iron skillet that you charred the green onions in, over medium-high heat. Add in the ground beef and cook until just browned, about 5 minutes. Make sure to crumble the beef as it cooks, so smaller pieces form. Drain the excess fat out of the pan. Return the cast iron pan to high heat. Once it has gotten extremely hot, add the cooked, crumbled beef back into the pan, along with the garlic. Stir this mixture around for 1-2 minutes. Quickly pour half of the sweet + salty sauce over the ground beef and cook for another 1-2 minutes. Cooking at such a high temperature will help the sauce to caramelize into the beef and deepen the flavor.
6. Finishing the Korean Beef Noodles: Pour the sauced, caramelized beef over the pasta in the large pot, and then drizzle in the remaining sweet + salty sauce and add in the finely sliced green onions. Using tongs, toss together all of the ingredients until they are evenly incorporated. Season the pasta with the dried minced garlic, toasted sesame seeds, and red pepper flakes. Mix everything together and serve while the noodles are still hot!

Friday, September 2, 2016

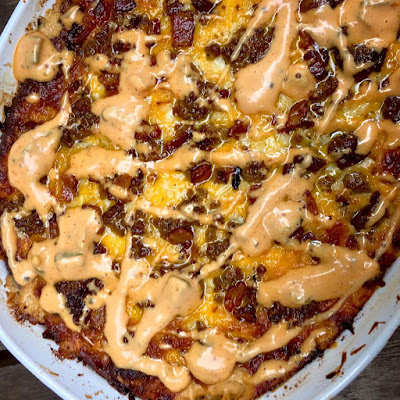
Saturday Down South: In 'n Out Animal Style Double Bacon Cheeseburger Dip with Mustard Grilled Burger Crumbles, Pan Fried Caramelized Onions, Cubed Dill Pickles, Diced Tomatoes, Crispy Bacon Lardons, + Secret Sauce Drizzle

It's officially the most wonderful time of the year... football season!! I swear my Mountain Man has been counting down the days since we won the national championship last season. Now comes the time of friends, tailgating, fatty food, bonfires, and plenty of booze. 

One of the mainstays of our menu is hearty dip, and this recipe that I am featuring today is just that! The inspiration came from a burger joint that is extremely popular in California... In n' Out Burger. Since Alabama is playing USC tomorrow, I thought this would be the perfect time to feature my first (of many) tailgate recipes this year. When you order a burger or fries "animal style", this usually means that it comes with extra secret sauce, caramelized onions, mustard grilled patties, and pickles. So, I started off with a creamy dip base and added mustard grilled burger crumbles, crispy bacon lardons, pan fried caramelized onions, cubed bread n' butter pickles, diced tomatoes, and shredded cheese. After it is baked in the oven until golden brown + delicious, you whip a batch of my not-so-secret secret sauce and drizzle it over the top. At this point, everyone will be salivating, so all that is left to do is serve with some some chips or crackers. I also like to put out some different bowls with burger toppings for extra garnishing... pickles, tomatoes, shredded lettuce, + more sauce. That way, when a friend grabs a chip and some dip, they can sprinkle a little bit of this and a little bit of that on top for the perfect bite! This recipe is super easy, so almost anyone can whip it up, don't y'all worry. I hope y'all love this first recipe of the season!! Enjoy :)


For the Mustard Grilled Burger Crumbles:
1lb 75-25 Ground Chuck
¼C Yellow Mustard
Kosher Salt + Fresh Cracked Pepper, To Taste
4T Unsalted Butter

For the Pan Fried Caramelized Onions:
2 Large Vidalia Onions, Sliced
4T Unsalted Butter + 2T Vegetable Oil
Kosher Salt, To Taste
¼C Sugar

For the Dip:
8oz Herbed Cream Cheese, Room Temperature
1C Sour Cream
½C Mayo
2C Shredded Cheddar, Split
2C Mozzarella Cheese, Split
1 Garlic Clove, Minced
1-2T Worcestershire Sauce
½t Smoked Paprika, Garlic Powder, & Onion Powder
Kosher Salt + Fresh Cracked Pepper, To Taste
Prepared Mustard Grilled Burger Crumbles
Prepared Pan Fried Caramelized Onions
1 Medium Tomato, Diced
½C Bread n’ Butter Pickles, Diced
Shredded Romaine Lettuce

For the Secret Sauce:
1/3C Mayo
3T Ketchup
1-2T Sweet Pickle Relish
1t Sugar + 1 White Vinegar
¼t Garlic Powder, Onion Powder, + Paprika
Kosher Salt + Fresh Cracked Pepper, To Taste

Directions:
1. Preheat the open to 350 degrees and spray a pan with Pam.
2. For the Mustard Grilled Burger Crumbles: In a large skillet, over medium high heat, brown the ground beef. Pour off any extra fat and stir in the mustard. Season with salt and pepper, and then set it aside.
3. For the Pan Fried Caramelized Onions: Heat the butter and onion in a large sauté pan over medium heat. Add the onions, salt, and pepper and sauté for 10 minutes. Reduce the heat to medium-low and cook, stirring occasionally, for 20 more minutes until the onions are browned and caramelized. Allow the onions to cool.
4. For the Secret Sauce: Mix together all of the ingredients until everything is incorporated. Taste the sauce and adjust to your taste preferences. Set this sauce aside until you want to top the dip with it.
5. For the Dip: Place the cream cheese, sour cream, and mayo in the bowl of an electric mixer, fitted with the paddle attachment, and bet until smooth. Add in 1C each of the shredded cheddar and mozzarella (saving the rest to put on top), followed by the mustard grilled burger crumbles, cooled caramelized onions, minced garlic, Worcestershire, spices, diced tomato, and diced pickles. Season with salt and pepper to taste. Sprinkle the left over cheese on top and bake in the oven for 20-30 minutes until the cheese has melted and begun to brown on top. Remove the dip from the oven and drizzle the secret sauce over the top. Serve with Ritz crackers or potatoes chips, and have a bowl of shredded lettuce on the side to garnish the dip.

Monday, February 16, 2015

Braised Short Rib Ragu Pasta

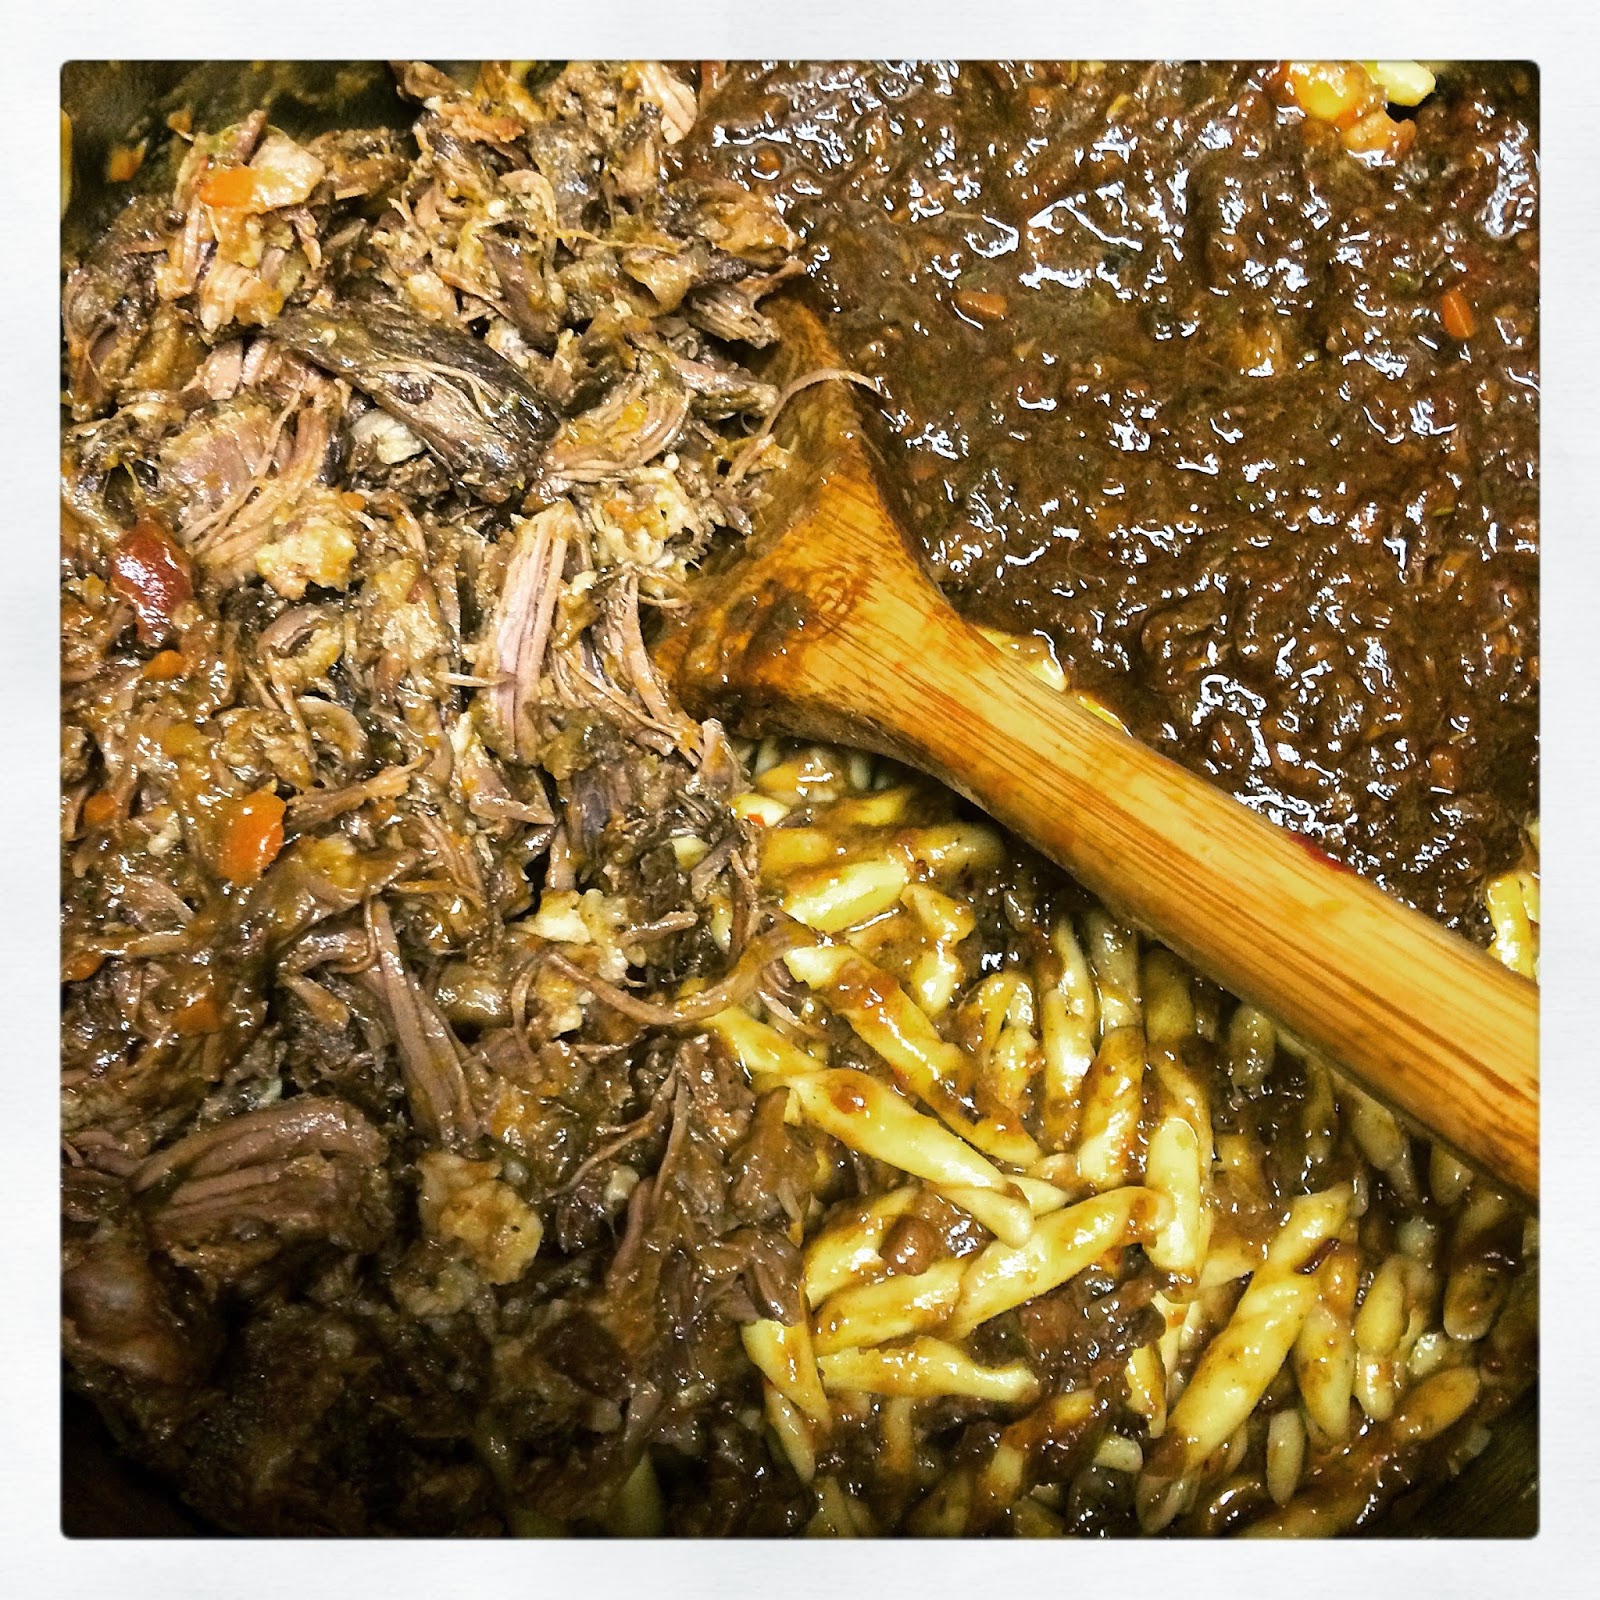
There are some meals here on Haute + Heirloom that we tend to repeat... and repeat... and repeat. Like our favorite Fancy Pot Roast, we make this 3-4 times a month. Well this Braised Short Rib Ragu Pasta is also becoming a weekly tradition. It is something that you can start early on Sunday and by dinner time you just have to stir together everything for a super comforting + filling meal. There is something so magical about braised short ribs, and I can't really put my finger on it, but it is truly special. After browning the short ribs in a big pot, I added in a bunch of aromatics... carrots, garlic, leeks, onions, parsley, and celery. After they saute a bit, it's time to add in the pureed tomatoes, tomato paste, beef stock, and red wine.
Finally, it is all topped with the crucial "flavor"-producing components... herbs, bay leaves, cocoa powder, balsamic vinegar, fish sauce, and Worcestershire sauce. These all bring such depth to the dish, so don't skip out on any of them. I MEAN IT. Now this pot, it's gonna braise and braise and braise some more. Like 4-5 hours worth of braising is on the horizon, but to me, that's okay because I'm already doing some house cleaning and laundry, so I can keep an eye out on the pot as well. Eventually you get to that glorious part of the recipe where the braised short ribs are amazingly tender and forked off the bone tender. UM YUM. And then, you have to reduce this sauce down until it becomes chocolate brown and much thicker than where it started. I continuously stirred the sauce, so it would evenly reduce and not burn on the bottom. Once that sauce is ready, it's time to add in some more yummy stuff. Begin by browning a stick of butter in a separate pot, once it is just started to brown, add in the minced garlic and saute for just a minute or two. Throw in already cooked pasta, turn off the heat, and coat the pasta in the garlicky brown butter. And this, my friends, is where the magic begins to happen. Put the shredded short rib met on top of the pasta, along with as many scoops of your ragu sauce as you like, caramelized onions, red pepper flakes, shaved bittersweet chocolate, half of the grated Parmesan, some fresh herbs, and heavy cream (to make it extra luscious). Fold in all of the ingredients until you have a cohesive pasta dish. Spoon the finished pasta into serving bowls and garnish with a mound of freshly grated Parmesan + fresh herbs. Y'all are gonna LOVE it!! Enjoy :)
For the Braised Short Ribs:
¼C Extra Virgin Olive Oil
4oz Diced Pancetta + A Heavy Pinch of Cinnamon
4lbs Bone-In Short Ribs
Fleur de Sel + Fresh Cracked Pepper (to heavily season the short ribs)
½C AP Flour
1 Vidalia Onion, Finely Minced
1 Leek, Finely Minced
3 Carrots, Finely Minced
4 Cloves of Garlic, Finely Minced
3 Stalks of Celery, Finely Minced
½C Fresh Parsley
28oz Whole San Marzano Canned Tomatoes, Pureed until Smooth
3T Tomato Paste
2 ½C Beef Stock
1 ½C Red Wine
2 Sprigs Fresh Rosemary + Fresh Thyme
1t Dried Oregano
3 Bay Leaves
3T Cocoa Powder (sifted to remove clumps)
1T Balsamic Vinegar
1T Fish Sauce
1T Worcestershire Sauce

For the Braised Short Rib Pasta:
1 Stick of Unsalted Butter, Melted & Browned
4 Cloves of Garlic, Minced
1lb Pasta, Cooked Al Dente
Braised Short Ribs, Shredded into Bite Size Pieces (prepared above)
A Few Scoops of the Braised Short Rib Ragu Sauce (from the pot used above… to taste)
1C Caramelized Onions
½-1C Heavy Cream (depending on how creamy you like it)
1-2t Red Pepper Flakes (or as spicy as you like)
4-6t Shaved Bittersweet Chocolate
1C Freshly Grated Parmesan (divided)
Fresh Herbs, For Garnishing (we used parsley, basil, and chives)

Directions:
1. Preparing the Short Ribs: Place the olive oil in a large heavy soup pot over medium heat. Add in the Pancetta, with a pinch of cinnamon, and cook until the Pancetta is golden and crisp. This will take about 2-4 minutes. Meanwhile, season the short ribs with salt and pepper, and then dredge in flour (make sure to dust off any excess flour, so there is only a light coating). Using a slotted spoon, remove the Pancetta from the pan and put them into a small bowl, and reserve it for later. Add the short ribs to the pan and brown on all sides, about 10 minutes. Once all of the short ribs have evenly browned, take them out of the pot and place them on a plate or baking dish.
2. Making the Braised Short Rib Ragu: Meanwhile, place the onion, leek, carrots, garlic, celery, and parsley into a food processor and pulse until everything is finely diced, but definitely not pureed! Add these minced aromatics to the pot that the short ribs had been browning in and allow them to cook and caramelize some, just about 5-10 minutes over medium heat. After sautéing them, add the crispy pancetta, pureed tomatoes, tomato paste, beef stock, and red wine. Bring this mixture to a boil and reduce the heat to a simmer, before you submerge all of the browned short ribs into the braising liquid, and then top with fresh rosemary, fresh thyme, dried oregano, and bay leaves. Cover the pot and cook at a simmer for 2 hours. Remove the lid and simmer for another 2 hours, making sure to stir occasionally. After this period of cooking, remove the lid, and continue to cook for another 2 hours (while also making sure to occasionally stir the sauce). After their second cooking period, remove the meat and bones from the pot. Discard the meat and bones from the pot onto a large cutting board (making sure to throw away any fatty pieces as well). Shred the meat into bite-size pieces and let them rest while we reduce the ragu sauce. Stir in the cocoa powder, balsamic vinegar, fish sauce, and Worcestershire sauce, and bring the sauce up to a boil, and then back down to medium heat. You will need to remain near the pot to stir the sauce to ensure that it does not burn. Cook this sauce until it is much darker in color and reduced in volume. It should be quite thick. Remove the bay leaves, sprigs of rosemary, and sprigs of thyme. Season the sauce with some kosher salt and fresh cracked pepper (and sugar if you want it to be a little bit sweeter).
3. Assembling the Short Rib Pasta: In another pot, melt a stick of butter over medium heat until it begins to brown and release a nutty fragrance. Add the minced garlic and sauté just for a minute or so in the brown butter. Turn off the heat and quickly add the al dente pasta and coat it completely in the garlicky brown butter. Throw all the meat on top of the pasta, followed by some scoops of the reduced ragu sauce (as much as you want), caramelized onions, heavy cream, red pepper flakes, ½C grated Parmesan, shaved bittersweet chocolate, and fresh herbs. Fold the pasta gently to combine and until a luscious sauce has coated your pasta.
4. Serving the Pasta: Spoon the short rib pasta into serving bowls and add a heap of freshly grated Parmesan and some fresh herbs to garnish. Enjoy! 

Tuesday, October 28, 2014

Fancy Pot Roast with Caramelized Shallots

Fancy Schmancy Pot Roast with Caramelized Shallots
I'm going to go right out here and say it... I hate the idea of a slow cooker and braising a tough piece of meat for hours upon hours for it to get tender and any notion of making meat into a "loaf". I know that's odd because I believe that most of these types of dishes are classic Americana cooking. Besides me, everyone I know loves Pot Roast, Meat Loaf, & Casseroles. In fact, my Mountain man would prefer these types of dishes over some of my favorite (and sometimes very complicated) recipes. That being said, I am really trying to make a conscious effort to make these dishes, but on my terms and high-end ingredients. First, you gotta find a big 'ole boneless chuck roast and heavily salt + pepper all sides of the meat. After seasoning it, I like to lightly coat the roast with some flour, which will aide in the browning process of the meat. So it looks like this...
perfectly browned chuck roast
Next, prep all your precious veggies... we like to use vidalia onions, peeled carrots, leeks, and celery. Sautee them in some butter + olive oil until they become softened, translucent, & caramelized. Pour in the red wine, beef stock, beef consomme, and 1 packet of onion soup mix. Whisk to combine the soup mix with variety of liquids. And like most food I eat + create, I always add a little bit of sugar, honey, maple syrup, or agave because it balances so perfectly against the richness of the pot roast. My secret ingredient comes from a good family friend who claimed that putting some prepared horseradish took a simple pot roast over the top... AND BOY SHE WAS RIGHT. So instead of just spooning it on top of your plate, I decided to whisk it into the braising liquid and it enhanced the flavor instantly. I recommend that you go by your own taste preference. Another key component is the use of fresh herbs; we liked the combination of dried bay leaves, fresh thyme, fresh rosemary, and garnished the finished product with minced chives.
veggies + aromatic herbs
Finally, add in cloves of roasted garlic, mushrooms, baby new potatoes, & wedges of cabbage (core removed). Now that your pot roast is ready, place the large dutch oven on a large baking sheet pan, and put the top to cover the pot (this will help to keep your oven clean; no drippings down the sides). Pot Roast is all about braising and baking for long periods of time, so it is a great meal to start early afternoon and pull out of the oven by dinner time. While it's gettin' all tender n' such for 4 hours, it's time to make my favorite part of the "fancy pot roast", which are the sweet + sticky caramelized shallots. I swear I could eat the whole pan of these onions. They are that good. Once all of 'em are baked, they just melt in your mouth, so much so that it seems like they have this fatty texture from boston butt or a ribeye steak (without being gross, I promise). And although I may be biased because my obsession with shallots has no boundaries, you're going to have to take this advice on blind faith. They are the BEST caramelized onions I have ever had, and they are as easy as pie, too.
heavenly caramelized shallots.
nuggets of shallot candy, garnished with fresh herbs
Literally the most difficult part of this recipe is peeling the shallots so that they remain whole. But I've found a way around that by hittin' up a Whole Foods and buying 2 pounds of their peeled shallots (already in small containers, so you have to buy a few of them). The caramelization all happens because of creamy butter, sweet sugar, tangy red wine vinegar, hearty red wine, salt, pepper, and a garnish of fresh herbs. After all of it is said and done, these plain/raw shallots turn into shallot candy. Once you start poppin' them into your mouth, there isn't any way of stoppin'. However, you're going to have to resist the temptation because the shallot candy gets placed into the pot roast as a garnishing component (yes, I realize that they are the biggest garnish in the culinary world, but who cares when it's that delicious). Now like I said before, I used to hate Pot Roast, and I think it's because it was all to salty for me. And these shallot candy nuggets, well, they made me a true believer and an advocate for Pot Roast. In other words, you gotta make this pot roast with these caramelized shallots, and you'll never go back to your grandmother's basic pot roast recipe. Sorry granny, I still got mad respect for you though. So, here it is... the recipe for my Fancy Pot Roast with Caramelized Shallots. Oh and did I mention that we make it on a weekly basis now? Especially when Autumn has arrived and you need a hearty dish to keep you warm from the chilly weather outside (you'll be significantly stuffed after) !! ENJOY :)
see the shallot candy bulbs? yesssss. 
the anatomy of the perfect, fancy pot roast with caramelized shallots

For the Pot Roast:
5lbs Boneless Chuck Roast (sprinkled heavily with salt & pepper)
2T EVOO + 2T Unsalted Butter
2 Vidalia Onions, Peeled & Cut into Wedges
8 carrots, Peeled & Cut into Sticks
2 Leeks, Sliced & Sautéed
2 Stalks of Celery, Finely Chopped & Sautéed
1C red wine
2-3C beef stock
1 can of Beef Consommé 
1 Packet of Onion Soup Mix
1-2T Sugar (or to your desired sweetness, to balance out the flavors)
1-2T Prepared Horseradish
2 Dried Bay Leaves
3 Sprigs of Fresh Thyme
3 Sprigs of Fresh Rosemary
8 Cloves of Roasted Garlic
1 Package of Portabella Mushrooms
½lb Baby New Potatoes
1 Small Head of Cabbage, Core Removed + Cut into Wedges

For the Caramelized Shallots:
6T Unsalted Butter
2lb Shallots, Peeled & Left Whole
3T Sugar + 2T Red Wine Vinegar
Splash of Good Red Wine
Salt & Pepper
Fresh Minced Parsley or Chives, For Garnishing

Directions:

1. Prepping the Meat: Generously salt and pepper your chuck roast. Lightly coat all sides of the meat with flour (this will help the meat brown better). 
2.Heat a large pot or Dutch oven over medium-high heat. Then add in the olive oil and butter.
3. Prepping the Veggies: Cut two onions in half and cut 6 to 8 carrots into 2-inch slices. When the oil in the pot is very hot (but not smoking), add in the wedges onions, browning them on one side and then the other. Remove the onions to a plate. Throw the carrots into the same very hot pan and toss them around a bit until slightly browned, about a minute or so. And then, you should sauté the celery and leeks until caramelized. Remove all of these sautéed veggies to the plate of carrots.
4. For the Pot Roast: Add a bit more olive oil & butter to the very Dutch oven pan. Place the meat in the pan and sear it for about a minute on all sides until it is nice and brown all over. Remove the roast to a plate. With the burner still on high, use the red wine to deglaze the pan, scraping the bottom with a whisk to get the entire wonderful flavor up. Add in the beef stock, When the bottom of the pan is sufficiently deglazed, place the roast back into the pan and add enough beef stock to cover the meat halfway (about 2 to 3 cups). Add in the onion and the carrots, as well as 3 or 4 sprigs of fresh rosemary and about 3 sprigs of fresh thyme.
5. Put the lid on, and then roast in a 300-degree oven for 4 hours.
6. For the Caramelized Shallots: Preheat the oven to 400 degrees. Melt the butter in a 12-inch oven-safe sauté pan, add the shallots and sugar, and toss to coat. Cook over medium heat for 10 minutes, tossing occasionally, until the shallots start to brown. Add the vinegar, salt, and pepper and toss well to coat. Place the sauté pan in the oven and roast for 15 to 30 minutes, depending on the size of the shallots, until they are tender. Season, to taste, sprinkle with parsley, and serve hot. If your sauté pan is like mine and not oven-safe, it works to start this dish in your frying pan then scrape the shallots and sauce into a baking dish (sprayed with Pam) when it’s ready to go in the oven. Bake them in the preheated oven for 15-30 minutes (depending on the size of the shallots. They will become soft, tender, and golden-brown in color. Season to taste with salt & pepper to taste and sprinkle the top of fresh herbs.
7. Finishing the Pot Roast: Once the meat + veggies have been braised for 4 hours, remove the dish from the oven, let it slightly cool down, and then strategically place the shallot candy bulbs over the top of the pot roast (so you can get a shallot in each serving).
8. Serving the Pot Roast: Put either some cooked pasta or mashed potatoes into the bottom of your bowl and top it with a generous scoop of pot roast and caramelized shallots. Finally, drizzle some of the braising liquid (or sauce) over the meat + pasta/mashed potatoes and garnish with minced fresh herbs.
my big 'ole plate of pasta, fancy pot roast, + caramelized shallots