Sunday, January 30, 2011

Blue Cheese-Honey Biscuits with Honey Butter

So apparently blue cheese & honey is like this amazing combination, and we had no idea. So we decided to try it. Normally you get toasted bread and spread on blue cheese, then drizzle honey on top, but we decided to make blue-cheese honey biscuits with some honey butter for a breakfast item. It turned out really well! We're enjoying them right now, and hopefully soon you will too!
Blue Cheese-Honey Biscuits with Honey Butter
For the Biscuits:
2 ¼C AP Flour
2 ½t Baking Powder
1T Honey
¾t Baking Soda
1t Salt
6T Butter, Chilled & Cut into Cubes
1 ½C Blue Cheese, Crumbled
1C Buttermilk

For the Honey Butter:
1 Stick Butter, Softened
1T + 1t Honey
¼t Vanilla
Dash of Cinnamon

Directions:
1. Preheat your oven to 450 and line a baking sheet with parchment paper and spray with Pam.
2. To make the biscuits, start off by blending the flour, baking powder, baking soda, salt, and cubed butter in a food processor until it is crumbly. Dump this mixture into a bowl and pour in the buttermilk, honey, and blue cheese. Mix until incorporated, but do not over-mix because it will make your biscuits tough. Scoop this dough with a spoon (or I used an ice cream scoop) onto the lined baking sheet. This recipe should make about 12 biscuits.
3. Bake in the preheated oven for 15-20 minutes, rotating halfway through.
4. While the biscuits are baking, make the honey butter. Put the softened butter, honey, vanilla, and cinnamon in a bowl and beat with a hand mixer, so the butter becomes light and fluffy. Serve this on the side for those who want a sweeter biscuit.
5. Serve the biscuits immediately with the honey butter, so it gets nice & melted!

source: drop biscuits

Saturday, January 29, 2011

Chicken Piccata with Balsamic Broccoli

Hello all! I've been a little lazy on the cooking this weekend, but I have a recipe for you tonight! We decided we wanted something Italian, but couldn't really put our finger on what we wanted to make. And Clayton has never really had Chicken Piccata, so we figured that would be a good choice. I served our Chicken Piccata with Balsamic Broccoli and whole wheat pasta. I hope you enjoy :)
Chicken Piccata with Balsamic Broccoli & Whole Wheat Pasta
For the Balsamic Broccoli:
½ Bag Broccoli, Steamed
½C Balsamic Vinegar
½C Honey
½C Brown Sugar
¼C Honey
1T Olive Oil

For the Chicken Cutlets:
4 Chicken Cutlets
Salt & Pepper
½C AP Flour
1 Egg
¼C Milk
1C Italian Bread Crumbs
1T Olive Oil
1T Butter

For the Piccata Sauce:
1C White Wine
¼C Lemon Juice
1t Garlic, Chopped
1T Pesto
1t Honey
½C Chicken Stock
1t Corn Starch
1 3oz Jar of Capers, Drained
2T Butter
Salt & Pepper

Directions:
1. To make the balsamic glaze, combine the balsamic vinegar, brown sugar, honey, and soy sauce in a pot. Bring the mixture to a boil and then reduce to a simmer, and cook for 15-20 minutes, while whisking constantly. Let the mixture cool before cooking with it.
2. In a sauté pan, drizzle in the oil and cook the steamed broccoli on medium-high heat for about 5 minutes. Now, toss the broccoli with some of the balsamic glaze (this just depends on how sweet you want it).
3. Preheat the oven to 400 and put a rack on a baking sheet (so the chicken can drain). To make the chicken cutlets, season the cutlets with salt and pepper, then dredge them in the flour, egg wash, and breadcrumbs. In a sauté pan, melt the butter and olive oil together. Fry the breaded chicken cutlets at high heat for a couple minutes on each side, or until golden brown. Place the fried chicken cutlets on the rack and bake in the oven for about 10 minutes (or keep them warm while you are making the sauce).
4. In the same sauté pan, pour in the white wine and lemon juice. Whisk in the chopped garlic, pesto, and honey. Let the mixture come to a boil, and then reduce to a simmer for 5 minutes. In a small bowl, whisk together the chicken stock and cornstarch to make a slurry. Slowly whisk the slurry into the wine. Bring it back to a boil for about 2 minutes. Add the capers and a dash of salt and pepper, to taste. Lastly, whisk in the butter until it is melted and the sauce is thick and glossy.
5. Drizzle the Piccata sauce on top of the chicken and serve with the balsamic broccoli and pasta and serve!

Friday, January 28, 2011

White Chocolate-Banana Bread French Toast with Salted-Caramel Sauce & Caramelized Bananas

So, it feels like it's been forever since I last posted... stupid school work! Anyway we bought a bunch of bananas yesterday, and we weren't quite sure what we wanted to make with it. Eventually we decided to make banana bread, but I added some white chocolate chips to make it extra yummy! So we saved a couple slices and let them become stale overnight for some banana bread french toast for this morning. We topped it with some of my left over salted-caramel sauce, caramelized bananas, and fresh whipped cream. It was really good and super decadent! I hope you enjoy :)
White Chocolate-Banana Bread French Toast 
with Salted-Caramel Sauce & Caramelized Bananas
For the White Chocolate-Banana Bread:
1C + 2/3C AP Flour
1t Baking Soda
¼t Cinnamon
½t Salt
1C + 2T Sugar
2 Eggs
½C Vegetable Oil
3 ½ Ripe Bananas, Mashed
2T Sour Cream
1t Vanilla
1C White Chocolate Chips

For the Batter:
3 Eggs
¾C Milk
½t Vanilla
½t Salt
¼t Cinnamon
1t Honey

For the Salted-Caramel Bananas:
1 Ripe Banana, Sliced into Rounds
½C Salted Caramel Sauce*
2T Butter

For the French Toast:
4 Slices White Chocolate-Banana Bread, Thick Cut
French Toast Batter
½C Salted-Caramel Bananas
1 Spoon Fresh Whipped Cream
Butter, For Frying

Directions:
1. To make the Banana Bread: First, sift together flour, baking soda, cinnamon, sugar, and salt. In a separate bowl, beat together the eggs and sugar, until light and fluffy. Then, beat in the sour cream and vanilla. Add the flour mixture slowly until incorporated. Next drizzle in the vegetable oil. In a small bowl, mash the bananas until it is a mushy. Fold in the mashed bananas into the other mixture, followed by folding in the white chocolate chips. Line a pan with tin foil and spray with Pam. Bake at 350 for about an hour, depending on the heat of your oven.  Let the bread cool completely before cutting. Slice into thick slices (to your liking) and place on a baking sheet to let the bread become stale overnight.
2. The next morning, retrieve your stale banana bread slices. Make your batter for the French toast by whisking together the eggs, milk, vanilla, cinnamon, salt, and honey. Dip the slices of banana bread in the batter, making sure they are coated and let soak for about 5 minutes.
3. Bring a sauté pan up to medium-high heat with about a tablespoon of butter for each slice in the pan.  Fry the slices of bread in the butter, about 2-3 minutes on each side, until golden brown. Once all of the slices have been browned, put them on a baking sheet and keep them warm in an oven (about 300).
4. Meanwhile, make the caramel sauce.  In the same sauté pan, fry the banana rounds until golden brown. Add the salted-caramel sauce to caramelized bananas, and cook until melted.
5. Now you need to assemble the French toast. Start off by drizzling the salted-caramel sauce on the plate, then stack one slice of toast, drizzle more sauce, another slice, and top with more sauce and the caramelized bananas. I like to top mine off with some fresh, whipped cream, but it’s really up to you on how you serve it.
6. Serve immediately and enjoy!
*I still had some of the salted-caramel sauce left over, so we decided to use that instead of maple syrup. But if you want to top it with something else, go for it!


Sunday, January 23, 2011

Maple Glazed-Bacon Donuts

For breakfast this morning, we were really wanting some donuts. And I remember as a child, my mom used to make donuts out of a can of biscuits (I know I find it so bizarre). Then just this week, Paula Deen was on the Food Network doing the exact same thing. My mom used to just shake the donuts in powdered sugar, and Paula did a chocolate glaze. We wanted something a little different then plain ole' donuts, so we made maple glazed donuts with bacon on top. They were really good, a little sweet & a little salty. I hope you like enjoy them :)

Maple Glazed-Bacon Donuts 
For the Maple Glaze:
1 ¼C Powdered Sugar
½C Maple Syrup
1t Vanilla

For the Donuts:
1 Can Biscuits
4 Strips Bacon, Cubed & Cooked
1Q Peanut Oil

Directions:
1. Preheat the oil in your deep fryer to 350.
2. To make the Maple Glaze, whisk together powered sugar, maple syrup, and vanilla. Set aside for the donuts.
3.Using the biscuits, find a cookie a cutter to cut out a circle from the inside of a biscuit. Continue until all the biscuits look like donut rings. Fry the donuts for 2-3 minutes, flipping halfway. The donuts should be golden brown on each side and not doughy in the inside.
4. Let the donuts cool and then dip them in the glaze, then quickly add the cooked bacon, so that it will stick to the glaze.
5. Serve immediately!

Saturday, January 22, 2011

Southern Burgers

We couldn't really decide what we wanted for dinner tonight, but I happened to have the homemade pimento cheese spread and vidalia-bacon mayo still in the refrigerator, so a burger instantly came to mind. We topped the burger with the pimento cheese and some candied bacon, while also spreading some of the vidalia-bacon mayo on each of the buns. It turned out fabulous! Yummmmm, I love me some southern food, and hopefully you will too! Enjoy :)

Southern Burger with Pimento Cheese & Candied Bacon 

For the Candied Bacon:
6 Strips of Bacon, Thick Cut
½C Brown Sugar
¼t Garlic Salt
Pinch of Cinnamon
½t Cajun Seasoning
½t Paprika
½t Ground Mustard

For the Burgers:
1 Burger Bun, Toasted
Pimento Cheese Spread*
Vidalia-Bacon Mayo*
3 Strips Candied Bacon
1 Ground Beef Burger Patty (80/20)
Salt & Pepper
Vegetable Oil

Directions:
1. Preheat the oven to 450 and line a baking sheet with tin foil and spray with Pam. To make the candied bacon, mix all of the dry ingredients together in a large plastic bag, then put the slices of bacon in the bag, and shake until the bacon is completely covered with the seasonings. Bake in the oven for 10 minutes on each side or until the bacon is crispy. Set the candied bacon aside until the burger is ready to be assembled.
2. With the ground beef, form a burger patty big enough for your burger bun. Once formed, sprinkle each side with salt and pepper and cook on high heat in a sauté pan with a little bit of oil. Brown each side for about 2 minutes and put on a baking sheet. Spoon some pimento cheese on top of the burger and broil for 2 minutes.
3. Get your toasted burger bun and spread with the Vidalia-bacon mayo on each side. Next, place the burger with the melted pimento cheese down then top with the candied bacon and top bun.
4. Serve immediately with some French fries.
*These recipes I posted earlier on in the blog and I had extra around to put on the burger. Look back if you would like those recipes.

Redneck Tacos with Creamy Coleslaw

For the next recipe today, we were really in the mood for some barbecue & some tacos. I know a really random combination to want. So we decided to combine both of them and make some southern tacos. But instead of a flour tortilla, I wanted to put a southern hoecake (or pretty much a cornbread pancake). It's unique, but doesn't taste too weird since all of those flavors are often served together at a restaurant. We really liked them, and I hope you do too! Enjoy :)

Redneck Tacos with Creamy Coleslaw & BBQ Sauce
For the Coleslaw:
3C Coleslaw Mix
1 Green Onion, Chopped
2T Feta Cheese, Crumbled
¼C Mayo
¼C Sour Cream
1t Yellow Mustard
1t White Vinegar
1t Sugar
1t Lemon Juice
Salt & Pepper

For the Hoecakes:
1C Self-Rising Flour
1C Self-Rising Cornmeal (from a mix)
2 Eggs, Beaten
1T Sugar
¾C Buttermilk
1/3C + 1T Water
¼C Vegetable Oil
Butter, For Frying

For the Redneck Tacos:
1C Pulled Pork
1C Creamy Coleslaw
Barbecue Sauce, For Drizzling 

Directions:
1. First, make the coleslaw. In a medium mixing bowl, whisk together the mayo, sour cream, mustard, sugar, vinegar, lemon, salt, and pepper. Toss this mixture with the coleslaw mix, green onions, and feta cheese. Set aside until the tacos are ready to be assembled.
2. Next, mix the hoecakes. Combine all ingredients together except for the butter. Once it’s a cohesive batter, heat up a skillet to medium-high heat and melt some butter for frying. Fry each hoecake until brown and crispy, just a few minutes on each side. Set these hoecakes and aside so that you can begin to assemble.
3. To assemble, place a hoecake flat on the plate, top with some of the pulled pork, followed by the creamy coleslaw, and then drizzle with some barbecue sauce.
4. Serve immediately with some chips or baked beans.
*Since the recipe can be either complicated or easy to make, it just depends on how much cooking you want to do. You can easily buy the coleslaw, pulled pork, and barbecue sauce. Or if you have certain recipes that you like that are homemade you can easily substitute them to fit your taste.


source: coleslaw

Baked Blueberry French Toast Casserole with Maple Butter

So when we moved to Savannah a couple weeks ago, we didn't really know anyone, but we ended up meeting the girl that lives above us! And her sweet mother bought us this delicious blueberry cobbler bread from a bakery back where she lives. So we couldn't really decide what we wanted to do with it, I mean it was delicious enough to eat on its own, and then we thought that it would be awesome as french toast. We ended up making it into a baked french toast casserole and it turned out so good! We topped ours with some homemade maple butter and fresh whipped cream. But also, don't feel obligated to use blueberry bread, you could substitute any kind of bread you wish or even add chocolate chips, fresh fruit, or nuts. Just get creative! Enjoy :)

Baked Blueberry French Toast Casserole with Maple Butter & Whipped Cream
For the Bread:
1 Loaf (or 24 oz) of Blueberry Bread, Cubed & Dried
2t Brown Sugar
1T Butter, Cubed

For the Batter:
4 Large Eggs
1C Half & Half
½C Whole Milk
1T Sugar
½t Vanilla
¼t Cinnamon
¼t Salt
1t Brown Sugar

For the Maple Butter:
½C Maple Syrup
4T Butter 

Directions:
1. For the bread, you first need to cut the loaf of bread into cubes. Place these cubes onto a baking sheet and let them become stale overnight. Once these cubes are stale, grease a baking dish and stuff them into the dish and press down as hard as possible, so it’s fully packed.
2. Next, you have to make the batter to soak the stale bread cubes. In a medium mixing bowl, add the eggs, half & half, milk, sugar, vanilla, cinnamon, salt, and brown sugar. Using the immersion blender, blend the mixture until it’s completely creamy. You can use an immersion blender or a whisk will work just fine. Pour the batter over the bread cubes and press down so that the batter soaks into all of the cubes on top.
3. Cover the dishes with tin foil and let it sit over night.
4.The next morning, preheat the oven to 350. Bake for 45 minutes to an hour, depending on your oven and what size baking dish you used. We used to individual baking ramekins, but you could easily do this is a large pan as well.
5. Serve hot with whipped cream, maple syrup, or maple butter.


Friday, January 21, 2011

Shrimp & Pimento Cheese Grits

For dinner tonight, we decided to have one of Clayton's all-time favorite dinners, Shrimp & Grits. But we decided to mix it up a little, and put pimento cheese spread in our grits instead of just ole' shredded cheese, ya' hear? It turned out delicious, way better than any grits I've ever had. We topped ours with lardons of bacon and diced green onion, but that's totally up to you. Enjoy :)

Shrimp & Pimento Cheese Grits 
For the Grits:
½C Instant Grits
1C Heavy Cream
1C Chicken Stock
1T Butter
2/3C Pimento Cheese

For the Shrimp:
1T Butter
4 Strips Bacon, Cut into Lardons
12 Jumbo Shrimp, Peeled & Deveined
1T Cajun Seasoning
1T Old Bay Seasoning
½t Paprika
1t Garlic Salt
½C AP Flour
1 Green Onion, Chopped

Directions:
1. In a pot, bring the cream and chicken stock to a boil. Slowly stir in the grits and bring down to medium heat and simmer 5-7 minutes. Melt the butter into the grits. Lastly, add the pimento cheese and whisk until the grits are creamy. Set aside and keep warm.
2. In a sauté pan, melt the butter and cook the lardons of bacon until they are brown and crispy. Strain onto a paper towel. Keep the bacon fat and butter to cook the shrimp. Toss the shrimp in the Cajun seasoning, old bay, paprika, and garlic salt. After that, dust the seasoned shrimp in the flour, making sure it is lightly covered (this will help the shrimp brown).
3. Cook the shrimp on high heat for 1 minute on each side, until light golden brown. Put the cooked shrimp on a plate while you assemble. Dice the green onions.
4. To assemble, put some of the pimento cheese grits down on the plate, top with the shrimp, followed by the bacon, and green onions. Drizzle some of the butter and bacon fat on top of the plate (Paula Deen would be proud). 
5. Serve immediately

Pimento Cheese Spread

The first recipe for this weekend is Pimento Cheese Spread, the south's most popular appetizer! We love pimento cheese, pretty much on everything or just crackers. Actually there will be two other recipes this weekend using this Pimento Cheese, so get excited! Enjoy :)

Pimento Cheese Spread 
For the Spread:
½ Block of Cream Cheese, Softened 
½ Mayo
¼t Garlic Powder
¼t Pepper
¼t Paprika
2t Hot Sauce
1 8oz Block Pepper Jack Cheese, Shredded
1 8oz Block White Cheddar Cheese, Shredded
1 8oz Block Sharp Yellow Cheddar Cheese, Shredded
½C Green Onion, Diced
1 7oz Jar Pimentos, Diced & Drained

Directions:
1. In a big mixing bowl, mix together the cream cheese, mayo, garlic powder, pepper, paprika, & hot sauce. Separately, shred the three blocks of cheese and put in the bowl with the cream cheese & mayo mixture. (I use the second smallest shredding side because I like it more that way. It does take more time, but I think it's worth it. But you can do the cheese in the bigger shred if that's how you like your pimento cheese.)
2. Toss the mixture together until the mayo is covering all of the cheese.
3. Lastly, put in the diced pimentos and green onions. Toss until it’s evenly incorporated.
4. Serve with toasted bread rounds, crackers, or on sandwiches.

Monday, January 17, 2011

Salted Caramel Brownies

So I couldn't sleep at all last night, which sucks because I didn't have school today because of MLK holiday, so of course the one day I could sleep in, I didn't... typical. Anyway, I woke up at like 3AM this morning and couldn't go back to sleep. Finally, I was soooo bored that I decided to go bake some brownies, keep in mind that this was at about 6AM. So I wandered into the kitchen and realized I still had some salted caramel sauce stored away from when I made it this weekend. So I put some of that in there, and it turned out delicious. And hey, it's a super healthy way to start off the day, right?!? Well enjoy :)

Salted Caramel Brownies
For the Brownies:
1 Box Brownie Mix
2 Eggs
¼C Water
½C Vegetable Oil
Salted Caramel Sauce, To Taste
Sea Salt
*Follow the back of whatever box of brownie mix that you get. The box I bought happened to call for eggs, water, and vegetable oil. But, make your brownies according to their directions and then layer with the homemade caramel sauce. Also, I didn't include the salted caramel sauce recipe because I made it earlier this week. If you want the recipe, please refer to the salted caramel-peanut butter cups and follow those directions, then add to your brownies. 

Directions:
1. Preheat the Oven to 350 and line a 9x13-baking pan with tin foil and spray with Pam.
2. Mix together the box, eggs, oil, and water in a medium bowl until incorporated (don’t over mix). Pour ¾ of the batter into the baking pan. Next spoon about 10 spoonfuls of salted caramel on top of the brownie batter.  Smear the salted caramel until it creates a thin layer on top of the brownies. Spoon the remaining brownie batter on top of the caramel and smooth again. Lastly, put about 5 more spoonfuls (or as much as you want) of salted caramel by drizzling. Swirl with a butter knife (but don’t over do it or it will mix together).
3. Sprinkle the top of the brownies with sea salt (to your liking)
4. Bake in the oven for 30-40 minutes, depending on the heat of your oven. To check if they are done, dip a toothpick into the brownies and if it comes out clean they are ready!
5. Let the brownies sit at room temperature for 2 hours. Remove from pan and tin foil and cut into squares.
6. Store at room temperature in a container for up to a week.


Sunday, January 16, 2011

Mexican Cheesy Corn Dip

Apparently, we're in the mood for Mexican food, so our last recipe for today is Mexican Cheesy Corn Dip. It's sweet, salty, spicy, creamy and crunchy. We serve it with tortilla chips, but you could serve it with toasted bread rounds or fritos. Hope you enjoy :)

Mexican Cheesy Corn Dip
For the Dip:
2T Butter
3 ½C Corn Kernels (I used frozen Silver Queen Corn)
1C Onions, Chopped
½C Roasted Red Peppers, Chopped
½C Green Onion, Chopped
1 Jalapeno, Seeded & Chopped
2t Garlic, Chopped
¼C Mayo
¼C Sour Cream
½ Block of Cream Cheese, Softened
1C Mexican Cheese, Shredded
¼t Cajun Seasoning
2T Hot Sauce
Tortilla Chips for Dipping

Directions:
1.  Melt 1T of Butter and sauté the frozen corn in a pan until golden brown, about 5 minutes. Pour corn into a medium-mixing bowl. 
2.  Melt another 1T of butter and sautee the onions, peppers, jalapeno, green onions, garlic, salt, and pepper. Cook until the vegetables are soft. Pour this mixture into the corn.   
3. In a separate bowl, mix together the cream cheese, mayo, sour cream, shredded cheese, and Cajun seasoning until smooth. Dump this mixture into the corn and stir until well incorporated. Pour the cheesy corn dip into a greased pan, top it with cheese, and bake it at 400 for 15 minutes (covered), then remove the tin foil and bring the oven up to broil and cook for another 5 minutes or until bubbly and brown on top.
4. Serve hot with the tortilla chips. 

source: hot corn dip

Spanish Steak Sandwich

The second recipe for today is a hearty steak sandwich. I marinated the steak overnight, grilled the onions, made the Cilantro-Jalapeno Pesto, and melted some pepperjack cheese. It's quite good, especially if you like Spanish or Mexican food (like how Clayton is obsessed with it). It's a great lunch, perfect for a romantic little picnic! Enjoy :)

Spanish Steak Sandwich
For the Steak:
1 Skirt Steak (or your favorite cut of meat)
¼C Soy Sauce
¼C Balsamic Vinegar
¼C Worcestershire Sauce 
2T Garlic, Chopped
½t Fresh Rosemary, Chopped
½t Garlic Salt
½t Sea Salt
¼t Pepper
¼t Lime Zest, Grated
1t honey,
1t Lime Juice,
1t Steak Seasoning
¼t Cajun Seasoning

For the Sandwich:
1 Small Ciabatta Roll
1C Marinated Steak, Cubed
½C Red Onions, Grilled & Chopped
2T Cilantro-Jalapeno Pesto Mayo
2 Slices of Pepper Jack Cheese
1 Roasted Red Pepper, Sliced 
Salt & Pepper
Olive Oil

Directions:
1. Marinate the Steak: In a medium bowl mix together all of the ingredients for the marinade, until well incorporated. Place the skirt steak into a gallon freezer bag and pour the marinade over it. Let it set over night in the refrigerator (or at least 4 hours). Take the steak out about an hour before you want to grill it, this way it will come to room temperature, which helps for better sear marks.
2. Grill the Onions: Heat up a grill pan (or I used my George Foreman Grill) to high heat. Cut 2 slices of red onion and rub with with olive oil, salt, and pepper. Grill the onions 5 minutes on each side, until they are becoming tender. Next, place the onions onto a pan and bake them in an oven at 400 for about 15-20 minutes. Chop the onions and set aside.
3. Meanwhile, get the sandwich roll and remove some of the bread filling so that it is hollowed out (this will help keep all the toppings in). Drizzle oil over the bread and bake in the oven at 400 until it is crispy and brown, about 10 minutes. Also, get a roasted red pepper, dry all the excess moisture (so your sandwich won't get soggy), and slice into thin strips. Set the bread and peppers aside with the onions.
4. Pull the steaks out of the bag and dry the meat of any excess marinade. Place the steak onto the grill pan and cook for about 2 minutes on each side. Keep in mind that skirt steak is a lot thinner than other cuts of steak, so cook yours according to what cut you buy. After done cooking, let meat rest for 5 minutes, and then cut into cubes.
5. Assemble the Sandwich: Get the toasted bread and spread with the pesto-mayo, on both sides. Starting from the bottom, layer one slice of pepperjack cheese, then the cubed steak, onions, peppers, and another slice of cheese. Top it with the other slice of bread and bake it in the oven at 400 until the cheese is melted, about 10 minutes.
6. Serve immediately.

*Also, keep in mind that a skirt steak is pretty big, so we had the marinated steak for dinner last night and saved a portion for a sandwich this afternoon.

Cilantro-Jalapeno Pesto

The first recipe today is going on the second recipe I'm about to post. I love pesto, so I decided to make a Spanish/Mexican pesto. I'm going to put it on a Spanish Steak Sandwich, but you could easily put it on some toast or even marinate some protein in it. It's really similar to a chimichurri. Enjoy :)

Cilantro-Jalapeno Pesto & Cilantro-Jalapeno Pesto-Mayo
For the Pesto:
1 Bunch of Cilantro
3T Pine Nuts
3T Garlic, Chopped
1T Lime Juice
1t Lime Zest, Grated
½ Jalapeno, Diced
¼C Parmesan, Grated
¼C Olive Oil
¼C Mayo, Optional 

Directions:
1. Combine all ingredients, except olive oil, in a food processor and blend until it's a coarse mixture. Slowly drizzle in the oil until it becomes smooth and creamy. 
2. Keep in the refrigerator for up to 2 weeks. 
3. If making the pesto-mayo, blend together the mayo and the pesto until well incorporated. 

Saturday, January 15, 2011

Buffalo Chicken Bombs

So, the dirty dirty birds are on TV as we speak, and I still find time to come on here and post a new recipe. For any big game (Bama, UGA, or Falcons), we always manage to make some kind of tailgate food. Really any game will do, it just gives me an excuse to entertain and eat unhealthy food. Last weekend when we made Buffalo Chicken Dip, so we decided to save half of it in preparation for the Falcons game this weekend. But, I had a marvelous idea... we should make buffalo chicken balls and deep fry them. I mean, what doesn't sound good about that?!? They are heavenly and oh-so-bad. If you have a deep fryer, I think this must be on your bucket list of fried goodies. I hope you enjoy... we are right now!

Buffalo Chicken Bombs
For the Bombs:
1 Buffalo Chicken Dip
1Q Peanut Oil
2C AP Flour
1T Paprika
1T Chili Powder
1T Cajun Seasoning
1T Salt
2 Eggs
1/3C Buttermilk
1T Hot Sauce
1 Box Panko Breadcrumbs
Salt, For Sprinkling
Ranch, For Dipping

Directions:
1. Heat your deep fryer to 375 with the peanut oil. Once you have made the Buffalo Chicken Dip, and it has cooled. Scoop them and form into compact balls. Return the balls to the refrigerator for 30 minutes. Next you have to set up a battering station. I use 3 pie tins for all of my stations. For the first station, I mix the flour & the seasonings. For the second station, whisk the eggs, buttermilk, and hot sauce. For the third station, pour the contents of one box of Panko bread crumbs.
2. Get the balls from the refrigerator and roll them in the flour mixture, then into the egg wash, and finally bread them with the Panko. 
3. Drop them into the hot oil and fry them for 4-5 minutes or until golden brown, making sure that no cheese is oozing out. Drain them on a paper towel and sprinkle with salt immediately. Your buffalo chicken balls have officially become Buffalo Chicken Bombs (so deadly).
4. Serve them with a side of ranch for dipping. WARNING: they are really hot, so don't burn your mouth!

*Since I already posted a recipe for my Buffalo Chicken Dip last week, I'm not going to retype all the ingredients. So all you really have to do is refrigerate the dip that you made until the mixture has hardened and cooled, and then form them into balls. I used an ice cream scoop so that all of the balls would be the same size. 

Fried Green Tomato BLT Sandwich (FGTBLT)

Every Saturday in Savannah, Forsyth Park has a local Farmer's Market. Forsyth is only a couple blocks from our apartment, so we look forward to it every weekend, especially so we can take Eloise on a long walk and let her run her ass off. So this morning we strolled on over to the market, and we bought some organic honey, and out of the corner of my eye, I saw the most gorgeous green tomatoes. And to be honest, the only thing I think of when I see green tomatoes... are fried green tomatoes. So we bought some and decided we could make a Fried Green Tomato BLT. Needless to say, it was ba-na-nas (as Rachel Zoe would say). The sandwiches are on toasted challah buns with a leaf of bibb lettuce, the fried green tomatoes, slices of pepper bacon, and a caramelized vidalia onion-bacon mayo. Enjoy my friend, we sure did :)

Fried Green Tomato BLT Sandwich 
For the Fried Green Tomatoes:
1Q Peanut Oil, For Frying
2C AP Flour
1T Paprika
1T Chili Powder
1T Cajun Seasoning
1T Salt
2 Eggs
1/3C Buttermilk
1T Hot Sauce
1 Box Panko Bread Crumbs
Salt, For Sprinkling

For the Mayo:
1C Mayo
2 Vidalia Onions, Sliced
4 Slices of Bacon, Chopped
1/4C Olive Oil
3T Butter
Salt & Pepper

For the Sandwiches:
1 Toasted Sandwich Roll or Bun (we used a challah roll)
1 Leaf of Bibb Lettuce
2 Fried Green Tomatoes
3 Slices of Peppered Bacon
2 Spoonfuls of Vidalia-Bacon Mayo

Directions:
1. For the Mayo: Preheat the oven to 400 and line a baking sheet with tin foil and spray with Pam. Bake the 7 slices of bacon; sprinkling pepper on 3 of them. Bake until crispy, brown, and cooked (about 20-30 minutes depending on your oven). Next, caramelize the sliced onions in pan with olive oil & butter. Salt heavily in order to draw the moisture out of the onions. Cook them until brown and soft. In a food processor, combine the mayo, caramelized onions, and 4 slices of chopped bacon, blending until well incorporated. Set aside until the sandwich is ready.
2. For the Fried Green Tomatoes: Heat your deep fryer to 375 with the peanut oil. Slice the green tomatoes to about 1/2inch thick, place the slices in a strainer and sprinkle the tomatoes with salt. Let the tomatoes drain for about 15-30 minutes. After drained, dry the tomatoes with paper towels, so that there is no more excess moisture. Next you have to set up a battering station. I use 3 pie tins for all of my stations. For the first station, I mix the flour & the seasonings. For the second station, whisk the eggs, buttermilk, and hot sauce. For the third station, pour the contents of one box of panko bread crumbs. Now, place the slices of green tomatoes in the flour, egg, and panko. Begin to fry the green tomatoes in the peanut oil. Fry 1 slice for about 5 minutes or 2 slices for 7 minutes. After the frying is done, sprinkle with salt and begin to assemble the sandwiches.
3. Assemble: Spread 1 spoon of the vidalia-bacon mayo on each side of the toasted bread roll. Next, place the leaf of lettuce on the bottom roll, then the green tomatoes, feta cheese, pepper bacon, and the top bun.
4. Serve immediately!

Friday, January 14, 2011

Raspberry White Chocolate Cheesecake Crumb Bars

So obviously this weekend I'm apparently in a baking frenzy. First the Salted Caramel-Peanut Butter cups, and now the Raspberry White Chocolate Cheesecake Crumb Bars (I realize the name is wayyyy too long, but I had to accurately describe them to y'all). These bars are so good! It's a layer of crust, a layer of cheesecake, a layer of fresh raspberries, and then a crumb topping. So I seriously recommend you making these, you won't regret it! Enjoy :)

Raspberry White Chocolate Cheesecake Crumb Bars

Dough Recipe:
3C AP Flour
1C Granulated Sugar
1t Baking Powder
¼t Salt
¼t Cinnamon  
1C Unsalted Butter, Cold & Cubed
1 Egg, Lightly Beaten
½C Brown Sugar

Cheesecake Recipe:
1 ½ Packages Cream Cheese, Softened
¾C Granulated Sugar
3T Fresh Lemon Juice
2t Lemon Zest, Grated
1t Vanilla
2 Eggs
½C White Chocolate, Melted
2C Fresh Raspberries

The Directions:
1. Preheat the oven to 350 degrees and line a 9x13-inch baking pan with tin foil and spray with Pam.
2. For the Dough: In a bowl, whisk together flour, granulated sugar, baking powder, salt, and cinnamon. In a food processor, add the chilled & cubed butter, along with the flour mixture. Process until crumbly then add the egg and blend. Press half of the dough into the greased pan and place the pan into the refrigerator until your cheesecake filling is ready. With the other remaining half of dough, mix in the brown sugar and set aside as the crumb topping.
3. For the Cheesecake Filling: Bring water to a light boil and create a double broiler so that you can melt your white chocolate chips. Heat until melted and set aside. In a bowl, using a mixer, add the softened cream cheese and sugar, and beat until incorporated and whipped.  Beat in lemon juice, lemon zest, and vanilla. Next, add in one egg at a time, making sure each egg is fully blended before adding the next. Lastly, beat in the melted white chocolate.
4. Assemble: Retrieve your pan with the crust. Pour white chocolate cheesecake batter over the crust. Then evenly sprinkle the fresh raspberries over the cheesecake until fully covered.
5. Bake: Place pan in the oven and bake for 20 minutes. After 20 minutes, bring up the oven to 375 degrees. Add the remaining dough by crumbling over the cheesecake. Return to the oven and bake for another 25 minutes.
6. Cool: Let cheesecake bars come to room temperature, about an hour. And then place in the refrigerator for another 2 hours. After cooling, cut them into 24 bars and serve.

Salted Caramel-Peanut Butter Cups

Okay, so you guys have a lot of food coming your way this weekend, so get excited! But the first post I'm going to do are Salted Caramel-Peanut Butter Cups. Yeap, you heard me right, they're pretty friggin' delish. So obviously, I live in Savannah. So on one of our daily walks the other day, we passed a small cafe & chocolate place on the way to downtown. It's called Wright Square Cafe for any of you whoever plan to visit! It's a charming little place, and they have the most amazing sea salt peanut butter cups. So I decided to kind of follow their recipe, but I added a salted caramel layer on top of the peanut butter. It's sooooo good. Warning: you might get addicted, but don't say I didn't warn you. Enjoy :)


Salted Caramel-Peanut Butter Cups

For the Salted Caramel:
1C Sugar
6T Unsalted Butter, Room Temperature
1t Sea Salt
2/3C Heavy Cream, Room Temperature

For the Peanut Butter:
1C Creamy Peanut Butter
¼C Honey

For the Cups:
1 Mini Cupcake Baking Pan
1 Pack of Mini Cupcake Tins
1 Bag of Semi Sweet Chocolate (Milk or White Chocolate will work)
Sea Salt

Directions:
1. To make the salted caramel, get a large sautee pan and bring it up to medium-high heat. Pour in sugar and keep continuously whisking until the sugar begins to melt and the lumps dissolve. This sugar will begin to turn a light caramel color, at this point add in the salt and all of of the butter. The mixture will begin to bubble, but keep stirring. Finally, take the pan off the heat, and pour in the heavy cream (once again, it will bubble, but just keep stirring) and stir until it is a smooth, consistent sauce. Pour into a container and let cool while you prepare the peanut butter and the chocolate cups.
2. To make the peanut butter mixture, blend the peanut butter and honey in a food processor until incorporated. As a side note, I like when my peanut butter is gooey and oozes out the sides of the cup. So if you would like your peanut butter mixture to be more firm then you could substitute powdered sugar. Set this mixture aside until the cups are ready.
3. Next, line the mini cupcake pan with cupcake tin liners. Then, make a double boiler in order to melt the chocolate. In order to temper the chocolate, melt ¾ of the bag in the boiler, saving ¼ to mix in after it is melted. Stir in the unmelted chips into the melted chips until smooth and blended. Next, spoon in a tablespoon of chocolate into the bottom of the tins. Spread this mixture up the sides until there is a thin layer of chocolate. Place the pan in the freezer until the chocolate hardens.
4. Once the cups are hardened, start to layer to the peanut butter mixture, then the salted caramel, and the top with a teaspoon of melted chocolate. Smooth and swirl the melted chocolate on top and then top with a pinch of sea salt. Return the pan to the freezer until hardened.
5. Serve cold so that the chocolate does not melt. Keep refrigerated for about 2 weeks.

source: salted caramel

Monday, January 10, 2011

Loaded Baked Potato Soup with Crispy Potato Hash Browns

Since it's snowing in Georgia (Who knew?!? I thought it was supposed to be hot in the south, but apparently I'm seriously wrong), we decided tonight would be a good night for some comforting soup. So, loaded baked potato soup it is. It's nothing too fancy, but filling and delicious. I add some green onion, chopped bacon, grated cheddar, and crispy hashbrowns to make it a little more hearty. Enjoy :)

Loaded Baked Potato Soup with Crispy Potato Hash Browns


For the Soup:
10 potatoes, peeled & cubed
1/2C AP flour
6C Whole Milk
2C Heavy Cream
1/2C Sour Cream
1/2C Green Onion, Chopped
1/2C White Cheddar Cheese, Shredded
12 Strips Bacon, Chopped
1/2t Paprika
3T Butter
Salt & Pepper

1. Peel and chop 8 potatoes, then place them in a microwavable glass bowl and cook for 8-10 minutes, or until soft. With the other 2 potatoes, peel, chop, and cut into small cubes. Put the small cubes into a bowl with water and let soak while making the soup base.
2. Bring a large pot up to high heat. Meanwhile, cut the bacon in to cubes and then sautee the bacon until cooked and crispy. Drain the bacon on to a paper towel, leaving the bacon grease in the pot. Chop the green onions into small rounds, and toss into the grease. Sautee until softened. Bring the heat down to medium and add the flour, whisking until incorporated. Slowly add in milk & heavy cream, until thick and smooth. Bring this soup base to a boil, and then simmer for roughly 10 minutes (or until thickened).
3. Stir in the cooked potatoes and chopped bacon (reserving about 4 slices of bacon for topping), and cook for another 5 minutes. Stir in sour cream and half of the cheese. Lastly season with salt & pepper. Let the soup simmer on low until the crispy potatoes are done.
4.  Drain the potatoes that have been soaking in water and pat dry. Melt the butter in a pan and bring up to a medium-high heat. Crisp up the potatoes (with salt, pepper, & paprika) until tender on the inside and brown & crispy on the outside, roughly 15-20 minutes. Remove crispy hash browns and drain on a paper towel.
4. Assemble the bowls by ladling some soup, then top it with cheese, chopped bacon, and crispy hash browns.
5. Serve with Garlic Bread.

Sunday, January 9, 2011

Southwestern Egg Rolls with Chipotle Ranch Sauce

Another one of my favorite tailgatin' recipes are my Southwestern Egg Rolls. They are filled with yummy, mexican goodness, fried to crispy, golden perfection, and smothered in a spicy, creamy dipping sauce. Like what doesn't sound good about that? Ok so maybe I won't be able to eat for the next week, but it will be totally worth it.

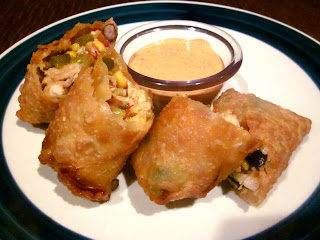
Southwestern Egg Rolls with a Chipotle Ranch Dipping Sauce


For the Chipotle Ranch Dipping Sauce:
1/2C Ranch Dressing
2T Chipotle Peppers in Adobo Sauce
1t Garlic, Chopped
Salt & Pepper to taste

For the Southwestern Filling:
Olive Oil
1C Onion, Chopped
1C Corn (can be canned, fresh or frozen)
1C Black Beans, Rinsed & Drained
1C Rotel Tomatoes
1/2C Green Onions, Chopped
1/2C Roasted Red Peppers, Chopped
1/4C Pickled Jalapenos, Chopped
2C Rotisserie Chicken, Shredded (can also be ground or cubed)
1T Cajun Seasoning
1t Cumin
Salt & Pepper

For Egg Rolls:
3C Peanut Oil
1 Package Wonton Wrappers
3T Water
1/2C Corn Starch

1. Pour oil into a deep fryer or deep pot and bring up to 375 degrees.
2. In a food processor, pour in the ranch, chipotle peppers, garlic, salt, and pepper. Blend on high until incorporated and creamy. Pour into a bowl and place in the refrigerator until the egg rolls are ready (the longer the better actually, it allows the flavors to really meld together).
3. Meanwhile, sautee the chopped onion on medium-high heat for about 3 minutes. Next add in the corn, beans, tomatoes, jalapenos, peppers, and green onions. Cook this mixture together at a medium heat until soft and cooked, about 5-10 minutes. Pour this mixture into a strainer and let drain & cool for about 20 minutes. In a medium mixing bowl, add chicken and cooled filling mixture. Add the seasonings and stir together.
4. Lay out the wonton wrappers in a diamond facing you. With your finger brush the edges on the wrapper to make them seal. Put about 3 spoonfuls of the filling in the middle of the wrapper. Fold over the south corner of the egg roll over the filling. Next, tuck in the edges and then continue to roll over until it is a tight roll. Seal the last corner with some water again.
5. Put some corn starch on a plate and roll the egg rolls in the corn starch, then lightly dust off excess.
6. Place egg rolls seal down into the fryer, and fry for roughly 5 minutes, until crunchy and golden brown.
7. Cut the egg rolls in half and serve with the dipping sauce.

**P.S. We decided to try and bake the egg rolls in the oven to save on calories and well expenses (buying a big container of oil is not cheap). They actually turned out really well. They were pretty crunchy, and not half bad for something that is typically deep fried. So if you want, bake them at 425 for about 5 minutes on each side (10 minutes total), or until they are crunchy and brown.

My World Famous Buffalo Chicken Dip

Ok so for today's recipe, I was inspired to make some tailgatin' food y'all, which I must say might be my favorite thing to cook everrrrr. I grew up a UGA Dawgs fan, then went to Alabama, so naturally I followed dem 'bama boys (and also dating the biggest 'Bama fan in the world helps too), and I also am a HUGE Atlanta Falcons fan... Dirrty Dirrty Birds Y'all!! So today we're watching the NFL playoffs to see who my Dirty Birds will be playing. I decided to make one of my favorite dips. It's creamy, spicy, cheesy, and just all around amazing. You can adjust the heat so it's less spicy or more spicy because to be honest I like things a little too spicy. Also, if you are not obsessed with Ranch Dressing like I am, then you could always add bleu cheese dressing & some bleu cheese crumbles and it would be just as good. I typically serve it with either some toasted bread rounds or tortilla chips. Enjoy :)

Buffalo Chicken Dip 

For the Dip:
1 Rotisserie Chicken, Shredded
1 Package Cream Cheese, Softened
1/2C Ranch Dressing
1/2C Buffalo Sauce
2T Texas Pete Hot Sauce
1C Cheese, Shredded
4 Slices Bacon, Chopped

1. Preheat the oven to 350 degrees and grease a glass baking pan (preferably 9x13)
2. Take the skin off of the chicken and start pulling & shredding the meat into a medium mixing bowl.
3. In a separate bowl, mix together the softened cream cheese, ranch, buffalo sauce, and hot sauce, until it is completely incorporated. Pour this mixture over the pulled chicken and toss until all the chicken is covered.
4. Scoop chicken into the greased baking dish and cover with shredded cheese (I use the mexican blend shredded cheese, but pick whatever you like). Lastly, scatter the crumbled bacon over the shredded cheese.
5. Cover with tin foil and bake for 30 minutes, and then remove tin foil and bring the oven up to broil, and finish the dip until the cheese is browning and the dip is bubbling, roughly 5 minutes.
6. Serve hot with toasted bread, tortilla chips, or even some vegetables.

Saturday, January 8, 2011

Turkey Meatballs with Tomato Sauce and Whole Wheat Spaghetti

Okay, so for my first recipe that I will be sharing are my Turkey Meatballs with Tomato Sauce and Whole Wheat Spaghetti. I know that the new year just began, and like the rest of the world, I'm trying to watch what I'm eating. So typically meatballs can be beef, pork, and veal, but I opted to make turkey to save a few calories (you could also do ground chicken). This is probably one of Clayton's favorite weight-watching meals, and let me tell you, he can eat! Also, I chose to serve my meatballs with whole wheat spaghetti because honestly when it's covered with meatballs and sauce, who can tell the difference?!? I hope you like the recipe, and of course you can add more spice, salt, or sweetness to your liking!

Turkey Meatballs with Tomato Sauce and Whole Wheat Spaghetti


For the Sauce:
1 Can of Classico Traditional Sweet Basil Tomato Sauce
1/2 Onion, Chopped
3T Garlic, Chopped
1T Balsamic Vinegar
1/4C Red Wine
2T Pesto
1/4t Oregano, Dried
1t Red Pepper Flakes
1/2t Garlic Powder
1/2t Onion Powder
1T Fresh Basil, Chopped
Salt & Pepper, to taste
Olive Oil

For the Meatballs:
1.5lbs Ground Turkey
1/2 Onion, Chopped, Cooked, and Cooled
2T Garlic, Chopped, Cooked, and Cooled
1/2C Italian Bread Crumbs
1/4C Parmesan Cheese, Grated
1 Egg
1/4C Milk
2T Pesto
1/2t Red Pepper Flakes
1/2t Garlic Powder
1/4t Onion Powder
1/4t Oregano, Dried
1/4t Paprika
Salt & Pepper, to taste
Olive Oil

1. Preheat the oven to 350 degrees and line a baking sheet with tin foil and spray with Pam.
2. The Sauce: Drizzle some EVOO in a pot and bring up to heat. Add the chopped onion and sautee until caramelized and tender, then add in the chopped garlic and heat through, making sure not to burn it. Next, pour in the can of tomato sauce, red wine, and balsamic vinegar and bring up to a slight boil and then return to a simmer for about 10 minutes. Next stir in the pesto, oregano, red pepper flakes, garlic powder, onion powder, salt, and pepper. Simmer for another 10 minutes on low. Lastly add in fresh, chopped basil. Keep cooking on low until meatballs are cooked.
3. The Meatballs: Drizzle some EVOO in a pan and sautee the chopped onions and garlic until cooked and tender, do not burn. Pour into a mixing bowl and let cool. After cooled, add ground turkey, breadcrumbs, milk, egg, cheese, pesto and seasonings. Mix together, but don't over mix because it can make the meatballs tough and dried out. Once incorporated, shape into 12 meatballs (roughly the size of a golf ball, but can also be changed to smaller or larger).
4. Bake: Place the meatballs on the greased baking sheet and bake at 350 for 35 minutes, flipping the meatballs halfway through for even cooking. Once cooked, place the meatballs in the sauce and let simmer until you're ready to serve.
5. Boil: Boil the pasta in salted water according to the back of the box or until tender.
6. Serve: Toss the pasta in tomato sauce and top with meatballs. Garnish with some grated parmesan, fresh basil, or chopped parsley (or anything to your liking) and enjoy.

All About Me

the family 
Soooooooooo FINALLY, we are all moved in! Anyway, I promised an introduction yesterday, so here's my pathetic attempt. I grew up in Buckhead, a small area of Atlanta. And as high school  ended, I decided to continue my studies at the University of Alabama, where I had also committed to play soccer for the Women's Soccer team. Unfortunately, I injured myself, and ended up having to cut my soccer career short. So I did what any normal college student would do... partyyyyy. So on my first night of freshman year, I went to a party with a few of my roommates. While walking into the party, a boy held open the door for me and actually said, "Let me get that for you ma'am". And the rest is history, we've been dating ever since... about 3 1/2 years now (crazy I know). So while at Alabama, I decided to enter the nursing program, and I chose to pick up my shit and move to Savannah, Georgia. Luckily for me, my wonderful boyfriend, Clayton, was graduating from Alabama and decided to follow me there. Now we're living in an apartment together with our crazy cat, Taz, and our new puppy, Eloise. Unfortunately I start Nursing School on Monday, so I only have a couple days to roam around our new city. So far we love love looooooove Savannah, it's just absolutely adorable. But today we had to get a lot of stuff done, like get parking passes, books, groceries, and so on. We had some extra time and decided to take Miss Eloise (Lil' Weezy as we call her) to the park for the very first time. She actually did really well, and I mean not many people live in a city that is almost 70 degrees outside in January (the pictures above are all of us at Forsyth Park). But on a side note, although I am going to nursing school, I have a passion for cooking & baking. So I started this blog to share all my recipes that I love making for friends, family, & Clayton. I hope that you will enjoy them as much as we do.

Friday, January 7, 2011

We Are ALL Moved In

We're all moved in our new apartment in Savannah, y'all
Now I can finally start sharing all of my recipes 


I'll give an introduction tomorrow