Showing posts with label Shortbread. Show all posts

Monday, June 24, 2013

Goo Goo Cluster Pie with a Coca Cola Reduction Drizzle

Goo Goo Cluster Pie with a Coca Cola Reduction Drizzle + Brown Butter Ice Cream
This is pretty much a glorified candy bar pie. With a twist of pecan pie on the side. And add in a large soda + a scoop of ice cream to boot. For all I care, you could just sub out the Goo Goo Cluster chunks with another candy treat. Do as you please, my friends. Y'all ever had a Goo Goo Cluster? Well, if you haven't, I sure feel bad for you. It comes from the South (Nashville to be exact) and contains caramel, roasted peanuts, marshmallow, and milk chocolate. Like a Snickers, but only way better. It starts off with my favorite peanut butter shortbread cookie crust. What's not to love about that? Candy. Cookies. Pie. Ice Cream. All in one bite? Whambamthankyama'am. Then, it's studded with fried, salted peanuts and candy pieces before it's filled to the brim with bourbon-flavored custard (similar to a pecan pie). After it's all said + done, and by that, I mean baking & chilling, you must drizzle the top of a slice with the homemade Coca Cola reduction... ya'know, to make it extra-southern. This pie is insane by itself, but make sure to make it super indulgent by adding a scoop of homemade ice cream. It was perfection with brown butter, but vanilla bean or bourbon would be amazing as well. It's the ultimate sweet treat indeed!! Enjoy :)


For the Peanut Butter Shortbread Cookie Crust:
1C Peanuts, Unsalted & Dry-Roasted
½C AP Flour
¼t Salt
¼t Baking Soda
¼C Light Brown Sugar, Packed
¼C Sugar
2T Unsalted Butter, Room Temperature
1 Large Egg Yolk
¼t Vanilla

For the Goo Goo Cluster Pie:
2 8oz boxes of Goo Goo Clusters or Cream-Nuts, Chopped into Chunks
3 Eggs
1C sugar + 2T Light Brown Sugar
½C Light Corn Syrup
2T Bourbon
1t Vanilla
1 Stick of Unsalted Butter, Room Temperature
½t Salt
2C Fried Salted Peanuts, Roughly Chopped (roasted peanuts may be substituted)
Prepared Goo Goo Cluster Chunks

For the Coca Cola Reduction:
2C Coca Cola (or any other soda substitute: Cheerwine would be my second choice)

Directions:
1. Spray a pie pan with Baking Pam and set it aside.
2. For Peanut Butter Shortbread Cookie Crust: Preheat oven to 350 degrees. Pulse the peanuts into the food processor and blend until a peanut butter forms, about 2 minutes (add a little oil or honey to loosen it up if it is too thick). In another bowl, whisk together flour, salt, and baking soda until incorporated. Using an electric mixer, beat together both sugars, peanut butter, and butter until well combined and mixture resembles wet sand, about 2-3 minutes. Beat in the egg yolk and vanilla, occasionally scraping down the sides of the bowl, until well blended, about 3 minutes (the mixture will be clumpy). Gradually add in the dry ingredients with your hands and beat until just combined (it will be crumbly, but do not over-mix). Gather dough with your hands, place into the prepared pan, and press evenly onto the bottom and up the sides of the dish. Bake until edges are golden brown, about 15-20 minutes. Set this aside to let it cool completely before adding the filling.
3. For the Goo Goo Cluster Pie: In the bowl of a standing mixer, add in the butter and both sugars and beat until light & fluffy, about 1 minute. In a separate mixing bowl, whisk together the eggs, corn syrup, bourbon, vanilla, and salt until smooth and incorporated. Add this wet mixture into the bowl of the butter mixture. Mix on medium-low speed until you have a smooth filling, and then add in your chopped peanuts and mix until just incorporated evenly throughout. Set your filling aside and place the Goo Goo Cluster chunks evenly into the bottom of your cooled, pre-baked peanut butter crust. Slowly pour the filling over the clusters until the whole pie has been filled to the rim. Sprinkle the top with fleur de sel. Place the pie onto a baking dish, so that it will catch any drippings or filling that has flooded over. Bake this pie at 350 degrees for 15 minutes, and then reduce the heat to 300 degrees. Lightly cover the pie with some tin foil and bake for another 20-30 minutes, or until the pie has set around the edges, but slightly jiggles in the center. Remove from the oven and cool on a cooling rack to room temperature.
4. Place the cooled pie into the freezer (you might want to cover with tin foil) and let it sit, undisturbed, overnight. The pie filling should be super gooey and runny, this is a good thing, don’t worry.
5. For the Coca Cola Reduction: Pour the coke into a pot and cook over low (just barely medium heat) until it reduces into thick soda syrup. This process took a long time for me almost an hour.
6. Serving the Pie: The next day, remove from the freezer and cut into slices. Place onto a plate and let it warm for 5-10 minutes. This gives the pie time to defrost and makes the caramel-y filling begin to ooze out. Drizzle the top of the pie with some of the Coca Cola Reduction and enjoy the gooey goodness. We added a scoop of ice cream on top of ours, and it was perfection (we had three homemade ice creams in our freezer: brown butter-bourbon, southern buttermilk, + malted vanilla bean).


Tuesday, May 8, 2012

From-Scratch, Homemade Southern Banana Pudding with Shortbread Cookie Crumbles, Creamy Roasted Banana-Vanilla Bean Pudding, Whipped Cream, Sliced Banana, & Toasted Marshmallow Meringue

Homemade Southern Banana Pudding (all from scratch)
As a southerner, banana pudding has a big spot in my heart. It is by far one of my favorite desserts, and always a go-to recipe for any meal. I mean, we plan on serving banana pudding at out wedding, y'all. Not like that's even close to happening, but still it will be there. How can you not love banana pudding? The cookies, creamy vanilla pudding, whipped cream, and fresh bananas... that's just a winning combination. I have a recipe that I usually make because it is easy and always delicious. But, for a while now, I have been wanting to tackle a homemade recipe, each component, all from scratch. And, I know that this sounds quite the feat, but I wanted to do it... I had to do it. So I did. First, I started off with the cookie component. I have never liked Vanilla Wafers, I'm sorry they just aren't my cup of tea. I decided I wanted to make classic shortbread cookies because they are just buttery-deliciousness. And instead of leaving them whole, I crumbled them up so that they would be evenly distributed throughout the pudding. And the cookies are my absolutely favorite part of the whole dessert, so I want A LOT. They are the best the day after you layer them in because they get soft and soak up all that pudding amazingness. Next, I made a luscious, creamy roasted banana-vanilla bean pudding. I started off by making a class vanilla bean pudding. I made this a lot thicker than a pudding that you would ever want to eat because I added in cream cheese, sweetened condensed milk, and roasted bananas, and all of these additions thinned it out quite a bit. So don't be alarmed if it seems disgustingly thick. It will get there, just trust me on this one. I think what makes this pudding unique is the addition of the roasted bananas. It brings another level of banana goodness to the dessert. Because not only do you have sliced bananas throughout, but it's incorporated into the pudding as well. Also, I made a homemade whipped cream to layer in between all of the other components. You could easily buy store-bought whipped cream, but that's not the point of this recipe, we're doing it all from scratch, people! The last and final component is the toasted marshmallow meringue topping. Holy moly, I love meringue. And I love marshmallow even more, so when you combine these together and top the banana pudding with it, it's even better. Not to even mention that it is toasted until golden brown & delicious, just like a toasted marshmallow. OMG, yum. Just talking about this dessert is making me salivate. Lemme go grab a mason jar from the fridge real quick... okay, I'm back. So, now that I have discussed each component in ridiculous detail, all you have to do is layer this bad boy up into a serving dish (or individual mason jars) and dig in. I seriously love this recipe, and I don't even care that it is crazy-involved. The end result is totes worth it!! Enjoy :)

Here's the Toasted Marshmallow Meringue Topping
Look at those beautifully browned tips 
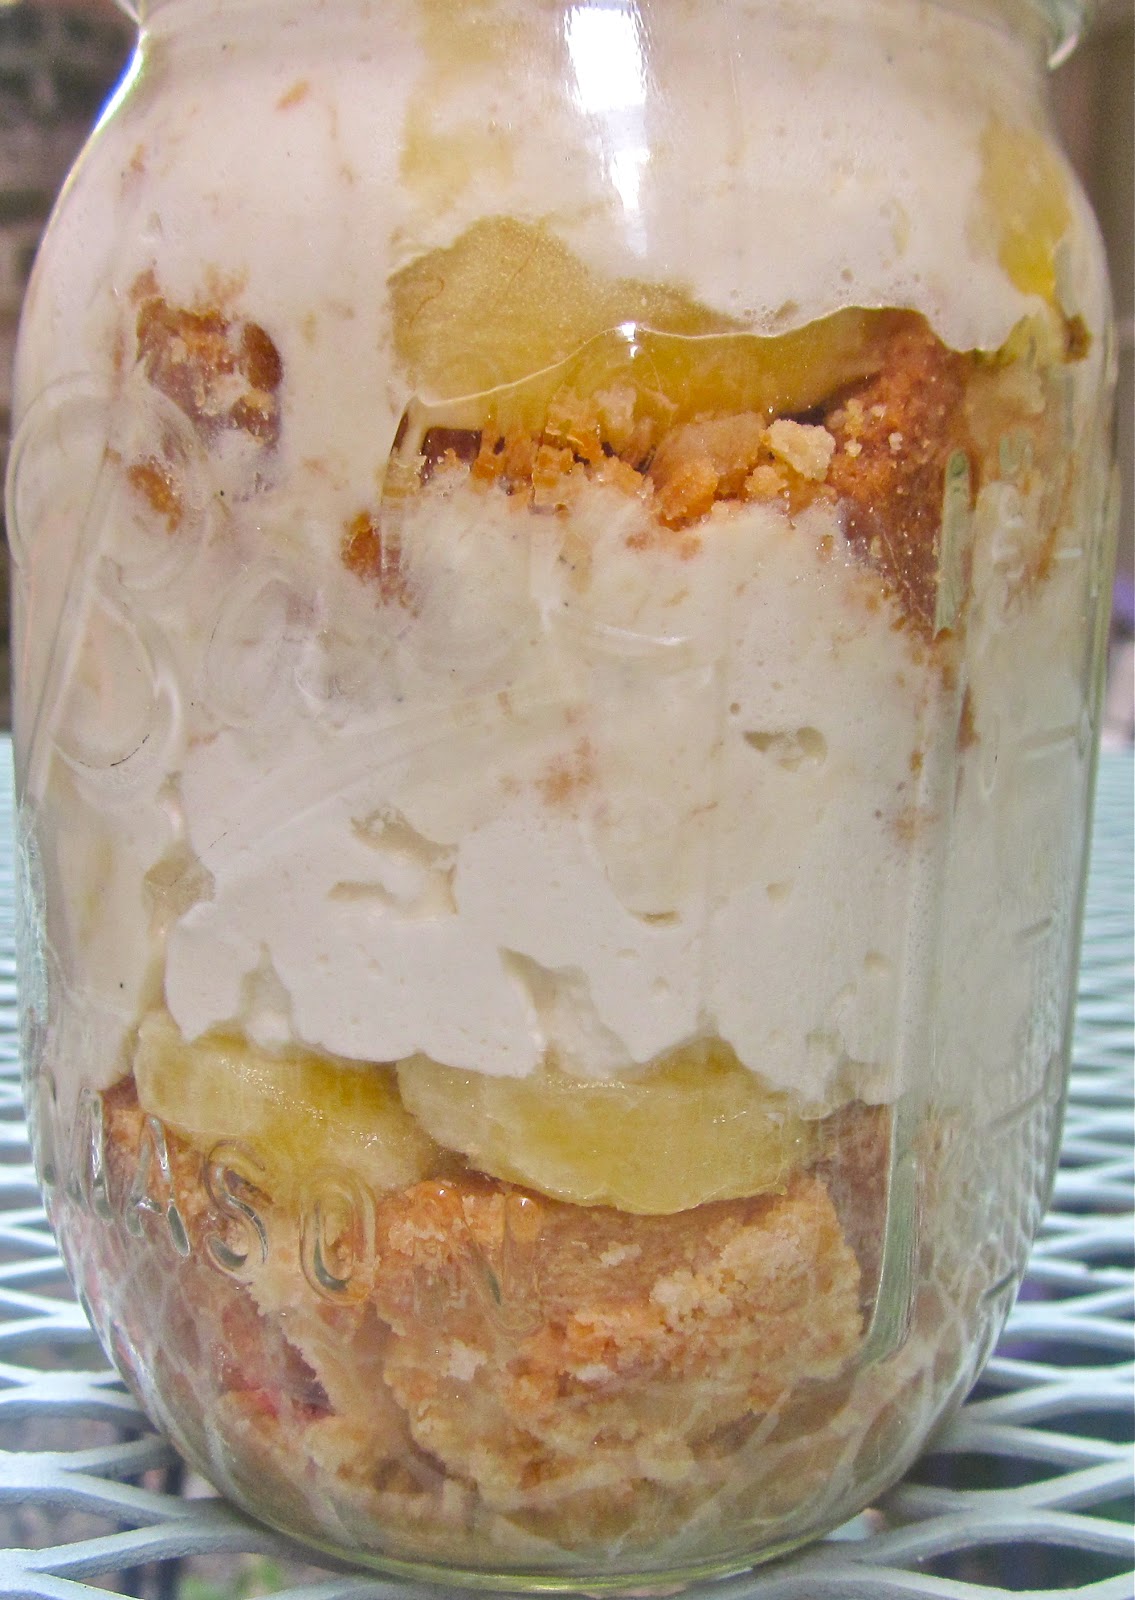
An individual serving of Southern Banana Pudding in a mason jar
Layers of Shortbread Cookies, Banana Slices, Creamy Roasted-Vanilla Bean Pudding, & Whipped Cream 
Diggin' in
Oh man, this is so good.
Here's all of it in a big ole' bowl...
It's so good, that even dogs like it!
For the Homemade Shortbread Cookies:
3 Sticks of Unsalted Butter, Room Temperature
1C Sugar
1t Vanilla
3 ½C AP Flour
¼t Salt
 
For the Creamy Roasted Banana-Vanilla Bean Pudding:
3-4 Large Roasted Bananas, Mashed & Cooled
2 2/3C Whole Milk, Divided
½C Sugar
½C Cornstarch
¼t Salt (heaping)
1 Vanilla Bean, Scraped for Seeds
1 Large Egg
1t Vanilla
8oz Package of Cream Cheese, Softened
14oz Can of Sweetened, Condensed Milk

For the Whipped Cream:
2C Heavy Cream, Chilled
2t Vanilla
2T Confectioners’ Sugar
Pinch of Salt

For the Toasted Marshmallow Meringue Topping:
3 Egg Whites
¼t Cream of Tartar
Pinch of Salt
7oz Marshmallow Crème

For the Southern Layered Banana Pudding:
Homemade Shortbread Cookies, Crumbled
Prepared Creamy Roasted Banana-Vanilla Bean Pudding, Chilled
3 Fresh Large Bananas, Cut into Slices
Homemade Whipped Cream, Chilled
Prepared Marshmallow Meringue Topping, Toasted with a Kitchen Torch

Directions:
1. For the Homemade Shortbread Cookies: Preheat the oven to 350. Then in an electric mixer, beat together the softened butter, sugar, and vanilla, then sift together the flour and salt and mix this into the butter. Beat until it just comes together, then pat the dough into a disc and chill in the refrigerator for about 30 minutes. After the dough has chilled, roll it out and using a cookie cutter, cut the dough into square cookies (or use a pizza cutter to cut into squares). Place the cookies on a parchment lined cookie sheet and bake for 20-25 minutes or until golden brown. Let the cookies completely cool before layering them into the banana pudding. Once the cookies have cooled, crumble them into bite size pieces and set aside.
2. Roasting the Bananas: Preheat the oven to 350 degrees. Place the bananas on a sheet tray that is covered with parchment paper. Bake the bananas for 20 minutes, and then flip over the bananas, and roast for another 20 minutes or until the skins are dark brown and the inside is soft. Let the roasted bananas cool, and then carefully peel them and place them into a bowl. Mash with a fork until somewhat smooth, but still some chunks remain. Put the mashed bananas into a fine mesh strainer and strain out any juice. This took about 30 minutes for me. After they have strained, put them into a mixing bowl, and then puree the mixture until as smooth as possible. Then measure out the banana puree to about one cup (that’s all that I used, and that was from exactly 4 bananas). Also, make sure the mashed, roasted bananas are completely cool before layering them into the pudding.
3. For the Creamy Roasted Banana-Vanilla Bean Pudding: Bring 2C of the milk to a boil in a medium saucepan. While it is heating, combine sugar, cornstarch, salt and vanilla bean (toss the leftover vanilla bean pods in the pot with the simmering milk for an extra vanilla boost) in the bottom of a medium, heatproof bowl. Gradually whisk in the remaining 2/3C whole milk, a little at a time so lumps do not form, and then whisk in the egg. Once milk is boiling, very gradually add it to the cornstarch mixture in the bowl, whisking the whole time. Return the mixture back to the saucepan, stirring constantly with a silicon spatula or wooden spoon. Once it comes to a simmer, cook it for one minute longer (which will cook the cornstarch and egg fully). Pour the pudding into a large mixing bowl and chill in refrigerator until fully set, about 2-4 hours. Press a piece of plastic wrap against the top of the pudding before you chill it to prevent pudding skin. Once the pudding and the roasted bananas have chilled, remove the pudding from the refrigerator. In a small mixing bowl, beat together the softened cream cheese and sweetened, condensed milk until smooth. Add this mixture into the chilled vanilla bean pudding, mixing until incorporated. Next, fold in the 1C of pureed, roasted bananas until they are mixed throughout (make sure they are room temperature or chilled). Return the finished pudding to the refrigerator to chill and set for another hour while you gather and make the remaining components.
4. For the Homemade Whipped Cream: In a large bowl, whip the cream until stiff peaks are just about to form. Beat in the vanilla and sugar until stiff peaks form. Make sure to beat the cream slightly thicker than usual. Make sure the whipped cream is chilled until ready to use.
5. Assembling the Layered Southern Banana Pudding: Layer a third of the homemade shortbread cookies into the bottom of a large serving bowl or trifle dish. Spread the slices of 1 fresh banana in an even layer on top of the shortbread cookie layer. Top the bananas with a third of the chilled creamy roasted banana-vanilla bean pudding. Spoon a half of the homemade whipped cream (a half of the half batch, so technically a fourth of the total batch) on top of the pudding layer. Repeat the layering procedure twice. Cover the pudding and refrigerate for 2-3 hours to set. The process should go cookies, banana slices, pudding, and whipped cream. You should have 3 cookie layers, 3 banana layers, 3 pudding layers, 2 whipped cream layers, and 1 marshmallow meringue topping. Do not do the marshmallow meringue topping until you are ready to serve.
6. For the Marshmallow Meringue Topping: After the pudding has chilled for a few hours, beat together the egg whites, cream of tartar, and a pinch of salt in the bowl of a standing mixer, at a high speed. Beat until soft peaks form.  Gradually add marshmallow crème in small portions, continuing to beat until stiff peaks form.  Spread or pipe the meringue over the top of the pudding in an even layer, making sure to seal edges completely (you can be as creative or rustic as you like with this layer, depending on your style). Broil the top of the marshmallow meringue with a kitchen torch until it reaches a golden brown & toasted marshmallow look (do not let it burn). 
7. Scoop into bowls and serve the pudding chilled. Enjoy immediately!

Friday, February 10, 2012

Revamped: Gourmet Twix Bars with Brown Butter Shortbread, Salted Caramel, & Dark Chocolate

I've made homemade twix bars before, almost exactly a year ago, and I knew I could put my own spin on them to make them just a little bit fancier (and a whole lot better). I used my first recipe as the base, but made a slightly different variation. Instead of the softer shortbread, I substituted it with a crisp, brown butter shortbread. I still stand firm on the fact that brown butter makes every meal better, both savory & sweet. I liked the caramel recipe from last year, so all I added was vanilla bean and fleur de sel. But I knew that there had to be more chocolate. I put a layer of soft chocolate, and then I decided to make a go at tempering bittersweet chocolate and lightly coating the candy like a traditional Twix bar. I honestly thought that the process of tempering would be way harder, but I found an easy, instructional step-by-step here. It might sound intimidating, but I pulled it off, and now I am so glad that I have this in my repertoire for future recipes. Lastly, I sprinkled the chocolate-coated bars with some fleur de sel because that's just my thang, yo. Yeah, I don't know why I just said that, but oh well. These revamped Twix bars are great and have a deep complexity of flavors that I love. They might be too fancy shmancy for some of y'all, and I get that, so if that's the case, make the first recipe for that classic taste. But give these a try for somethin' a little different and unique!! Enjoy :)
Gourmet Twix Bars
Layers of Brown Butter Shortbread, Salted Carmel, Dark Chocolate
Coated Twix Bars in Tempered Dark Chocolate
A Sprinkle of Fleur de Sel
For the Browned Butter Shortbread Cookies:
1 ½ Sticks of Unsalted Butter
½C Dark Brown Sugar, Lightly Packed
1t Vanilla
½t Fleur de Sel
1 ½C AP Flour
Gourmet Raw Bourbon Vanilla Sugar, For Sprinkling

For the Salted Caramel Layer:
2C Sugar
¾C Light Corn Syrup
½C Water
1t Lemon Juice
1C Heavy Cream
1C Sweetened, Condensed Milk
1 Vanilla Bean, Scraped for Seeds
¼t Salt
Fleur de Sel, For Sprinkling

For the Dark Chocolate Layer:
1 ½C Semi Sweet Chocolate Chips
4T Unsalted Butter

For the Dark Chocolate Coating:
10oz 70% Bittersweet Chocolate, Coarsely Chopped
Fleur de Sel, For Sprinkling

Directions:
1. To Make the Browned Butter Shortbread Cookies: Line an 11x7-inch square pan with aluminum foil, leaving an overhang of foil on two sides so you can easily lift the shortbread out of the pan, and then lightly spray with Pam. Set the pan aside while you make the shortbread. In a small saucepan over medium heat, melt the butter and continue to cook until it lightly browns and emits a nutty aroma. Remove the browned butter from heat. In a medium bowl, combine the browned butter, sugar, vanilla, and salt. Stir to combine. Add in the flour and mix until incorporated. Spread the dough evenly in the prepared pan, and then let the dough stand for at least 2 hours (do not refrigerate). After resting, preheat the oven to 350 degrees. Lightly sprinkle the surface with the vanilla sugar. Bake the shortbread for 20-30 minutes and remove them from the oven and let it cool.
2. To Make the Salted Caramel Layer:  Combine sugar, corn syrup, water, and lemon juice in a sauté pan and cook over medium-high heat until the mixture comes to a boil (do not whisk). Once this mixture begins to turn caramel brown, insert a candy thermometer and when the mixture reaches 300 degrees F, remove from heat and let it sit for 1 minute. Whisk in the heavy cream, then the condensed milk, then salt until smooth. Return the pan back to the heat, and cook until the caramel reaches 240 degrees F. Remove from heat and pour over the shortbread. Let it set at room temperature for 2 hours.
3. For the Dark Chocolate Topping & Coating: Heat the chocolate chips and butter in a bowl in the microwave in 30 second intervals until the chocolate is just melted, then whisk until incorporated. Spread this chocolate mixture over the caramel layer until an even, thick layer of chocolate covers the caramel. Cool in the refrigerator until you are ready to cut. Cut into small rectangles and prepare the chocolate coating. Melt ¾ of the chopped chocolate in a metal bowl set over a saucepan of barely simmering water. Remove the bowl from the pan and add the remaining chocolate, stirring until smooth. Cool the chocolate until a thermometer inserted at least ½inch into the chocolate registers 80 degrees. Return the water in the pan to a boil and remove it from heat. Set the bowl with cooled chocolate over the pan and reheat, stirring, until the thermometer registers 88-91 degrees as necessary. Remove the bowl from the pan. Balance one Twix bar on a fork and submerge in the melted chocolate, letting the excess drip off and scraping the back of the fork against the rim of the bowl if necessary.  Place the coated caramel-cookie stacks onto a parchment lined baking sheet to stand until the chocolate is set, about 1 hour. Sprinkle the tops with fleur de sel while the chocolate is still soft. Repeat with the remaining stacks until all of them have been coated with chocolate.
4. Wrap the finished candy bars in parchment paper and keep them in an airtight container in the refrigerator for up to 3 weeks. Bring to room temperature before enjoying.

Wednesday, December 14, 2011

Festive White Chocolate-Cherry Shortbread Cookies

The Christmas cookie marathon continues... second up are Festive White Chocolate-Cherry Shortbread Cookies. I have mentioned before of my obsession with Pinterest. And I will urge all of y'all to go get an account because I assure you people that it is more addictive than Facebook. So just do it. Well, I have seen  this recipe for white chocolate-cherry shortbread floating around titled as "the best Christmas cookie", and that simply screams to me that I needed to make these. And so I did. I had to put my little twist on it and I wasn't quite sure what that would be until I arrived at the grocery store and saw green maraschino cherries. I suddenly thought that I should make red & green cookie dough and combine them together to make a super festive cookie (unlike the plain red cookie that I had seen). The cookies were perfectly buttery and sweet from the white chocolate. The only complaint I had was that they did not have enough cherry flavor, which I think could be solved by adding some cherry syrup or extract. So definitely give that a go if you want stronger fruit flavor. Also, the dough is extremely crumbly and tough at first, but just keep working it and it will come together. Otherwise, we enjoyed these cookies a lot and they were a nice added surprise to my Christmas cookie recipes!! Enjoy :)
The two doughs rolled together
Ready to be baked!
Decorating the cookies 
Red, white, & green 
Lots & lots of sprinkles
The finished product

Festive White Chocolate-Cherry Shortbread Cookies
For the Red Cookies:
¾C Red Maraschino Cherries, Drained & Finely Chopped
2 ½C AP Flour
½C Sugar
1C Butter, Very Cold
2/3C White Chocolate, Finely Chopped
½t Almond Extract (or cherry extract)
Red Food Coloring

For the Green Cookies:
¾C Green Maraschino Cherries, Drained & Finely Chopped
2 ½C AP Flour
½C Sugar
1C Butter, Very Cold
2/3C White Chocolate, Finely Chopped
½t Almond Extract (or cherry extract)
Green Food Coloring

For Decoration:
16oz White Chocolate, Finely Chopped
4t Shortening
Sprinkles & Glitter, For Decorating

Directions:
1. Preheat the oven to 325 degrees and spread cherries on a paper towel to drain well.
2. In a large bowl, combine flour and sugar. Using a pastry blender, cut in the butter until mixture resembles fine crumbs. Stir in drained cherries and 4 ounces (2/3 cup) of the chopped chocolate. Stir in almond extract and, if desired, food coloring. Knead mixture until it forms a smooth ball. Repeat with the same ingredients to make the green dough.
3. Place both doughs onto parchment paper or plastic wrap and form to halves of a round log. Place the doughs on top of each other and press together. Roll the dough into a smooth, long log again and wrap tightly. Place into the refrigerator and chill for 30 minutes to an hour. 
4. Once chilled, cut the dough into thin, even slices and place about 2 inches a part on a baking sheet that is lined with a silpat or parchment paper.
5. Bake in preheated oven for 10 to 12 minutes or until centers are set. Cool for 1 minute on cookie sheet. Transfer cookies to a wire rack and let cool.
6. In a small saucepan, combine remaining 8 ounces white chocolate and the shortening. Cook and stir over low heat until melted. Dip half of each cookie into chocolate, allowing excess to drip off. If desired, roll dipped edge in sprinkles and/or edible glitter. Place the cookies on waxed paper until chocolate is set.

Thursday, August 18, 2011

Revamped: Homemade Gourmet Oreos

We went to the beach yesterday, and it was such a great day. It was super windy, so you couldn't even feel the 100 degree heat beating down on you. We had a picnic and just relaxed in the sun for the day. It was especially nice because my Mountain Man went out of town to visit home this morning for the weekend, so I won't get to see him until Sunday :( Not so much fun for me. But, here are some pictures from our day yesterday...
Gorgeous Beach Water 
Lookin' Out at the Water 
Me & My Mountain Man
When we got back from the beach, I knew that I wanted something sweet. So, I looked through the pantry to decide what I should bake. I ended up having everything I needed to make some Oreos. I realize I have already made Homemade Oreos once before. I liked the recipe a lot, but I knew at some point I wanted to update it. I just love retro desserts. It's so much fun making old classics into something new & delicious. I used a little scalloped edge cookie cutter, just so that they were that much cuter. It just had the best vintage feel. These cute little cookies were awesome. I mean, we loved these. For the cookie, I decided to make a classic French chocolate sable cookie with lots of cocoa powder and fresh grated dark chocolate, for a richer & deeper flavor. But more importantly, I wanted to make a better filling for these cookies. I didn't want to use any butter or vegetable shortening, but something more luscious. I ended up making a white chocolate ganache, and it was the perfect filling between those dark chocolate cookies. I also sprinkled a little bit of fleur de sel on top of the cookies because I always do, it just makes it soooo much better. We really really loved these, they are already gone (my recipe made about 24 cookie sandwiches)! Enjoy :)
See the Specks of Fleur de Sel
A Stack of Homemade Gourmet Oreos with White Chocolate Ganache
Homemade Gourmet Oreos
For the Chocolate Sable Cookies:
1C AP Flour
1/3C Unsweetened Cocoa Powder
1t Instant Espresso Powder
½t Baking Soda
½C Unsalted Butter, Room Temperature
2/3C Sugar
1 Egg
¼t Sea Salt
¾t Vanilla
3.5oz 70% Chocolate, Grated
Fleur de Sel, For Sprinkling

For the White Chocolate Ganache Filling:
½C Heavy Cream
8oz Ghirardelli White Chocolate Chips
½T Unsalted Butter
½t Vanilla 

Directions:
1. Preheat the oven to 350 degrees and line a baking sheet with parchment paper. Set them aside.
2. To Make the Chocolate Sable Cookies: Sift together the flour, cocoa powder, and baking soda into a bowl and set it aside. In the bowl of a standing mixer fitted with the paddle attachment, beat together the butter, sugar, egg, salt, and vanilla until light & fluffy, about 3-4 minutes. Add in the dry ingredients and the grated chocolate and mix until just combined (the dough will be a crumbly, wet sand texture). Wrap the dough up tightly in plastic wrap and refrigerate for 30 minutes. Once chilled, roll the dough out to ½inch thick on a lightly floured surface. Using a scalloped edge cookie cutter, cut the dough into 1-2inch cookies. Place the cookies onto the prepared baking sheets, roughly two inches apart. Sprinkle lightly with fleur de sel. Bake the cookies until they are firm, about 12-14 minutes. Remove the baked cookies from the baking sheet onto a wire rack to cool while you make the white chocolate ganache filling.
3. To Make the White Chocolate Ganache Filling: Heat a medium saucepan on low heat and add in the heavy cream. Add the white chocolate chips into a mixing bowl. Bring the cream to a boil, but keeping a close eye on it, so it doesn’t boil over. Immediately remove from the heat and pour over the chocolate chips. Let it sit for 2-3 minutes, and then whisk together to melt the chocolate. Finally, stir in the butter. Once it is melted & thick, lay plastic wrap over the top and refrigerate for 30-60 minutes (whisking every 10 minutes or so to make sure it stays smooth).
4. To Assemble the Homemade Oreo Cookies: Once the cookies & ganache have both cooled & chilled, fill a pastry bag with a ½inch round tip with the white chocolate ganache. Pipe teaspoon-size dollops of the filling into the center of one cookie. Place another cookie on top of the ganache. Lightly press down to work the filling evenly to the outsides of the cookie. Continue this process until all the cookies have been sandwiched with ganache.
5. Refrigerate the Oreo for about an hour (I like them best cold, so I kept mine in the refrigerator) and serve with a large glass of milk!


*Check out Sweets for a Saturday for this recipe, as well as many others!!*

Wednesday, August 10, 2011

Boozy Bourbon Pecan Pie-Chocolate Cheesecake Bars

I know it's not Thanksgiving yet, or even Fall, but I'm itchin' for it to get here. I love everything about Fall. I love the weather, football, tailgatin', festivals, soup, holidays... pretty much anything you can think of. This recipe would be perfect for Thanksgiving, especially in the South :) I mean it's like chocolate pecan pie, but in bar-form... with CHEESECAKE... and BOURBON. I know I know, you can thank me later (just kidding). But these bars are definitely Mountain Man approved. I think any guy would approve of a dessert with bourbon in it. I think my Mountain Man would drink it out of his shoe, I mean he wouldn't really, but maybe. I don't know, probably if he was already liquored up some, but that's besides the point. The bars are soooo yummy. It is a layer of bourbon shortbread, chocolate cheesecake, and bourbon-pecan pie topping. It's just my little twist on a holiday classic. I hope you enjoy them as much as we did :)


Boozy Bourbon Pecan Pie-Chocolate Cheesecake Bars
For the Bourbon Shortbread Crust:
1 ¾C AP Flour
Pinch of Salt
1 ½ Sticks of Unsalted Butter, Almost Room Temperature
¼C Gourmet Raw Bourbon Vanilla Sugar
¼C Confectioners’ Sugar
2t Vanilla
1T Bourbon, Heaping (I used Maker’s Mark)   

For the Chocolate Cheesecake Layer:
1 ½ Packages (or 12oz total) of Cream Cheese, Softened
¾C Sugar
1t Vanilla
2 Eggs
8oz Semisweet Chocolate, Melted & Cooled

For the Boozy Pecan Pie Filling:
3 Large Eggs
1C Light Corn Syrup
¾C Brown Sugar
¼C Sugar
2T Melted Butter
1T Bourbon
2C Pecans, Toasted & Roughly Chopped
Pinch of Salt (or to taste)

Directions:
1. To Make the Bourbon Shortbread Crust: Sift together the flour and salt, and then set aside. Put the butter and both sugars into the bowl of a standing mixer and beat them together until light and fluffy. Add in the vanilla & bourbon and mix on medium speed until well combined. Finally, with the mixer on low speed, gradually add in the flour mixture until it is completely incorporated and the dough comes together cleanly off the sides of the bowl. Next, line a 13x9-baking pan with tin foil and spray with Pam, and then press the shortbread dough into the pan in an even layer. Place the pan into the refrigerator and chill the dough for 2 hours. Once chilled, preheat the oven to 350 degrees. While the oven is preheating, make the chocolate cheesecake layer.
2. To Make the Chocolate Cheesecake Layer: In the bowl of a standing mixer, beat together the cream cheese and sugar until light and fluffy. Add in the eggs and beat until incorporated. With the mixer on low, mix in the melted chocolate and vanilla until smooth and creamy. Pour the cheesecake batter evenly over the shortbread. Bake for 20 minutes until the cheesecake is partially cooked and starting to set. Remove from the oven and cool for 10 minutes while you make the boozy pecan pie filling.
3. To Make the Boozy Pecan Pie Filling: In a large bowl, whisk together the eggs, corn syrup, sugar, melted butter, and bourbon until well combined. Stir in the pecans. Gently pour the pecan pie filling evenly over the cooled cheesecake layer. Bake the bars until set or for another 25-30 minutes. Once they are slightly set, cool the bars completely in the pan, and then place the bars in the refrigerator to chill for four to six hours.
4. Once the bars have chilled, lift them out of their pan using the tin foil and cut into squares. Keep refrigerated until ready to serve. Enjoy!


*Check out Sweets for a Saturday for this recipe, as well as many others!!*

Saturday, February 26, 2011

Homemade Twix Bars

It's another lonely night at the apartment for me, since Clayton had to work all day today :( I guess it's a good thing because I was actually semi-productive and studied all day for my test on Monday. But I took a study break to make some Homemade Twix Bars. They have a nice shortbread layer that's just the perfect texture, a salty-sweet caramel layer, and smooth, melt-in-your-mouth chocolate layer. If you like Twix Bars, then you will definitely like these! Well, enjoy :)
Homemade Twix Bars
For the Shortbread:
1 Stick + 3T Unsalted Butter, Softened
¼C Sugar
1 ¾C AP Flour
¼t Salt
2T Ground Rice, Sifted

For the Caramel:
2C Sugar
¾C Light Corn Syrup
½C Water
1t Lemon Juice
1C Heavy Cream
1C Sweetened, Condensed Milk
¼t Salt
Salt, For Sprinkling Over Caramel Layer

For the Chocolate Topping:
1 ½C Bittersweet Chocolate Chips
4T Butter

Directions:
1. Preheat the oven to 350 and line a 9x13 baking dish with parchment paper and spray with Pam.
2. To make the Shortbread: in a mixing bowl, beat together the butter and sugar until creamy. Gradually add the flour, salt, and ground rice. To make the ground rice flour, blend any rice that you have in your kitchen until it is a fine powder. Sift this rice power, so that there are no large rice pieces. After the dough is incorporated, press it into the prepared pan. Bake for 12 minutes, then rotate and bake for another 10 minutes until the shortbread is lightly golden. Let this cool while you make the caramel layer.
3. To make the Caramel: Combine sugar, corn syrup, water, and lemon juice in a sauté pan and cook over medium-high heat until the mixture comes to a boil (do not whisk). Once this mixture begins to turn caramel brown, insert a candy thermometer and when the mixture reaches 300 degrees F, remove from heat and let it sit for 1 minute. Whisk in the heavy cream, then the condensed milk, then salt until smooth. Return the pan back to the heat, and cook until the caramel reaches 240 degrees F. Remove from heat and pour over the shortbread. Let it set at room temperature for 2 hours.
4. For the Chocolate Topping: Heat the chocolate chips and butter in a bowl in the microwave in 30 second intervals until the chocolate is just melted, then whisk until incorporated. Spread this chocolate mixture over the caramel layer until an even, thick layer of chocolate covers the caramel. Cool in the refrigerator until you are ready to cut.
5. Cut the Twix Bars into small rectangles. When I’m giving these Twix Bars to friends, I like to wrap them in wax paper, so they look like individual candies. But you can easily just cut them and keep them in your refrigerator for easy snacking.
6. Enjoy!