Friday, June 24, 2011

Vanilla Bean Bacon Caramels

For my next post of the day, I made some Vanilla Bean Bacon Caramels. I know it sounds soooo bizarre. And it is very strange. But I kind of relate it to eating candied bacon or bacon dipped in maple syrup. After I made these bacon caramels, well I kind of went bacon crazy. I ended up making some Bacon Caramel Chocolate Chunk Cookies and some Candied Bacon Caramel Ice Cream. So I'll be posting them later this weekend. Enjoy!
Vanilla Bean Bacon Caramels
For the Caramels:
½C Sugar
½C Dark Brown Sugar
1C Corn Syrup
1 Stick of Butter
1C Heavy Cream, Divided
¼C Maple Syrup
1 Vanilla Bean Pod, Split Lengthwise & Scraped for Beans
6 Strips of Thick-Cut Bacon, Fried to a Crisp & Roughly Chopped
Salt, For Sprinkling

Directions:
1. Reserve ½C of the heavy cream. Combine the sugars, corn syrup, butter, maple syrup, vanilla bean pod, and vanilla beans in a medium saucepan. Stir to combine. Set on medium high heat. Stir occasionally and cook until 240 degrees. The candy is now at the firm-ball stage. Remove from the stove and carefully stir in the remaining ½C of Cream. Place the pan back on the heat and continue to cook to 245 degrees. Immediately remove from heat and stir in ¾ of the Cooked, Chopped bacon (saving the other ¼ of the cooked bacon for topping). Pour the caramel into a buttered dish (8x8 dish=thick caramels & 9x13 dish=thin caramels). Scatter the remaining bacon on top. Let it set for at least 3 hours before cutting.


source: bacon caramels. vanilla bean caramels.


*Please check out, Sweets for a Saturday for my link, as well as many others!!

Tuesday, June 21, 2011

Revamped: The Most Amazing Fried Green Tomato BLT with Savannah Remoulade Sauce

I know what a lot of you are probably thinking... why is this chick posting another recipe for a Fried Green Tomato BLT, when she already has one? I know, I know. I have already made this sandwich. And it was really good. But sometimes your recipes need some updating (like my almond poundcake and my chocolate chip cookies). The last sandwich was a winner, or so we thought, but after watching the Fried Green Tomato BLT Throwdown with Bobby Flay, I was just itchin' to update mine and make it better. And boy was it better, like amazingly better. Hands down, the best thing we have made. Ever. Yes, I know I probably say that a lot. But I really mean it this time. The updated & revamped version consists of thick, crusty bread fried in BACON FAT. You heard me right... bacon fat. It is just that much more delicious and buttery and just melt in your mouth amazing (I don't know if I'm even making sense at this point). I also added some creamy Boursin Cheese, which gives it just a nice tangy taste. I also added more bacon (because god forbid there isn't enough bacon, I mean it's a BLT sandwich isn't it?). But just not any bacon, the thick-cut monster applewood smoked bacon. We also changed from the bibb lettuce to baby arugula. I think this made a HUGE difference in flavor. The baby arugula added a spiciness & bitterness that gave a nice contrast to all the heavy flavors from the bacon and cheese. The last change was the switch from the vidalia-bacon mayo to my Savannah Remoulade Sauce. This is becoming one of my favorite go-to sauces for pretty much anything. It's pretty much the love child of Utah's Fry Sauce & a Cajun Remoulade. It's sweet, tangy, but has a really nice kick. I just love it. It goes with anything too... chicken fingers, french fries, fish sticks... and more importantly, my Fried Green Tomato BLT's. I just can't get over that sandwich. It was so good. And the sandwiches are HUGE. But surprisingly, Clayton managed to hoover down two of them, like that's just ridiculous. Anyway, I really want everyone of you to stop what you're doing and go make this. Like now. GO RIGHT NOW. Ok, well enjoy!!
The Most Amazing Fried Green Tomato BLT with Savannah Remoulade Sauce
For the Savannah Remoulade:
3 Pepperoncinis, Diced
1T Capers
1C Mayo
¼C + 1T Ketchup
¼C Sweet Chili Sauce
1t Garlic Powder
1t Onion Powder
1t Paprika
1t Yellow Mustard
2t Grainy Mustard
1t Horseradish
½t Pepper
1t Pepperoncini Juice
1t Apple Cider Vinegar
½t Cajun Seasoning
2t Texas Pete
2T Bacon Fat Drippings, Cooled
Salt & Pepper, To Taste

For the Fried Green Tomatoes:
2 Green Tomatoes, Cut into ½inch Thick Slices & Patted Dry
1Q Peanut Oil, For Frying
2C AP Flour
1T Paprika
1T Chili Powder
1T Cajun Seasoning
1T Salt
3 Eggs
½C Buttermilk
1T Hot Sauce
1 Box of Panko Breadcrumbs
Salt, For Sprinkling

For the Sandwiches:
4 Slices of Crusty Country Bread, Fried in bacon grease until golden brown
4 Fried Green Tomatoes
8 Slices of Thick Cut Applewood-Smoked Bacon, Cooked (Save the Grease)
Fresh Baby Arugula
Creamy Boursin Cheese, Room Temperature
Prepared Savannah Remoulade Sauce

Directions: 
1.  To Make the Savannah Remoulade: In a food processor or immersion blender, pulse together the Pepperoncinis and capers, until it is a coarse chop (resembling a pickle relish). In a separate bowl, whisk together the mayo, ketchup, and sweet chili sauce until there are no lumps left. Then add the rest of the ingredients & the chopped relish mixture and whisk to combine until it is a smooth, creamy sauce. Refrigerate this sauce for at least an hour (or preferably over night) to let the flavors meld.
2. To Make the Fried Green Tomatoes: Slice the tomatoes to about ½inch thick and place the slices on a paper towel and sprinkle with salt. Let the tomatoes drain for 15-30 minutes. After they have drained, dry the tomatoes a little more with some paper towels, removing any excess moisture. Next, you have to set up a battering station. I use 3 pie tins. For the first station, I mix the flour & the seasonings. For the second station, I whisk together the eggs, buttermilk, and hot sauce. For the third station, pour the contents of one box of Panko breadcrumbs. Now, place the slices of dried green tomato into the flour mixture, then into the egg wash, and finally the panko (making sure they are completely covered). Put the breaded slices on a tin foil-lined baking sheet with a cooling rack on top, and then put the pan into the refrigerator and let the slices rest for about 15-30 minutes.
3. Frying the Tomatoes: Heat your deep fryer to 375 degrees with the peanut oil. Once the oil has heated, pull the chilled slices out of the refrigerator. Fry the slices for 4-7 minutes each (depending on the size of your fryer, mine is pretty small, so I do 2 at a time). The green tomatoes should be golden brown on the outside, but cooked, yet still firm on the inside. Once they are done frying return them to the same baking sheet and sprinkle them with salt immediately. Once all of the tomatoes are fried, put them in an oven on a low temperature to keep them warm while you finish the rest of the sandwiches.
4. Assemble the Fried Green Tomato BLT: On one of the slices, spread a heavy bit of the creamy Boursin cheese, top the cheese with 2-3 slices of the fried green tomatoes, drizzle some of the Savannah Remoulade on top of the tomatoes (this helps the arugula stick), lay on a handful of the baby arugula, making sure it’s compact. Top the arugula with the thick, crispy slices of bacon. Spread a heaping spoonful of more Savannah Remoulade on the other slice of bread and then top it onto the thick bacon. Serve the sandwich immediately.

Monday, June 20, 2011

Swirled Lemon Raspberry Poundcake with Raspberry Glaze

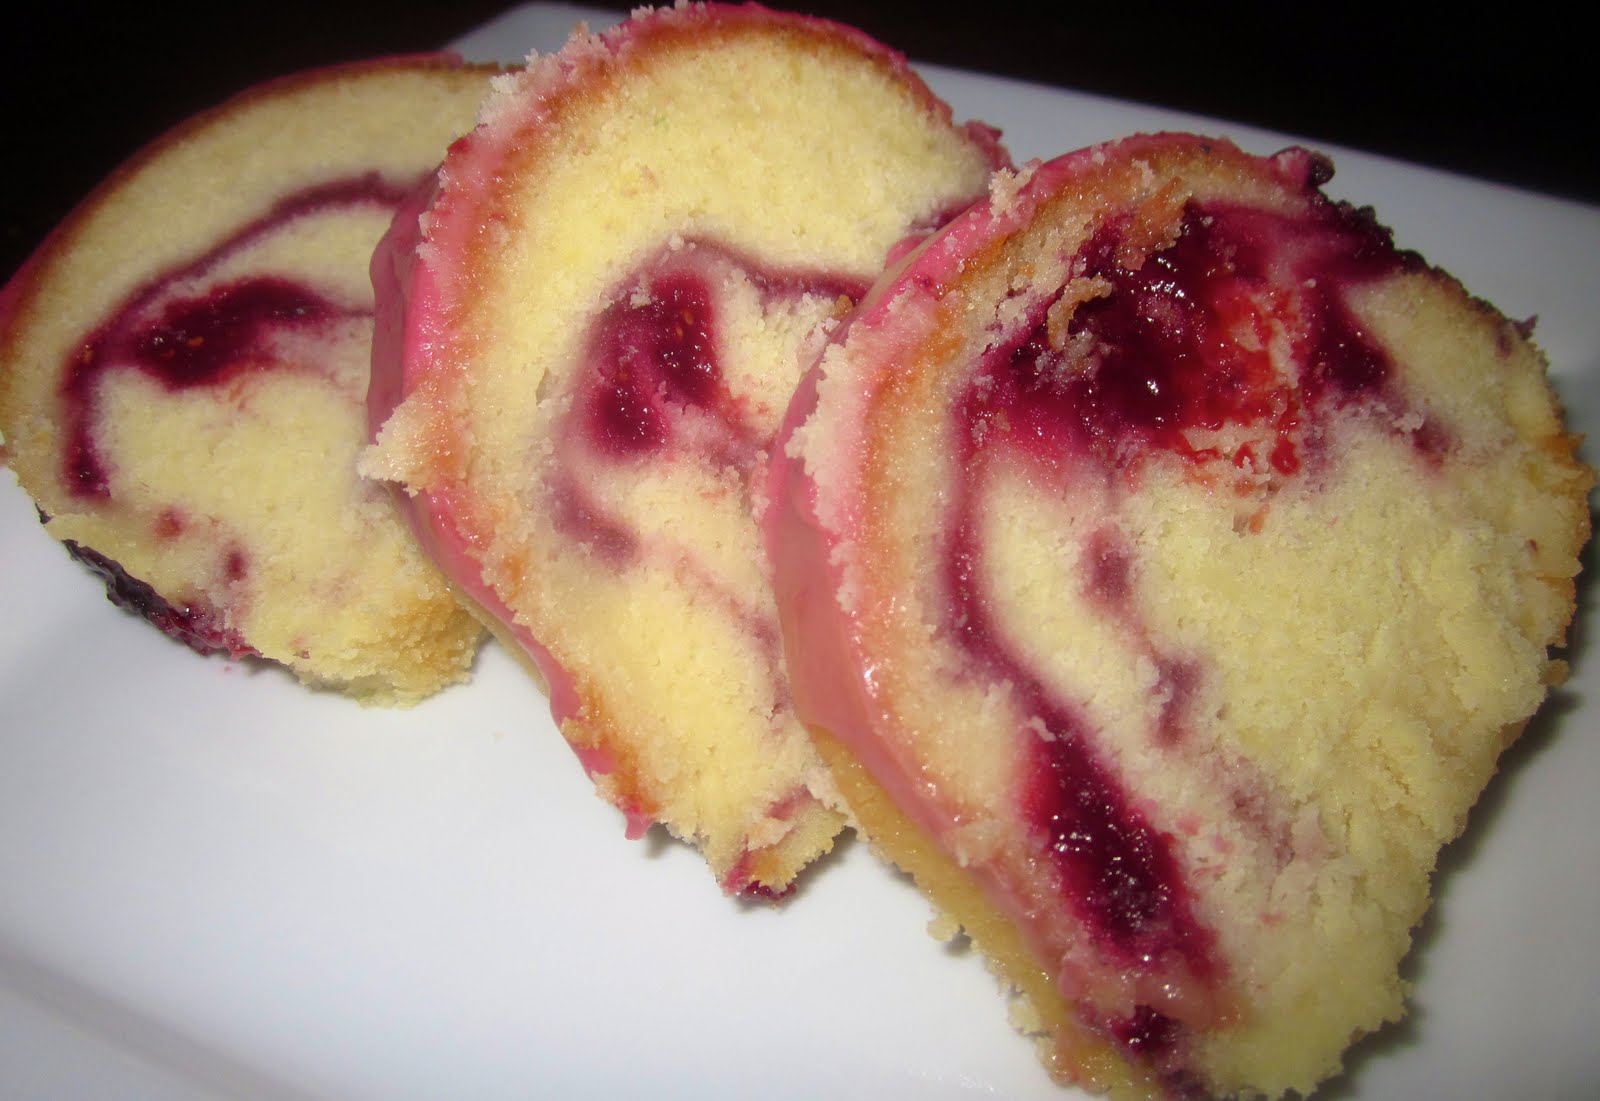
I just love poundcake. It's so satisfying and luscious, but still light and fluffy. I seriously make a different poundcake every week. I just use my favorite recipe and substitute a few ingredients to customize the different flavors. This week I decided to make Swirled Lemon Raspberry Poundcake with Raspberry Glaze. I just love lemon and raspberry together. It's such a refreshing combination and so summery. The base is a dense, creamy lemon curd poundcake swirled with layers of raspberry filling, and then topped with a raspberry glaze. Yum yum yum! Enjoy :)
I Love the Bright Pink Raspberry Glaze
Lemon Curd Poundcake with Swirled Raspberry Layers & Raspberry Glaze
For the Poundcake:
2 Sticks of Unsalted Butter, Softened
1 8oz Package of Cream Cheese, Softened
½C Lemon Curd
1 ½C Sugar
4 Eggs
2t Vanilla
1T Lemon Zest
3T Lemon Juice
2C AP Flour
1 ½t Baking Powder
1t Salt

For the Raspberry Filling:
1C Frozen Raspberries
¼C Raspberry Jam
2T Lemon Juice
¼C Confectioners’ Sugar

For the Raspberry Glaze:
2C Confectioners’ Sugar, Sifted
2T Raspberry Filling
½C Raspberry Jam
2t Lemon Juice
3T Milk
½t Vanilla  

Directions:
1. Preheat the oven to 325 degrees and spray a bundt pan with Pam, and then set aside.
2. To Make the Raspberry Filling: Combine all of the ingredients in a small saucepan over medium-low heat. Break up any large raspberry chunks. Once the mixture has come to a bubble, remove from the heat and let it cool completely before adding it to the cake.
3. To Make the Poundcake: In a mixer, cream together the butter, cream cheese, and lemon curd. Pour in the sugar and mix until fluffy and smooth. Add the eggs, one at a time, mixing each one until it is incorporated before adding the next egg. Next, add in the vanilla, lemon zest, and lemon juice. Beat to combine. While ingredients are mixing, whisk together the flour, baking powder, and salt. Slowly add this flour mixture into the wet mixture. Mix until just incorporated.
4. Layering & Baking the Poundcake: Pour ¼ of the batter into the prepared bundt pan and smooth it over, making sure it is completely even. Next, spoon half of the cooled raspberry filling on top of the batter (try to keep the filling in the middle, so that it doesn’t spill out while baking). Repeat by topping the filling with ½ of the remaining batter and smooth once again. Spoon the rest of the raspberry filling over the batter and finally top with the remaining ¼ of the Poundcake batter. Smooth one last time. You should have three layers of lemon Poundcake separated by two layers of raspberry filling. Bake the cake for roughly an hour or until a toothpick inserted into the center comes out clean. Let the cake cool completely before pouring on the glaze.
5. To Make the Glaze: combine the confectioners’ sugar, raspberry jam, milk, zest, and vanilla in a bowl and whisk until it is completely combined and smooth. Pour the glaze over the cooled cake. Let the glaze harden for 15-20 minutes before you cut and serve. 


source: raspberry filling.


*Please check out, Sweets for a Saturday for my link, as well as many others!!

Swirled Lemon Raspberry Poundcake with Raspberry Glaze

I just love poundcake. It's so satisfying and luscious, but still light and fluffy. I seriously make a different poundcake every week. I just use my favorite recipe and substitute a few ingredients to customize the different flavors. This week I decided to make Swirled Lemon Raspberry Poundcake with Raspberry Glaze. I just love lemon and raspberry together. It's such a refreshing combination and so summery. The base is a dense, creamy lemon curd poundcake swirled with layers of raspberry filling, and then topped with a raspberry glaze. Yum yum yum! Enjoy :)
I Love the Bright Pink Raspberry Glaze
Lemon Curd Poundcake with Swirled Raspberry Layers & Raspberry Glaze
For the Poundcake:
2 Sticks of Unsalted Butter, Softened
1 Package of Cream Cheese, Softened
½C Lemon Curd
1 ½C Sugar
4 Eggs
2t Vanilla
1T Lemon Zest
3T Lemon Juice
2C AP Flour
1 ½t Baking Powder
1t Salt

For the Raspberry Filling:
1C Frozen Raspberries
¼C Raspberry Jam
2T Lemon Juice
¼C Confectioners’ Sugar

For the Raspberry Glaze:
2C Confectioners’ Sugar, Sifted
2T Raspberry Filling
½C Raspberry Jam
2t Lemon Juice
3T Milk
½t Vanilla  

Directions:
1. Preheat the oven to 325 degrees and spray a bundt pan with Pam, and then set aside.
2. To Make the Raspberry Filling: Combine all of the ingredients in a small saucepan over medium-low heat. Break up any large raspberry chunks. Once the mixture has come to a bubble, remove from the heat and let it cool completely before adding it to the cake.
3. To Make the Poundcake: In a mixer, cream together the butter, cream cheese, and lemon curd. Pour in the sugar and mix until fluffy and smooth. Add the eggs, one at a time, mixing each one until it is incorporated before adding the next egg. Next, add in the vanilla, lemon zest, and lemon juice. Beat to combine. While ingredients are mixing, whisk together the flour, baking powder, and salt. Slowly add this flour mixture into the wet mixture. Mix until just incorporated.
4. Layering & Baking the Poundcake: Pour ¼ of the batter into the prepared bundt pan and smooth it over, making sure it is completely even. Next, spoon half of the cooled raspberry filling on top of the batter (try to keep the filling in the middle, so that it doesn’t spill out while baking). Repeat by topping the filling with ½ of the remaining batter and smooth once again. Spoon the rest of the raspberry filling over the batter and finally top with the remaining ¼ of the Poundcake batter. Smooth one last time. You should have three layers of lemon Poundcake separated by two layers of raspberry filling. Bake the cake for roughly an hour or until a toothpick inserted into the center comes out clean. Let the cake cool completely before pouring on the glaze.
5. To Make the Glaze: combine the confectioners’ sugar, raspberry jam, milk, zest, and vanilla in a bowl and whisk until it is completely combined and smooth. Pour the glaze over the cooled cake. Let the glaze harden for 15-20 minutes before you cut and serve. 


source: raspberry filling.


*Please check out, Sweets for a Saturday for my link, as well as many others!!

Saturday, June 18, 2011

Breakfast Sliders with Spicy Syrup

So, I've been studying away... barely any cooking at all unfortunately. But this morning, we decided to whip a simple breakfast that is really just a little cooking and more assembling. You can really make it as easy as you want. These Breakfast Sliders taste almost exactly like a sausage, egg, & cheese McGriddle from McDonald's... but better and with a nice kick. It really doesn't take any time at all, so if you're in a rush, this recipe makes a lot of food in a short period of time. Enjoy :)
Breakfast Sliders with Spicy Syrup
Sweet Pancakes with Salty Sausage Patties, Melty Cheese, Fluffy Eggs, & Spicy Syrup
For the Pancake Buns:
1 ½C AP Flour
3 ½t Baking Powder
1t Salt
1T Sugar
1 ¼C Milk
1 Egg
1t Vanilla
3T Butter, Melted

For the Spicy Syrup:
½C Maple Syrup
¼C Honey
1T Chili Powder

For the Breakfast Sliders:
20 Pancake Buns, Silver Dollar-Sized
10 Sausage Patties, Cooked
5 Scrambled Eggs, Cooked & Formed into 10 Small Patties
5 Slices of Cheese (Each slice cut into quarters/fourths)
Prepared Spicy Syrup

Directions: 
1. To Make the Pancake Buns: In a large bowl, sift together the flour, baking powder, salt, and sugar. Make a well in the center and pour in the milk, egg, vanilla, and melted butter. Mix until smooth. Heat a lightly oiled griddle or frying pan over medium heat. Pour or scoop a scant ¼C of the batter onto the griddle. Brown each pancake on both sides, about 2-3 minutes.
2. To Make the Spicy Syrup: Whisk together the maple syrup, honey, and chili powder until completely incorporated and smooth.
3. Assemble the Breakfast Sliders: Preheat the oven to 450 degrees and spray a baking dish with Pam. Stack 1 sausage patty, 1 scrambled egg patty, and 2 quarters of cheese on top of one pancake bun.  Once all of the sliders have been assembled (leaving the top pancake bun off), put the baking dish in the oven to heat the slider and melt the cheese, about 5 minutes. Once the cheese has melted, place the heated sliders on to a plate and drizzle the spicy syrup all over them (do this to taste). Finally top with the other pancake buns. 
4. Serve warm and enjoy!


Wednesday, June 15, 2011

Triple Chocolate Mousse Cake

So, my fun for the week is over :( and it's only wednesday (I have a test coming up on Monday, yuck). Luckily for me, one of my best friends from high school/soccer came down to visit me & see Savannah for the first time. We just went to all the restaurants that I love, shopped, and went on a haunted pub crawl. Here are some pictures from her visit.
Me & Clayton on the Haunted Pub Crawl
Haunted Pub Crawl
Me & Syd on the Haunted Pub Crawl
Having Drinks & Appetizers at the Rooftop Bar
What a Great View While Drinking
Anyway, in celebration of Sydney's visit, I cooked us eggplant parmesan (one of her favorite meals), and then I also made an amazing, delicious, over-the-top dessert. I don't know about you, but can you ever really get enough chocolate? I can't. Honestly. Well if you feel the same way as me, then this is the cake for you. It's four layers of flourless chocolate cake with three layers of chocolate mousse. Not just one type of mousse, but three. Yes, you heard me, THREE. There is a layer of white chocolate mousse, milk chocolate mousse, and dark chocolate mousse. Then, to top it all off, there is a thick, sturdy layer of dark chocolate ganache. I mean this is decadent. You pretty much go into a chocolate coma afterwards, but that's totally okay because it's worth it. I included the longer, more complicated recipe, as well as a Cheater's Chocolate Mousse, so that it wouldn't be so time consuming. Either way though, it's delicious. I mean the cake is already gone, and I just made it 2 days ago. Ridiculous, I tell you, just ridiculous. Enjoy your chocolate comas :)
Slice of Triple Chocolate Mousse Cake
For the Flourless Chocolate Cake Layers:
1 ½ Sticks of Unsalted Butter (12T Butter)
16oz Bittersweet Chocolate, Finely Chopped
12 Eggs, Separated
1C Sugar

For the White Chocolate Mousse: 
5 ¼oz White Chocolate, Chopped
1 ¾C Heavy Cream, Very Cold
3 Large Egg Whites
2T Sugar

For the Milk Chocolate Mousse:
5 ¼oz Milk Chocolate, Chopped
1 ¾C Heavy Cream, Very Cold
3 Large Egg Whites
2T Sugar

For the Dark Chocolate Mousse:
5 ¼oz Dark Chocolate, Chopped
1 ¾C Heavy Cream, Very Cold
3 Large Egg Whites
2T Sugar

Chocolate Ganache Frosting:
2C Heavy Cream
½C Confectioners Sugar
Pinch of Salt
1lb Bittersweet Chocolate, Chopped

Directions: 
1.  To Make the Flourless Chocolate Cake Layers: Preheat the oven to 275 degrees with the rack in the center. Butter four pie/cake tins heavily and set them aside. Place the butter and chocolate in a large heatproof bowl and microwave in 30-second increments, stirring each time, until completely melted. Let cool slightly. Whisk in egg yolks. In a large bowl, beat egg whites until soft peaks form. Gradually add in granulated sugar, and continue beating until glossy, stiff peaks form. Whisk ¼ of the egg whites into the chocolate mixture; then gently fold in the remaining egg whites. Pour the batter evenly into each prepared pan, and smooth the top with a rubber spatula. Bake each cake until the cake pulls away from the sides of the pan and is set in the center, about 25-30 minutes. Cool completely on a wire rack before layering the cake .
2.  To Make Each Chocolate Mousse: Place the chopped chocolate in a double boiler and heat until completely melted, then turn off heat and let it stand. In a separate bowl, beat the cream over ice until it forms soft peaks, and then set aside. In another bowl, with a mixer, whip the egg whites to soft peaks. Gradually add the sugar and continue whipping until firm. Remove the chocolate from the double boiler and using a whisk, fold in the egg whites all at once. When the whites are almost completely incorporated, fold in the whipped cream. Cover the mousse and refrigerate for approximately 1 hour or until set. Repeat for the other 2 chocolates .
3.  To Make the Chocolate Ganache Frosting: In a large saucepan, bring the heavy cream, confectioners’ sugar, and salt to a boil. Remove from heat and add the chopped chocolate and let it stand, without stirring, for about 1 minute. Whisk until just combined and then refrigerate, stirring occasionally, until spreadable (around an hour).
4. To Assemble the Triple Chocolate Mousse Cake: On a cake stand, layer the cake by starting with one flourless cake, then the dark chocolate mousse, cake, milk chocolate mousse, cake, white chocolate mousse, last layer of cake, and then finish it by spreading the chocolate Ganache all over the cake. Refrigerate to let the cake firm up, but remove the cake 15-20 minutes before you want to enjoy it. 
See Them Ridiculous Layers?
Cheater's Chocolate Mousse


For the Dark Chocolate Mousse:
1 ½C Heavy Whipping Cream
1C Milk
1 5.9oz Box of Instant Dark Chocolate Pudding
¼t Vanilla
¼t Instant Espresso Powder
½C 60% Dark Chocolate, Melted

For the Milk Chocolate Mousse:
1 ½C Heavy Whipping Cream
1C Milk
1 5.9oz Box of Instant Milk Chocolate Pudding
¼t Vanilla
¼t Instant Espresso Powder

For the White Chocolate Mousse:
1 ½C Heavy Whipping Cream
1C Milk
1 5.9oz Box of Instant White Chocolate Pudding
¼t Vanilla
½C White Chocolate Chips, Melted

Directions:
1. In a large mixing bowl, add in heavy cream & milk (both extremely cold), vanilla, and instant espresso powder. Add in the pudding mix to the bowl. Whip the mixture with a handheld mixer (or use a standing mixer), for about 3-5 minutes until it is light and fluffy. 
2. The mixture should be thick enough that when a spoonful is turned upside down it says on the spoon. Cover the mixing bowl and place in the refrigerator for at least 10 minutes (preferably an hour) until ready to layer on the cake. 
Just in Case You Couldn't Tell...

Tuesday, June 14, 2011

Kicked Up Caprese Panini

So for today's recipe, I'm featuring my Kicked Up Caprese Panini. I love vegetables, and this panini has a bunch of fresh veggies on it. We bought some heirloom tomatoes at the farmer's market and then added red onions, marinated roasted red peppers, homemade pesto, fresh basil leaves, thick slices of buffalo mozzarella, and a balsamic reduction. Because the heirloom tomatoes were so juicy, I deseeded them a bit and let them dry off on a paper towel, so they wouldn't make the sandwich soggy. I also sprinkled them with a bit of salt & pepper to bring out their natural flavors. This has been our favorite sandwich to date. We're both still thinking about it. It was just so sweet and fresh, without being super heavy. And they always say that you eat with your eyes first, and this sandwich does not disappoint. All of the vibrant colors just make you want to eat it more. We will definitely be making this very soon... like maybe this weekend :)
Kicked Up Caprese Panini
The Perfect Balance Between Sweet & Salty
For the Balsamic Reduction:
¾C Balsamic Vinegar
¼C Brown Sugar

For the Homemade Pesto:
2C Fresh Basil Leaves, Packed
½C Parmesan Cheese, Freshly Grated
½C Olive Oil
½C Pine Nuts or Walnuts
3 Cloves of Garlic, Minced
1T Lemon Juice, Freshly Squeezed
Salt & Pepper, To Taste
  
For the Panini:
2 Slices of Rustic Bread
2T Olive Oil
4T Homemade Pesto
4 Slices of Fresh Buffalo Mozzarella
1 Small Heirloom Tomato, Patted Dry & Cut into Slices
2T Balsamic Reduction
4 Leaves of Fresh Basil
4 Red Onion Rings
1 Whole Marinated, Roasted Red Pepper, Patted Dry & Sliced into Halves
Salt & Pepper, To Taste

Directions:
1. For the Balsamic Reduction: Bring the vinegar to a boil, turn down the heat and let it simmer. When it reduces halfway, add in the brown sugar. Simmer some more until the vinegar become thick & syrupy and sticks to the back of a wooden spoon, about 20 minutes. As it cools it will also thicken up. Set aside.
2. For the Homemade Pesto: Combine the basil in with the pine nuts, pulse a few time in a food processor. Add in the garlic cloves and pulse a few more times. Slowly add in the olive oil in a constant stream while the food processor is on. Stop to scrape down the sides of the food processor with a rubber spatula. Add the grated Parmesan cheese and pulse again until blended. Add in the lemon juice and salt & pepper to taste, and then pulse one last time to distribute the final additions. Set aside.
3. Heat up your Panini press, electric grill, or a skillet to high heat.
4. To Assemble the Sandwich: Spread 2T of the homemade pesto on each slice of bread, then designate one slice of bread to be the bottom piece. Lay 2 slices of fresh mozzarella on top of the bottom slice of bread, and then top with the slices of heirloom tomato. Sprinkle the tomatoes with salt & pepper. Drizzle the 2T of Balsamic Reduction over the tomato slices. Lay the leaves of fresh basil on top of the balsamic glaze (so that they stick), and then layer on the onions. Add the red peppers and the other 2 slices of mozzarella on top of the onions (to help keep all of the fillings from falling out). Finish the sandwich by topping it with the other slice of bread and brush 1T of olive oil on each of the outer surfaces of the bread slices.
5. To Cook the Panini: Grill or fry the sandwich for 4-5 minutes on each side until the bread is perfectly golden brown and extremely crunchy on the outside, but also making sure that all of the ingredients on the inside are warmed thoroughly and the cheeses are melted.
6. To Serve the Panini: Cut the Panini into halves & serve immediately.